Budget Kitchen Renovation with DIY Shaker Painted Cabinets
DIY PROJECT

This may just be my favorite reveal because we were able to salvaged SO MUCH of the original kitchen!! Mr. Yolo and I have never painted cabinets before (the are usually too bad to salvage), so I really wanted to try it. It totally exceeded my expectations! ALL the DIY details after the break.

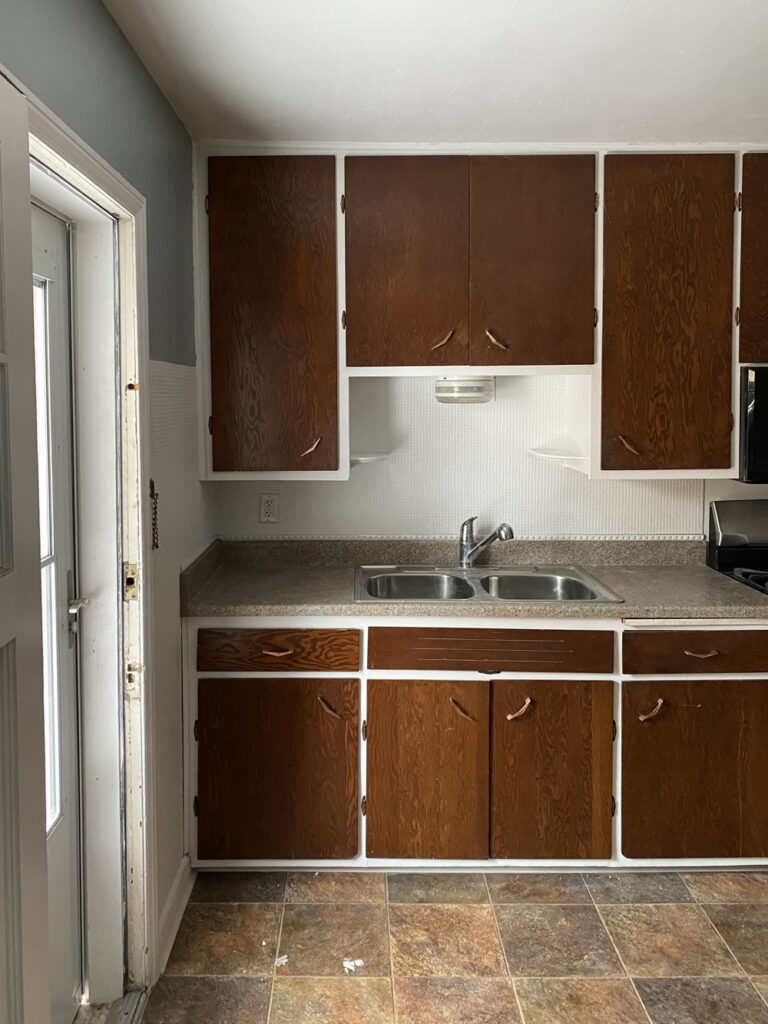

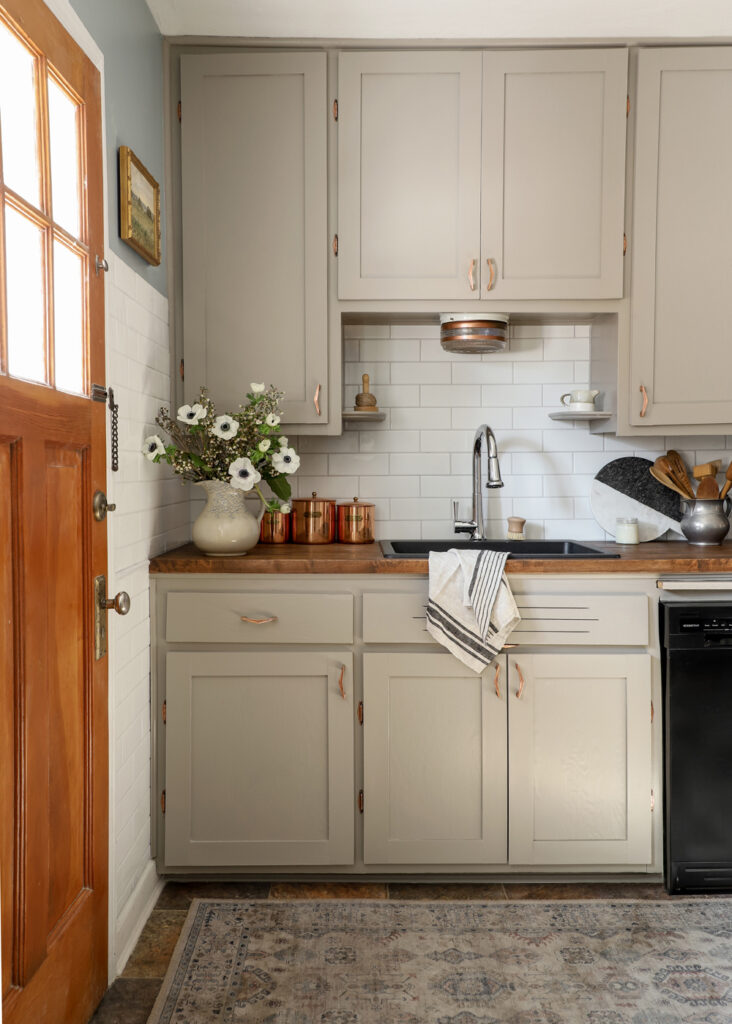
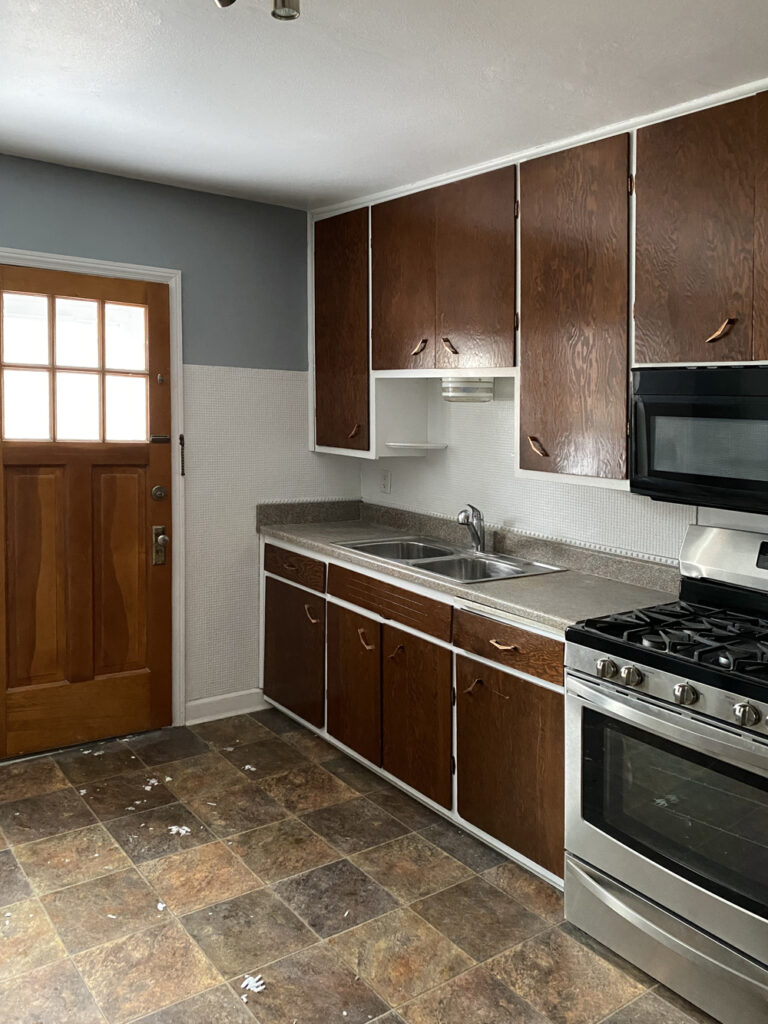
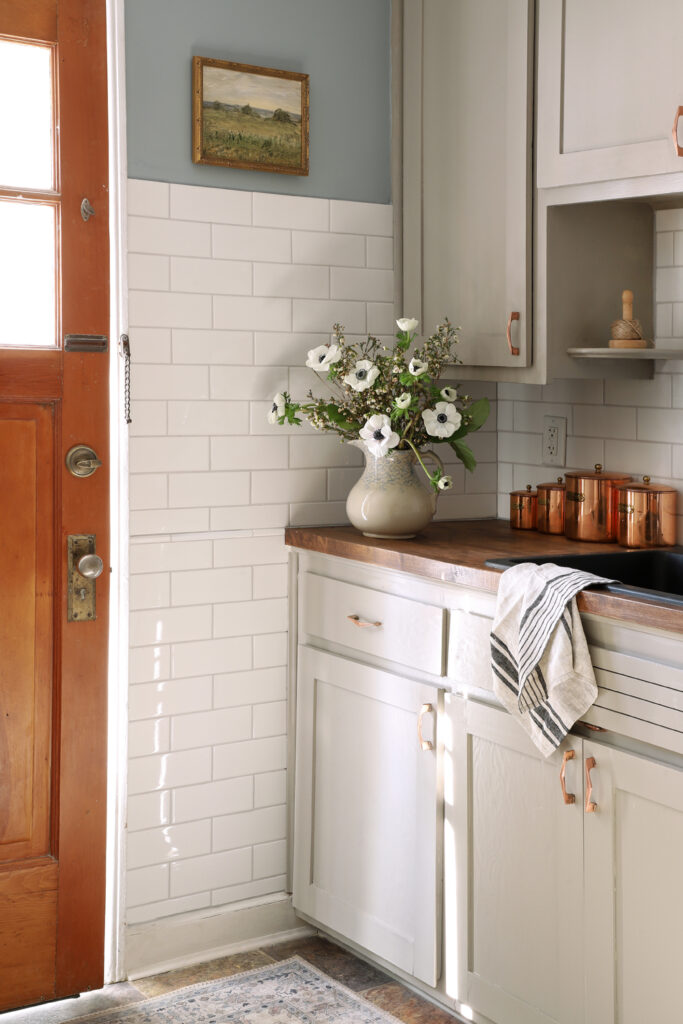
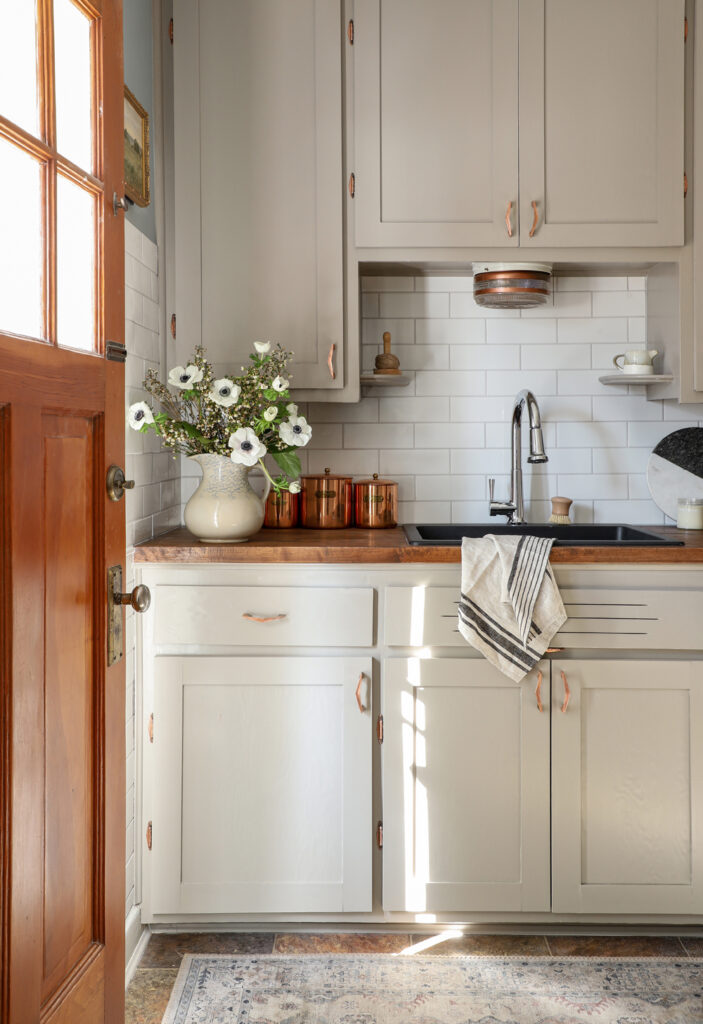
Can you believe those are the same cabinets?!?! Some backstory: My little Sister and her Hub bought a rental house in Milwaukee, and they wanted to give the kitchen a refresh before putting it on the market. Enter Older Sister who renovates for a living. I pitched the idea of adding wood to the existing cabinets, to make them look like shakers, and then painting them a mushroom color. They were sold on the idea! I have always wanted to try Rust-Oleum’s Cabinet Transformations Kit, and they had a Greige color that was the exact color I wanted!
First things first:
We absolutely would have used this product even if it was not sponsored. We have been SO impressed with how our painted floors, using a Rust-Oleum product, have held up.
Rust-Oleum’s Cabinet Transformations kit comes with a SUPER comprehensive booklet. And it has a troubleshooting and a Q&A section, so would suggest reading that before you start. This post will be more about my experience with painting this kitchen and some tips I learned along the way.
Follow-up: we finished painting a couple weeks ago, so the cabinets have not gotten a ton of use yet. I will have to do a follow-up after the renter uses them for a chunk of time. I will say, when I was posting about the product in my IG Stories, I got a lot of feedback from readers who have used the kit in their bathrooms and kitchens, and said it has held up amazing!
Ok, let’s dive in! The goal with this rental kitchen was to make the makeover as budget friendly as possible, while making updates that would bring in a great rental price. It’s alway fun to have the “$50/$100/$200 Kitchen Makeover” headline, but the reality is that we added a new dishwasher, new countertop, and sink…so it did cost some money (breakdown at the end). But each individual upgrade we did was super cost efficient.
Cabinets
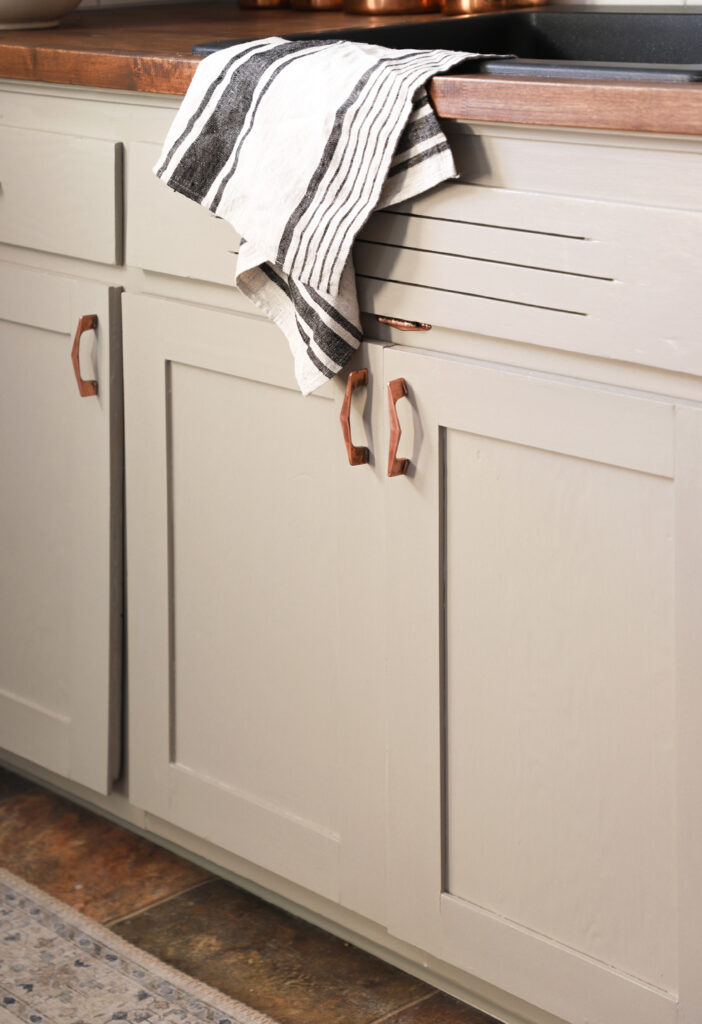
So the reason we are all here, the big transformation, THE CABINETS! I still can not believe these are the same cabinets AND the same hardware. If we decided not to add the shaker, this would have been a $77 makeover, because Rust-Oleum’s Cabinet Transformations Kit has everything you need to paint cabinets (deglosser, paint, topcoat, sponge, and stir sticks). Adding the wood to create the shaker cabinets was an additional $48. And cutting the wood, filling in the gaps, sanding…definitely was the most time consuming part of the process, but was totally worth it in my option. My siblings all pitched in on this project so we were able to get the project done in a week!
The Color
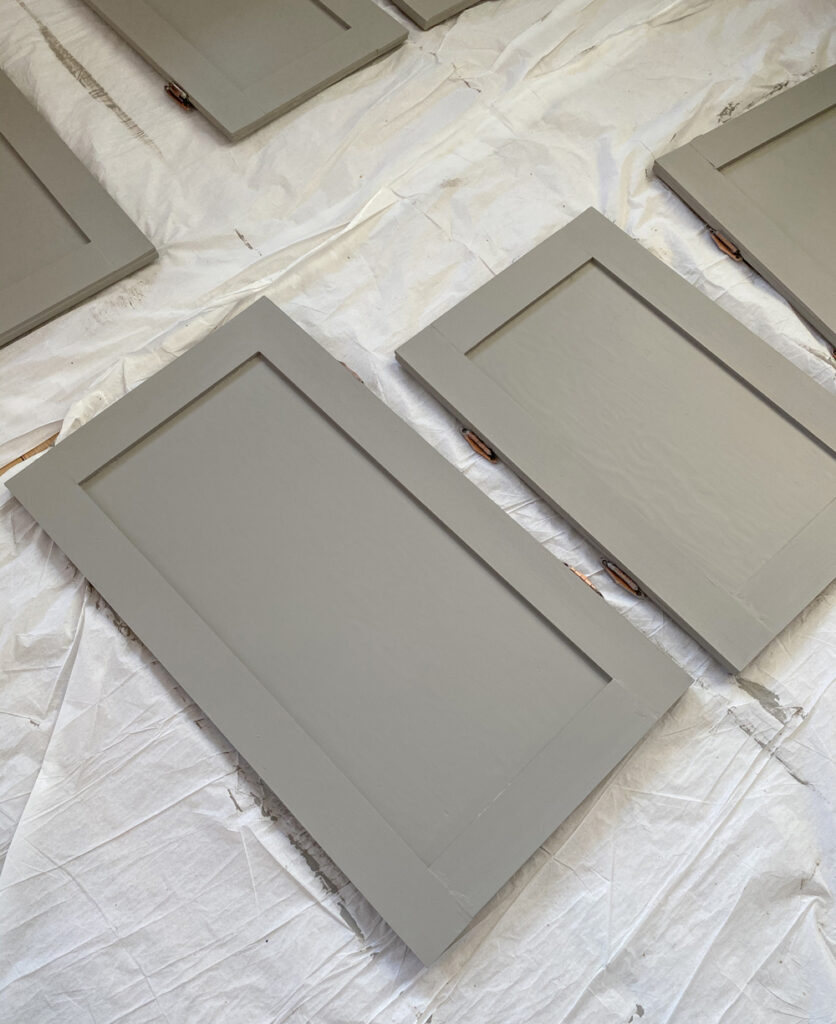
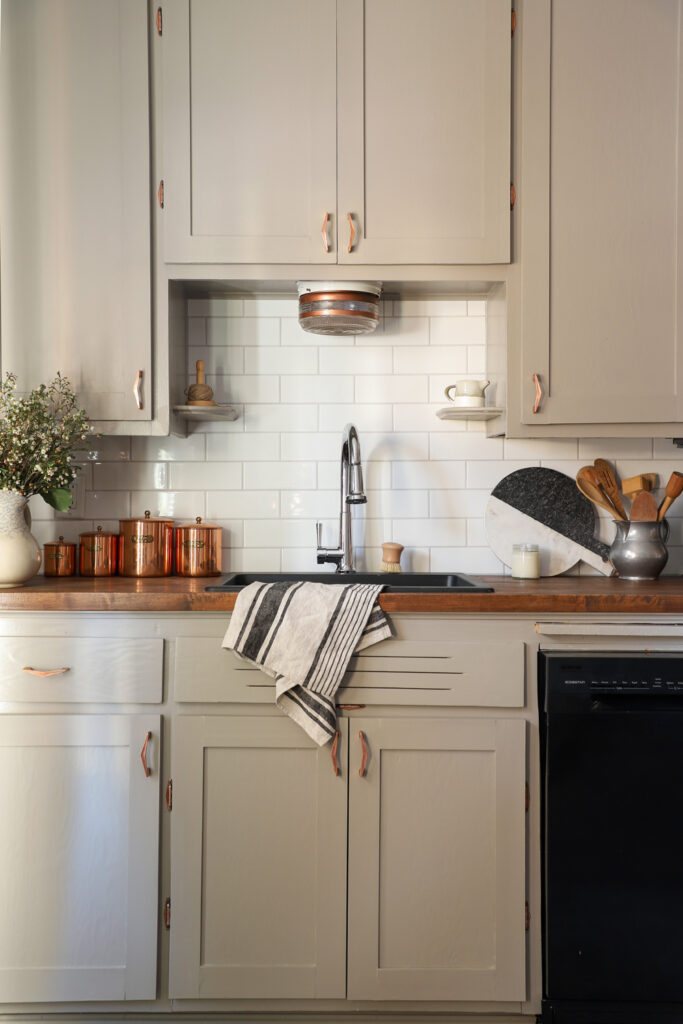
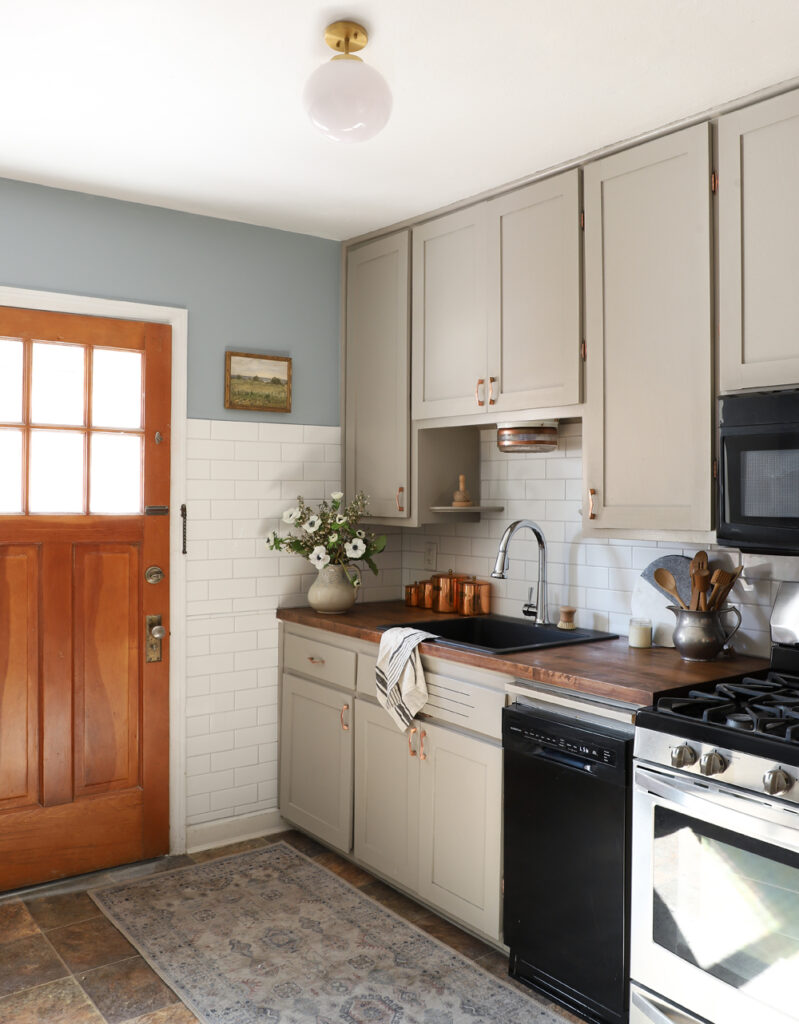
After you get the kit, you have to get the paint tinted to your preferred color. My Sister and I both loved Greige; it is so beautiful. I think we are going to see this color replace white cabinets. It’s a soft Grey/Beige that looks great against the white tile backsplash. It’s just the perfect color.
DIY Shaker Cabinets
I saw a couple tutorials online where people cut down strips of plywood to create the cabinet framing…that seemed like a lot of work, and there was more room for error. I am sure the wood I got was more expensive than plywood, but we were trying to get this all done in a week, so the price increase was worth it for me. We paid $48 for 16 pieces of 1/4in thick x 3in wide x 4ft long pieces of Poplar. After seeing the end product, and how seamless it looks, I was happy we spent the money.
Steps
First, remove the cabinet doors from the cabinet and take off the hinges and pulls. We did not remove the hinges and it was a pain to paint around them and get the paint off at the end. Definitely removing them next time! Also, number your cabinets, or have a system that helps you figure out where they go back up after they are painted (we also did not do this…learning curve!)
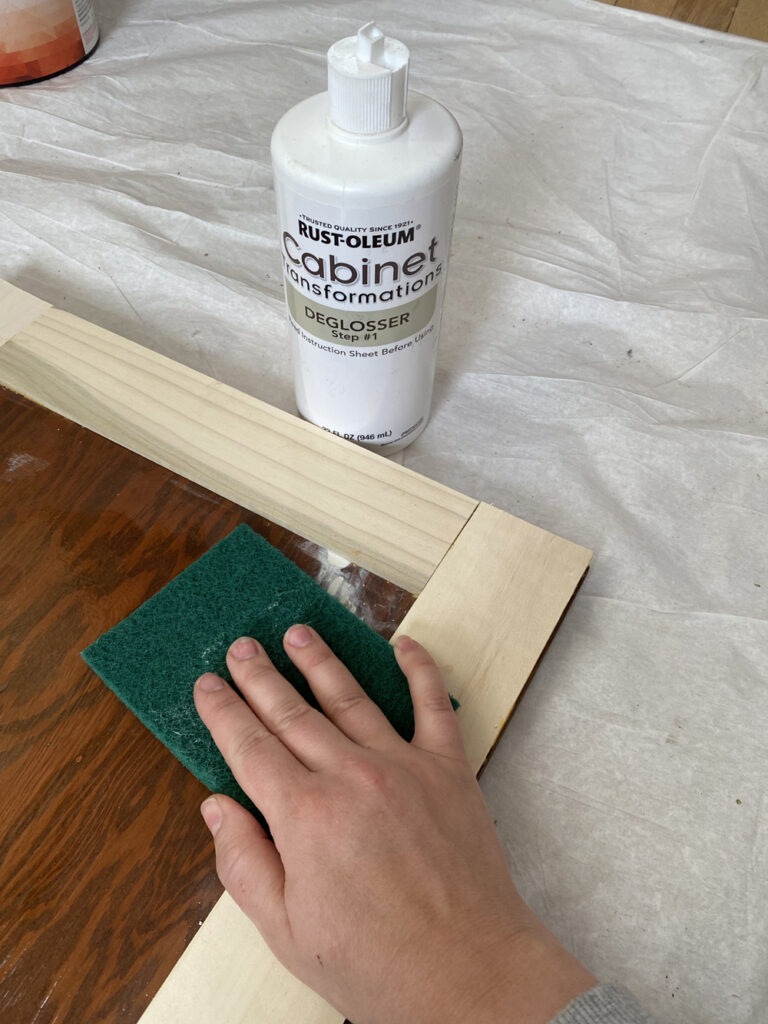
Next, degloss your cabinets with the deglosser in the kit. If you are using Rust-Oleum’s Cabinet Transformations Kit you do not have to sand or prime. I repeat, you DO NOT HAVE TO SAND OR PRIME.
Now get your shaker wood and use a miter saw to cut the wood to frame the cabinets. We did a butt cut, with the horizontal piece sitting inside the verticals. (I originally thought it should be the other way, but it makes more sense for both handle holes to land on one piece of wood)
Next, glue your wood to the cabinet with wood glue and clamp. Troubleshooting tip: the wood started to cup a bit, so instead of just using two clamps on a piece, sandwich another piece of wood under the clamps to disperse the force of the clamp along the entire piece fo trim.
Let them dry overnight, and fully cure.
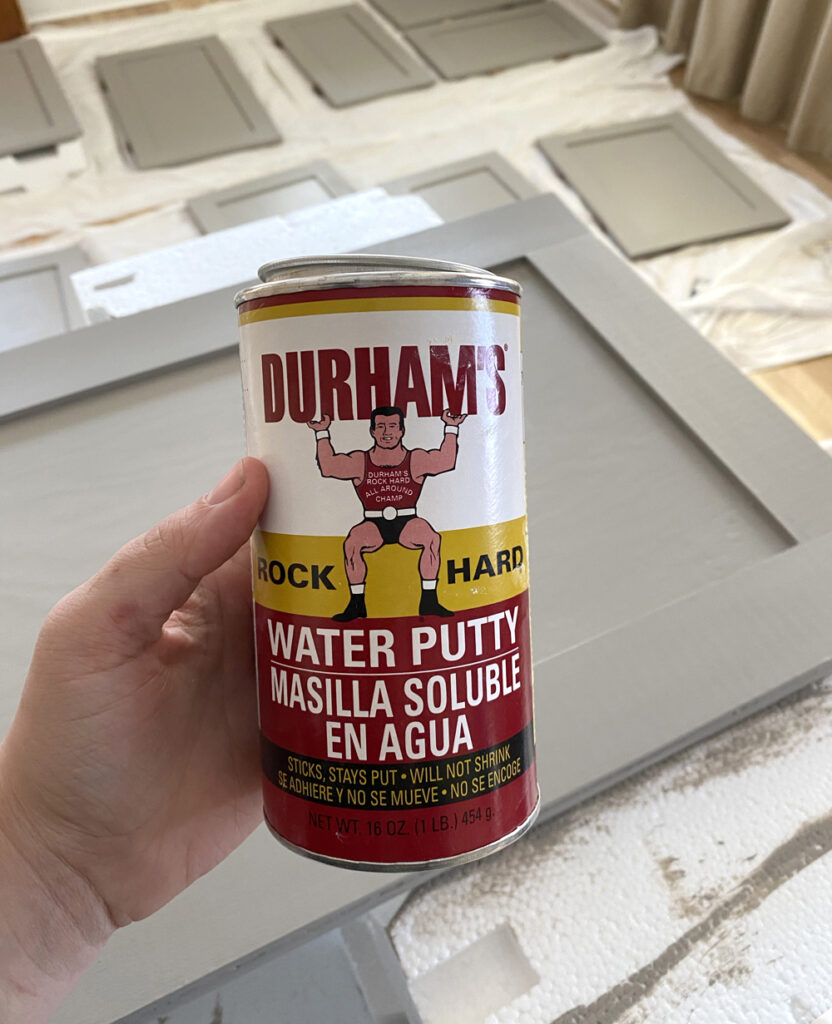
I would advise to put the brush down and pick up the wood filler. Fill any gaps between the wood and cabinet, and in between the butt joints. Let that dry and then sand so there are no gaps or seams. This is time consuming, but really made them look so much cleaner.
Next, wipe them down to get all the dust off, let them dry, and get ready to paint!
Painting the Cabinets
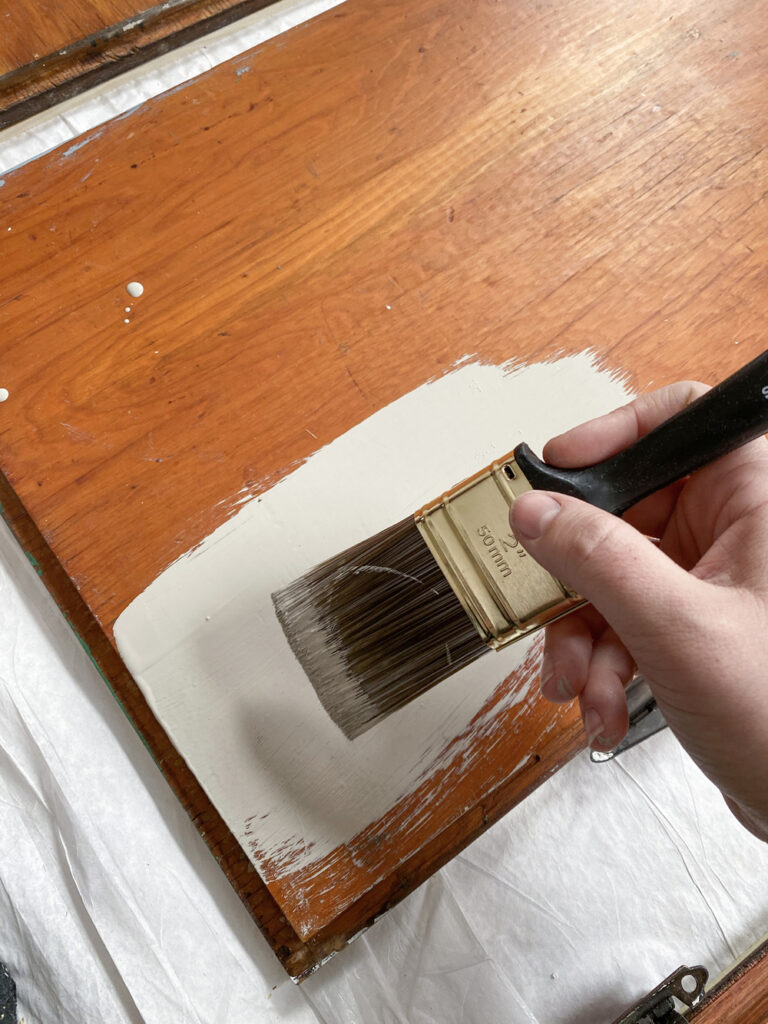
So you already deglossed, added the shaker wood, and cleaned them off. Now you can paint!
The kit instructions show the best steps for getting smooth coverage. They also suggest using a brush instead of a roller or a sprayer.
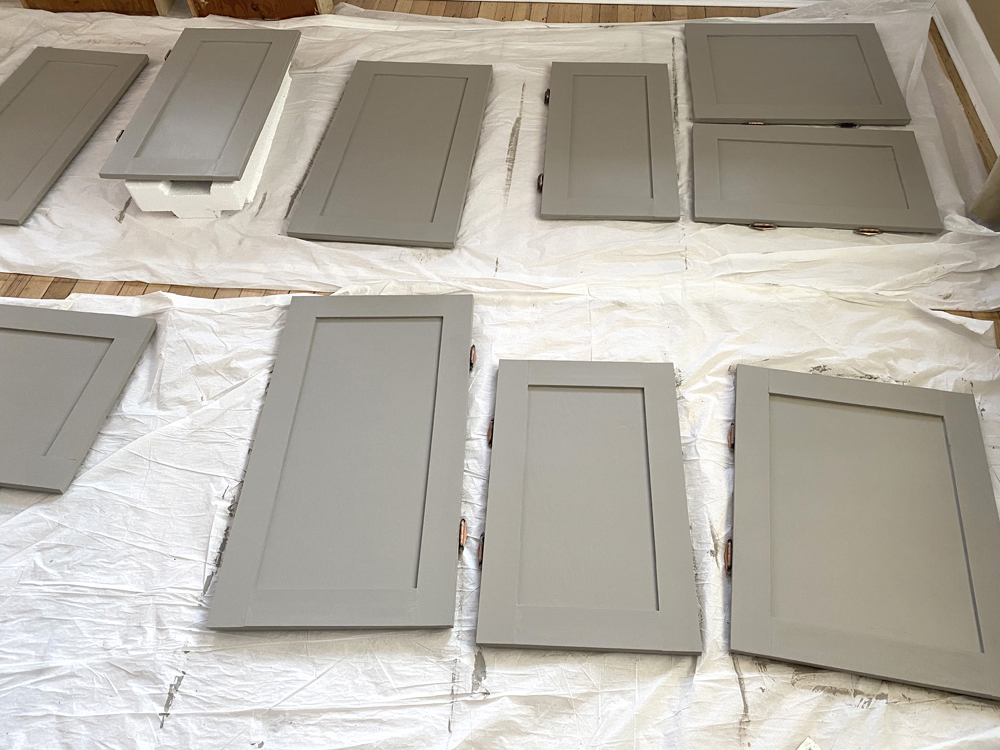
We painted on two coats, starting with the back and then painting the front. This part was quick, so if you are planning to skip adding the shaker wood, this project would have been way faster! The paint goes on super smooth and fast, so you just have to factor in dry time.
There is a glaze option in the kit, which I skipped, because I was going for a classic shaker look.
After everything dries, it’s time for the final step, the protective Top Coat. I got into a couple debates with my family about putting the top coat on before or after we hung the doors back up. And I stand by my decision to do it after they went up. (We didn’t mark the doors (oops!) so had to hang them to figure out where to drill the new holes for the cabinet pulls.) So we hung the doors, drilled the pull holes, and then could do one final round of touch ups when they were in place. THEN we painted on the top coat on both sides and could leave the doors open and untouched while they cured.
Note: As I was painting on the Top Coat, the paint changed color a bit, especially in the spots I did touch-ups, which was a bit panic-inducing. But it all evened out after it dried.
The Finish: I would say the topcoat is a satin-ish finish. I thought it was perfect, not shiny, but a slight sheen so it would be more durable to fingerprints and splashes.
Butcherblock/sink
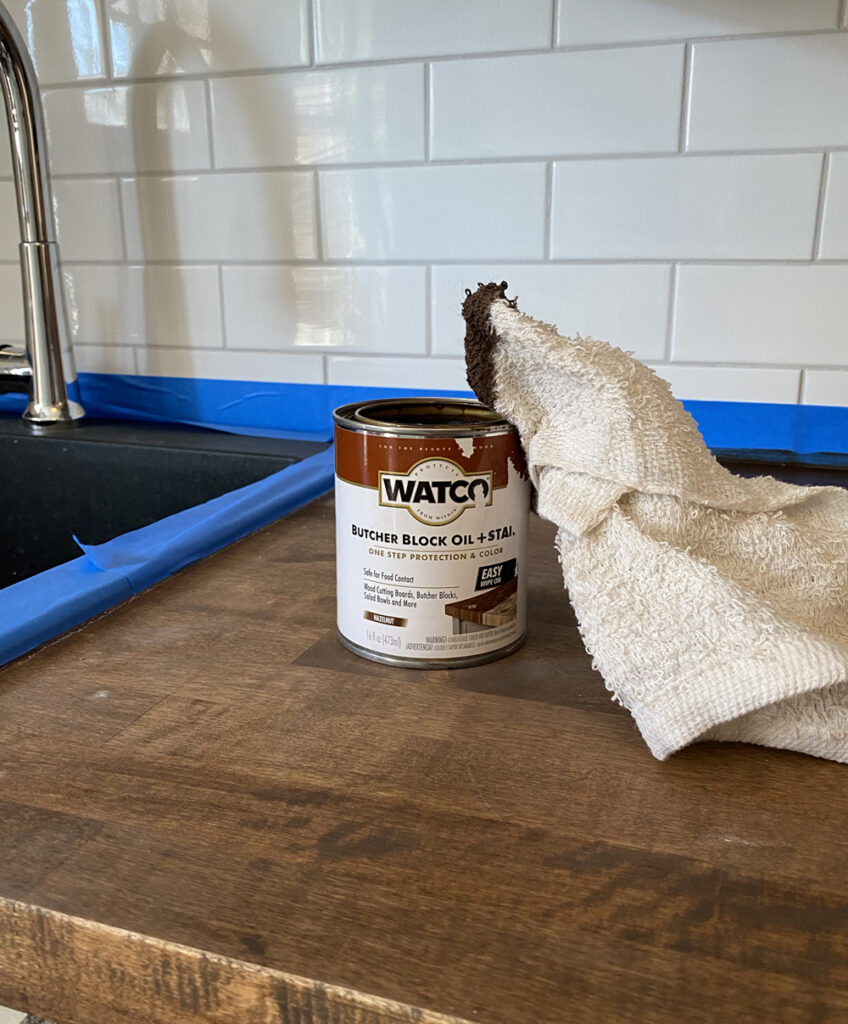
We used one piece of butcherblock from Home Depot that cost $180, and cut a hole for a drop-in sink/faucet/drain from Elkay (much easier than an undermount because the hole does not need to be perfect). More on butcherblock countertops in this post. We used a matte black sink/faucet/drain combo which looks SO slick!
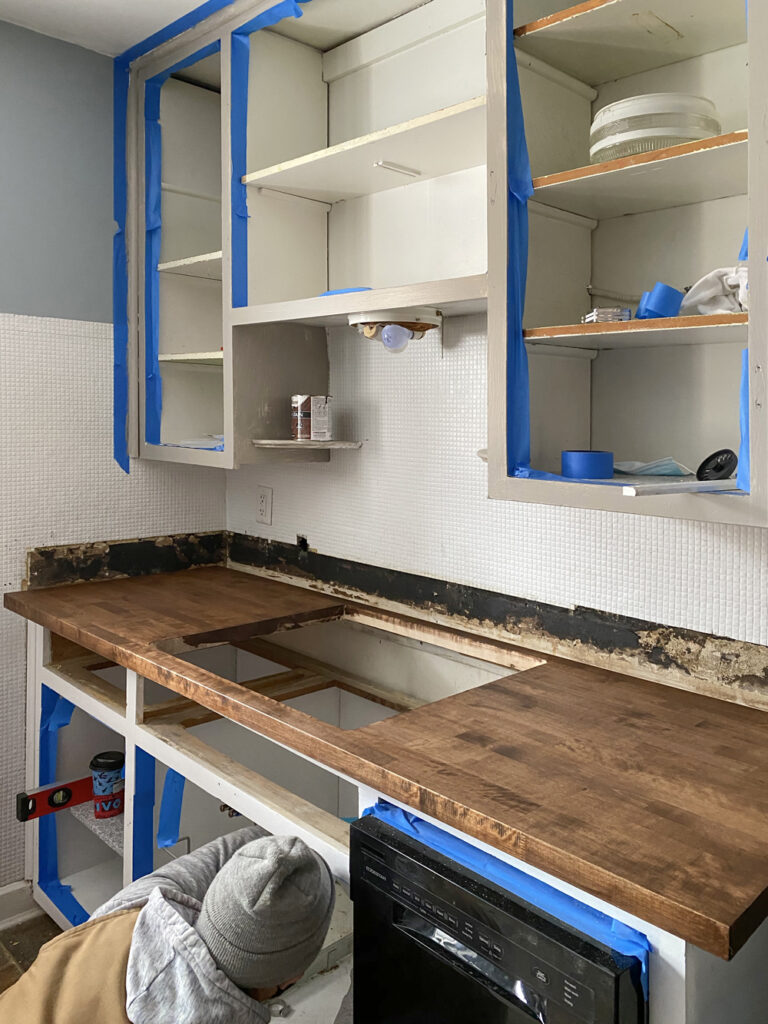
I stained the countertops with Varathane Classic Dark Walnut stain, and then went over it with WATCO Butcher Block Oil + Stain in Hazelnut from Rust-Oleum. This product is amazing! And food safe! (although we don’t recommend cutting food directly on your countertop)
Hardware
We ended up using the original hardware! If you noticed, in the Before photo the cabinet pulls were installed at an angle. But, once we turned them straight, they looked great, and matched the hinges. This tool is super helpful when installing. I like to put tape over the holes I am not using so there is no confusion on which guide to use to mark where to drill.
Tile
Mr. Yolo replaced the backsplash with some leftover subway tile from The Tile Shop, but you can also find really inexpensive subway tile here. And Whisper Gray grout, which looked really soft and beautiful with the Greige cabinets.
Light
I gave the existing light a mini makeover and spray-painted the chipping white stripes with a Rose Gold spray paint.
Budget Breakdown
Rust-Oleum Cabinet Transformations $77
Shaker Wood = $48
(we had supplies for cabinets including wood glue, wood filler, clamps, sandpaper, paint brushes)
Butcher Block Wood = $180
Stain/Sealer = $13
Sink/faucet/drain = $450
Dishwasher = $458
Ceiling light = $25
Existing Paint color
Repurposed hardware and sink light
Total = $1,251
Without dishwasher (an upgrade my Sister wanted) = $793
Styling items
Runner
Rag
Dish Brush
My Art
Vintage copper containers and vase
I would love to hear what you think, and if you are going to try painting your cabinets!
This post was made in partnership with Rust-Oleum, all opinions are my own. Thank you for supporting my amazing sponsors!
EXPLORE MORE: DIY PROJECT


Hi! This looks amazing! Quick question. My bathroom vanity is formica (I know, yuck!) Can I paint over that? Thanks!
They have a Floor Coating project, and I think a countertop product that works on Formica. Thanks!
Do you know why they recommended a brush over roller or sprayer for paint?
Let me check with Rust-Oleum and I will update the post!
It’s amazing!!! I want to try this on my bathroom cupboard…and this is a great great color!!! Thank you for breaking it all down!!
Just terrific. I really really really appreciate that you take your before and after photos from the same angle! Thank you. Glad you went with the original hardware and think the mini makeover on that light was the cherry on top. So fun to watch your work.
The budget kitchen looks great. The color is perfect for the make over.
Love it! Great job!! There are so many griege paints now, could you tell me the specific name you used? Thanks!
The Kits come with colors, and Griege is one of them. They mix it at Home Depot!
Nice looking remodel! Did you repaint the inside of the cabinets as well? I need to repaint my kitchen cabinets and I have about 3x the number and it’s not the doors that scare me it’s the cabinets left hanging on the walls and the interiors. That part seems like a nightmare!
Thank you! We did not, because they were already painted white.
Someone suggested I do this to my cabinets and I had no idea how to get started. It looks great and I love all the tips! TY
Oh boy! I am super excited to try this paint in my kitchen! We did a HUGE Reno in our living room/kitchen that expanded our space and opened it all up, about 5 years ago. At that time we added wood to the walls, which I still love, and I milk painted EVERYTHING! This included our older style, brown stained cabinets, which we kept in order to save money. It was a pain and I did sand all of it. *sigh*. But of course the heavy duty use areas are totally worn down now and I wouldn’t recommend milk paint in those areas above the sink, on cabinets, or backsplash.
I was looking for a way to still keep the cabinets but not go through the process I did before, and get a result that was longer lasting. Looks like I found it! Thanks so much!
Yay! Glad to help!
Wow, that is an amazing transformation, and what a bargain! Like so many others who have cabinets from 1990, our pickled oak cabinets have a shiny finish. Do you think the paint will adhere with just the deglosser? I’ve been wanting to try this Rust-Oleum product for 10 years!
We just used deglosser!
Yes! We just deglossed!
This looks amazing!! We will be using this exact process, paint, color, and even the sink to redo ours. We wanted to do a reface instead of a replace, but now we’re going to do this! Thank you so much for this! This will save us a bundle of $$$! Thank you, thank you, thank you!!!! 💕⭐️⭐️⭐️⭐️⭐️
I will try to take pics along the way, but don’t know if I know how to post them.
Your kitchen makeover is fabulous and any renter would be so excited, especially with the addition of the dishwasher. Good move. You have so many great ideas and I enjoyed reading about your process. Thanks for sharing and inspiring others to do the same.