BAYVIEW BUNGALOW | DIY Pattern Painted Wood Floors
DIY PROJECT
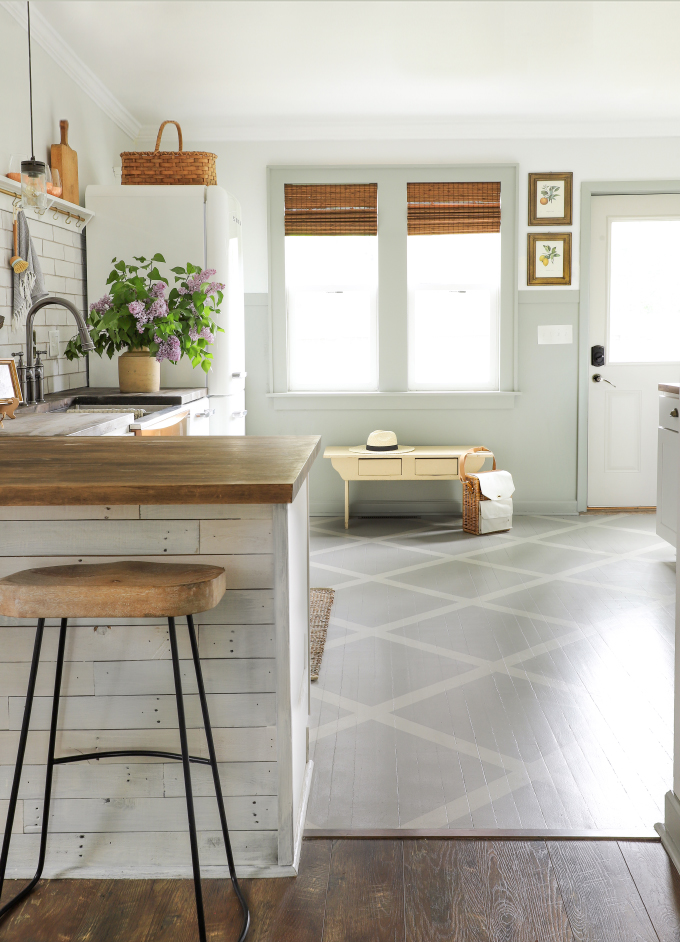
Painted wood floors DIY Time!!! Thank you for all the love on the kitchen reveal! The star of the show is the floor. I am just SO happy with how it turned out. Honestly, how pretty?! It really makes the entire kitchen feel so special. If you all were following along on @ispydiy Instagram (check out the FLOOR PAINT highlight) there were a bunch of questions about the Rust-Oleum® HOME Floor Coating we used. So I’ll dive into those first, then share the details of the process and some troubleshooting we did along the way (hint: don’t use a pencil to draw the pattern on the floor…oops!)


Why did you paint the floor instead of refinish?
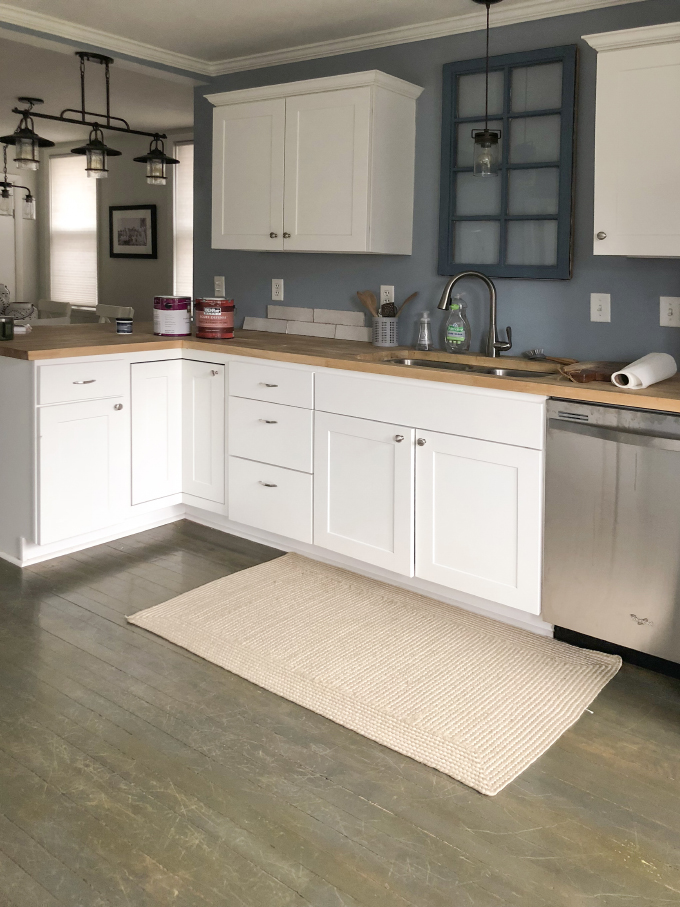
My first choice would always be to save an original hardwood floor. When Mr. Yolo renovated this house 4 years ago, after removing all the layers of flooring (7 including the underlayments), he sanded the floor down, and unfortunately the area by the sink had a bunch of water staining. Additionally, the area in front of the new back door that was cut in was missing flooring. So he repurposed the bathroom wood floor in this spot. And would you believe the woods were different??? He picked a darker blue/gray stain to hide the watermarks and the difference in wood, then sealed it with a poly top coat. Over time, the floor turned green…and the top coat got all scratched up. Instead of sanding the floor down again, we decided to lighten the room up by choosing painted wood floors. And I, of course, had to make things extra “fun” by adding a pattern. #worthit
Do you seal the floors?
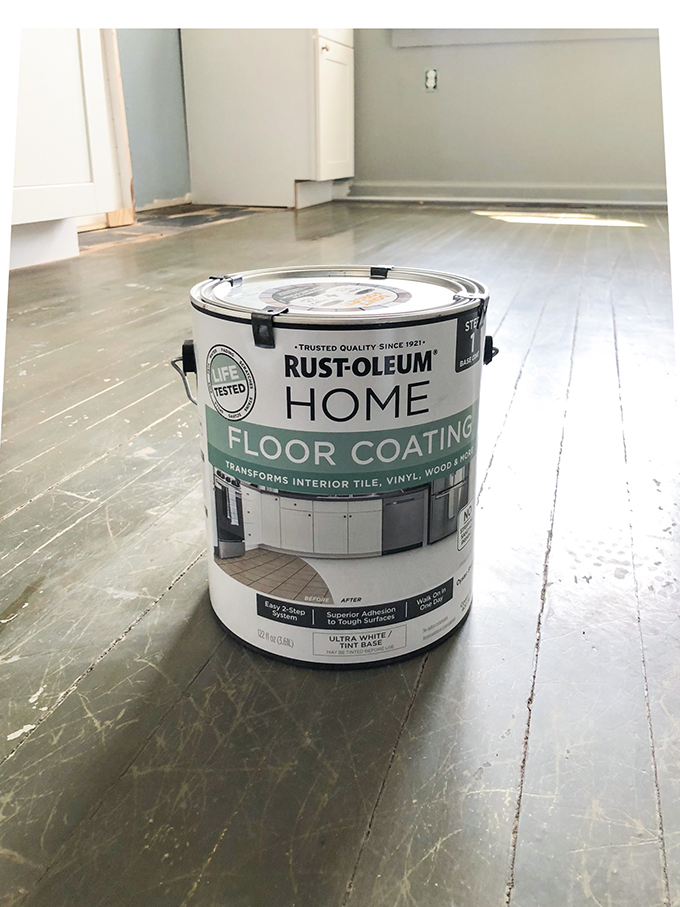
Yes! It’s a two-step process. Rust-Oleum® HOME Floor Coating Base Coat and Top Coat. The top coat comes in a matte (shown here) or semi-gloss finish.
Do you have to sand the floors first?
Not if you prep it correctly! We were so happy that we did not have to sand. I share the prep process in the steps below. And there are detailed instructions on the can explaining the test swatch, which we did. And since none of the paint pulled up from the floor, we could skip the sanding step. (We did have to sand where we put the samples though…so I would advise doing smaller swatches or swatch after you prep!)
How do you clean the painted wood floors?
Once the top coat fully cures, you can clean like a normal wood floor!
Can I use the Rust-Oleum® HOME Floor Coating on Tile?
Yes! Ceramic & porcelain tile, concrete, hardwood, laminate, vinyl & more! It would work great on a tile backsplash too! FYI: You cannot use it in showers or anywhere that’s going to be submerged in water. But, they do have a Tub & Tile Refinishing Kit that can be used to paint shower tile.
Cost? And Where do I buy it?
We definitely could have used quarts instead of gallons because our 150 sf kitchen used less than a gallon of paint (even with the two colors) and maybe half a quart of the top coat. Great news because Home Depot just started selling a kit with quart of paint and a quart of topcoat for $40!! Not bad to totally transform a floor!
How did you measure out the pattern?
We found the center of the room using wall to wall measurements. From that point we used a square to get 45 degree lines intersecting the center (think a big X in the middle of the room). We then spaced the next lines 24” in each direction. That line marked the CENTER of the stripe in our pattern. We placed a strip of 1.5” thick painters tape on each side of the line to make a 3” stripe. Once the tape was down, we painted the open floor with the second color.
How well will it hold up?!
We just finished two weeks ago, so it has not really been put to the test, but a BUNCH of readers have sent me DMs about using it on wood, tile, and linoleum and said they have not seen any scratches or chips, even the people with kids and dogs!! But we will keep you updated on how our painted wood floors wear. If you are nervous about a light floor and foot traffic, Rust-Oleum® recently released a line of dark paint colors.
Steps:
1) Floor Prep
This is probably the most critical. Confession: I don’t enjoy prepping for paint. There just isn’t any thrill in it. It’s like cleaning a house. And in most cases, you can just go over existing paint on a wall and it’ll work just fine. But a floor that gets walked on, now that’s a different story.
Also, an optional step 1 that we did was pull all the quarter-round from the walls and cabinet bases. They needed to be repainted anyway, and it gave us a bit of a buffer for the floor paint. The less things you have to worry about getting paint on during this process, the better you’ll feel.
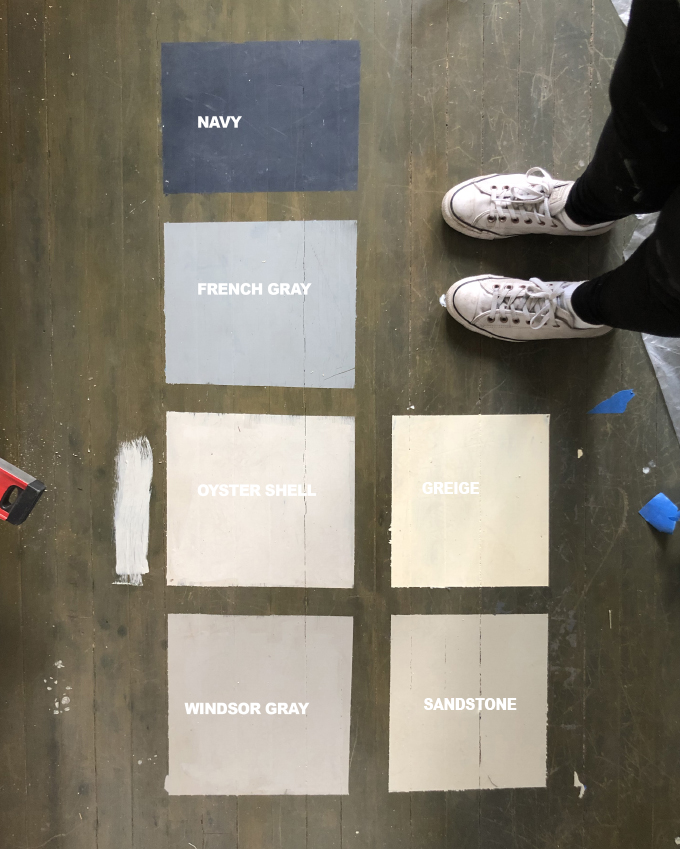
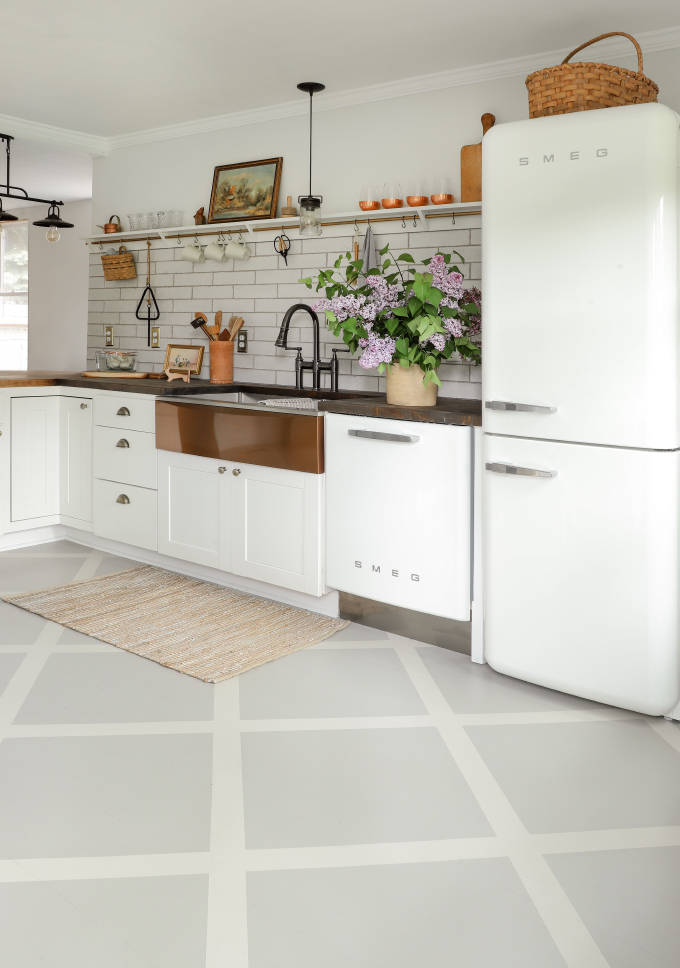
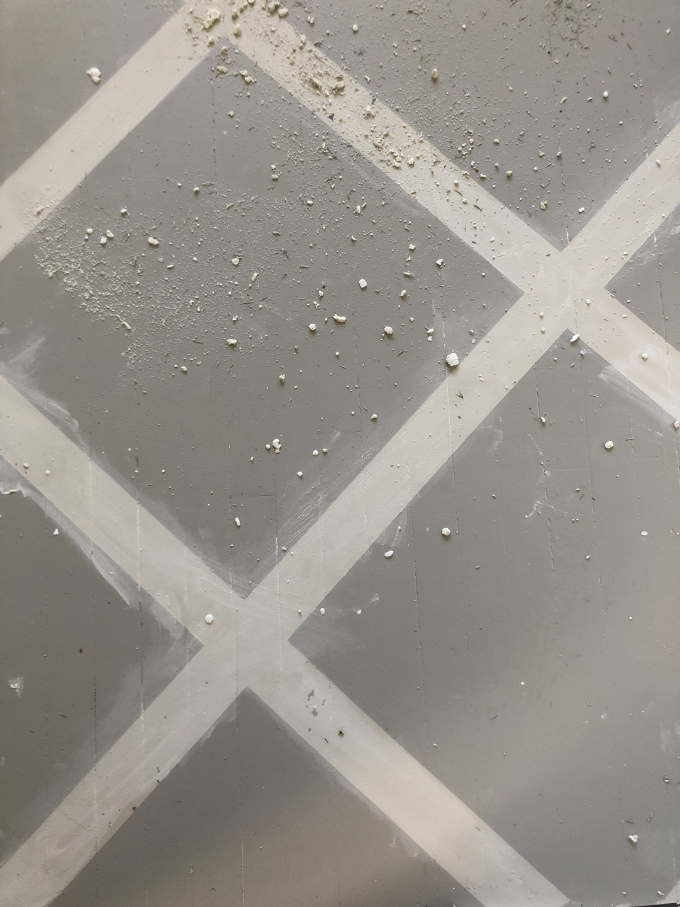
As I mentioned above, we sanded off the sample squares we painted on the floor to choose the colors: Oyster Shell for the stripes and Windsor Gray for the diamonds. Then we sprayed on Krud Kutter and used the rough side of a sponge to scrub the floor. For this step, Mr. Yolo got on his hands and knees and scrubbed the floor. Even though this house gets cleaned on a regular basis, we were surprised at how much “crud” was on the floor (paint splatter, cooking grease, etc.) All things that you can’t see from walking around. For these things we removed with a paint scraper. Once all the debris was loose, we mopped the floor with water. Once dry we mopped again, this time with a new mop head to make sure the Krud Kutter was gone. And then we swept.
IMPORTANT NOTE: We swept and vacuumed a hundred times. The loose hair seems to multiply. It got to the point where Mr. Yolo would bring clean clothes and socks in a plastic bag and would change into them at the house. Especially in the lighter colors, loose hair is very noticeable.
MORE STEPS AFTER THE BREAK! And if this post is way too long, skip to the Cliff Notes at the end!
2) First Coat
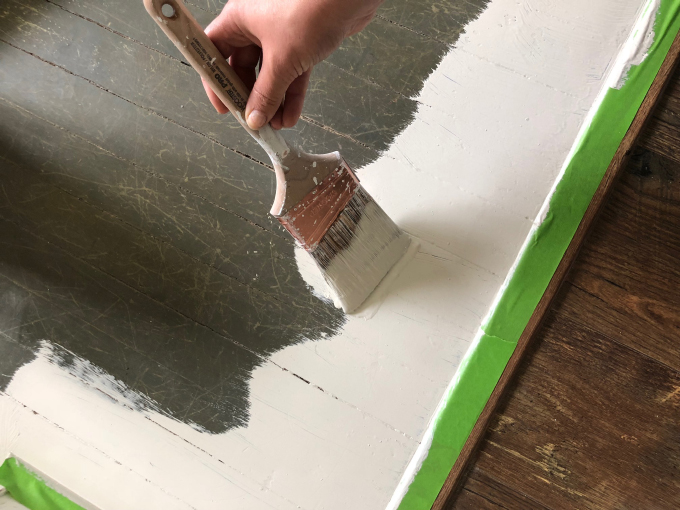
Now that the floor is prepped, paint can start (Which I usually call step 1, but I fought my urge and prepped the floor first). We edged around the perimeter of the kitchen with a brush.
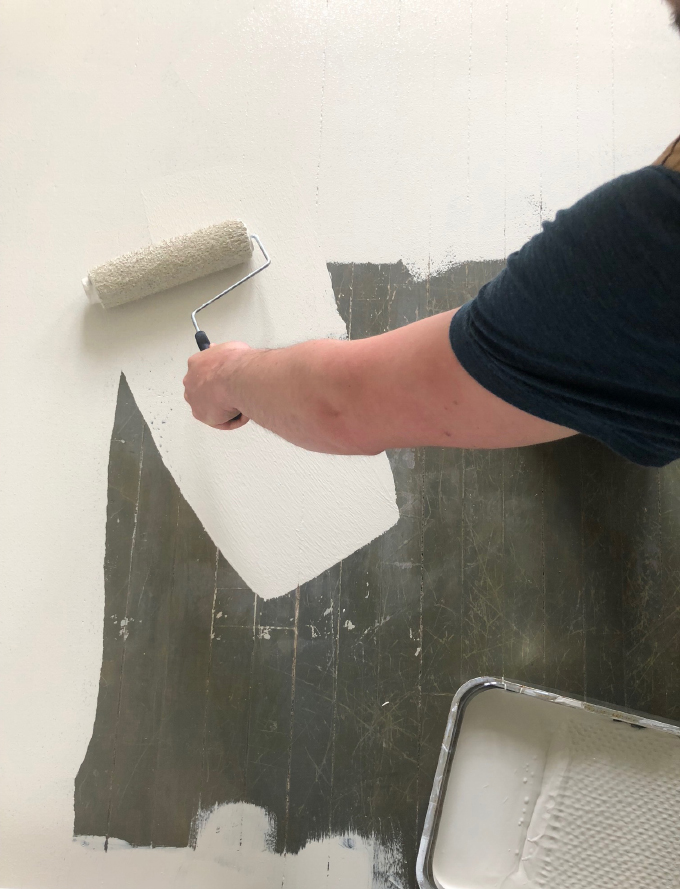
Then used a ⅜” nap roller for the open floor, always keeping an eye out for stray hairs that are magnetically charged to stick to the paint.
Once done, we waited 24 hours (they suggest 6 hours between coats) before the next step.
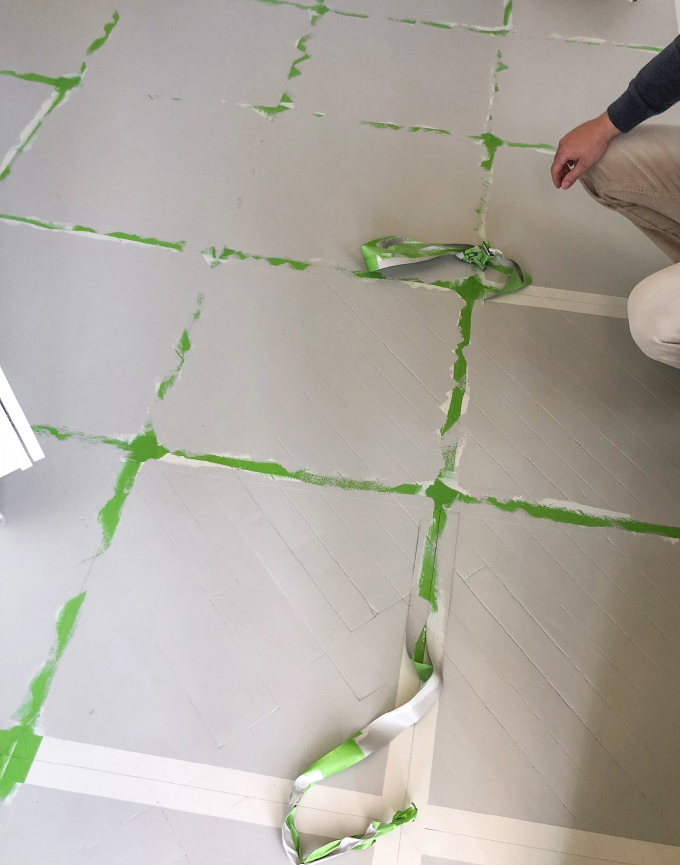
3) Pattern Layout
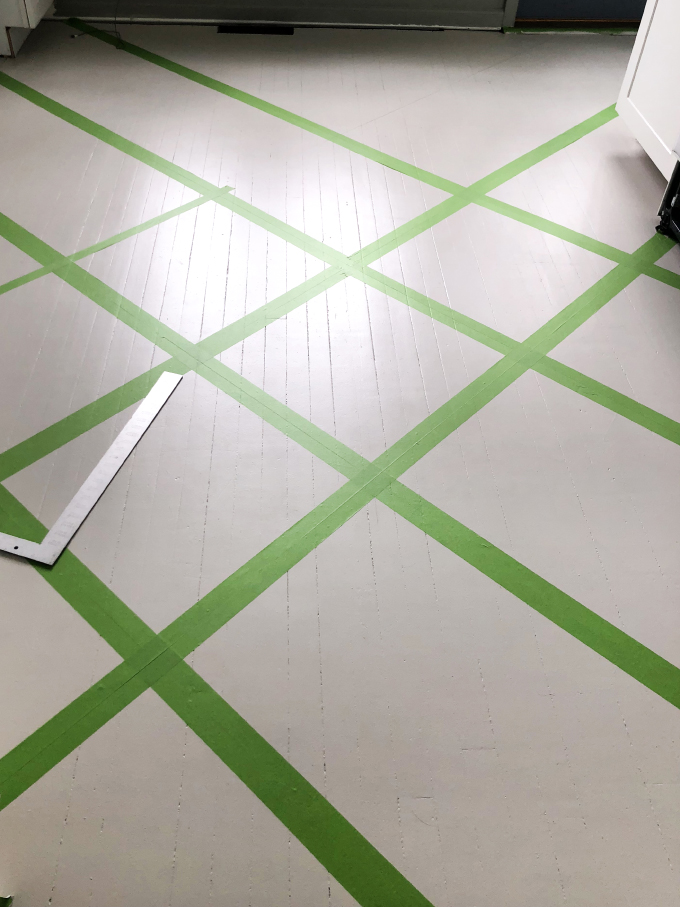
We found the center of the room using wall to wall measurements. From that point we used a square to get 45 degree lines intersecting the center (think a big X in the middle of the room). We then spaced the next lines 24” in each direction. That line marked the CENTER of the stripe in our pattern.
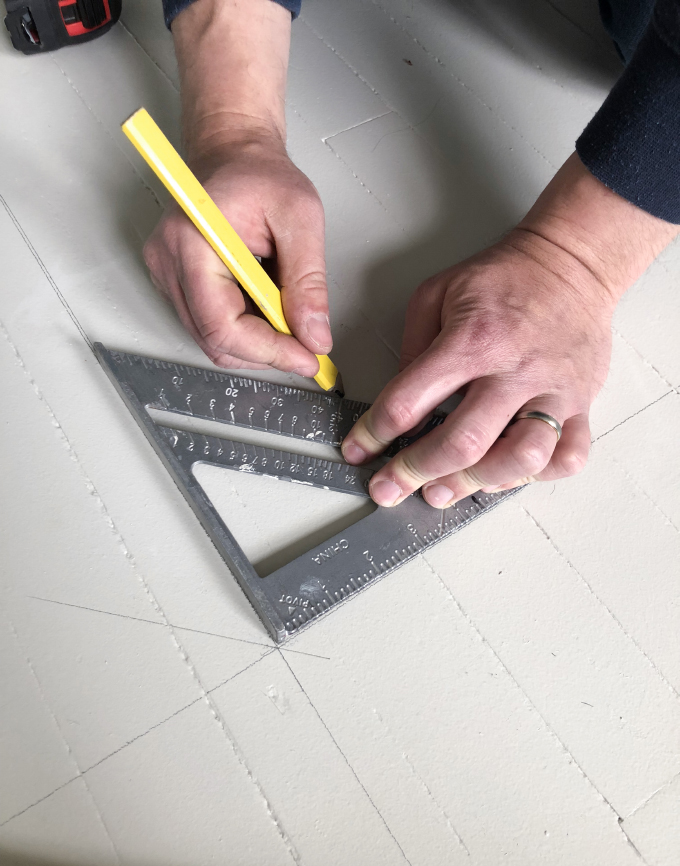
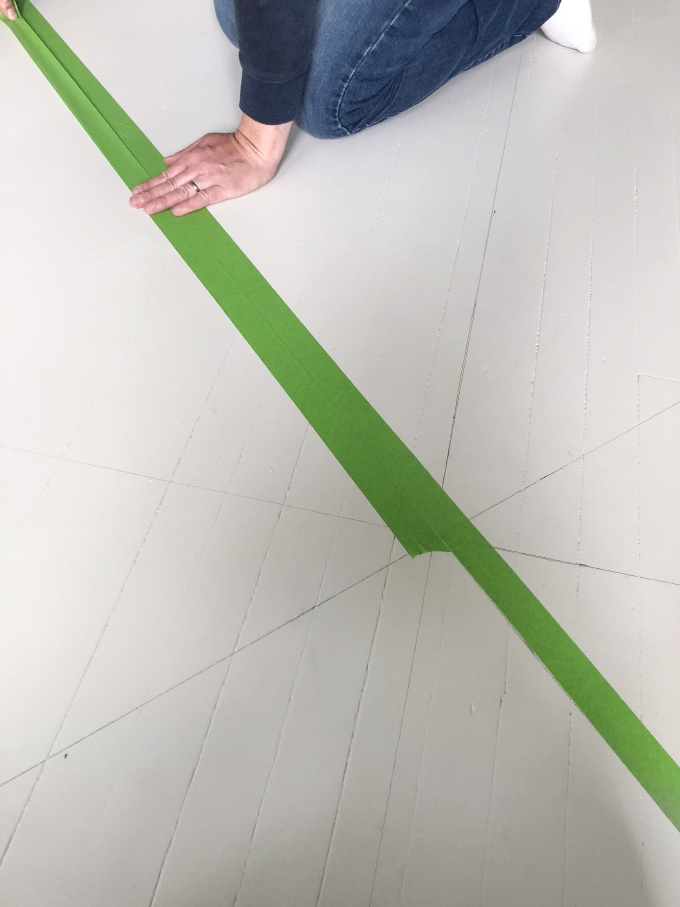
We placed a strip of 1.5” thick painters tape on each side of the line to make a 3” stripe.
HOW TO GET CRISP LINES!
Once the tape was down, we used the painter’s hack to get crisp lines: used the Oyster Shell paint (aka the base color) to coat the edge of the painters tape and let dry. This seals the tape edge so you ensure a crisp line with no bleed through.
4) Second Color
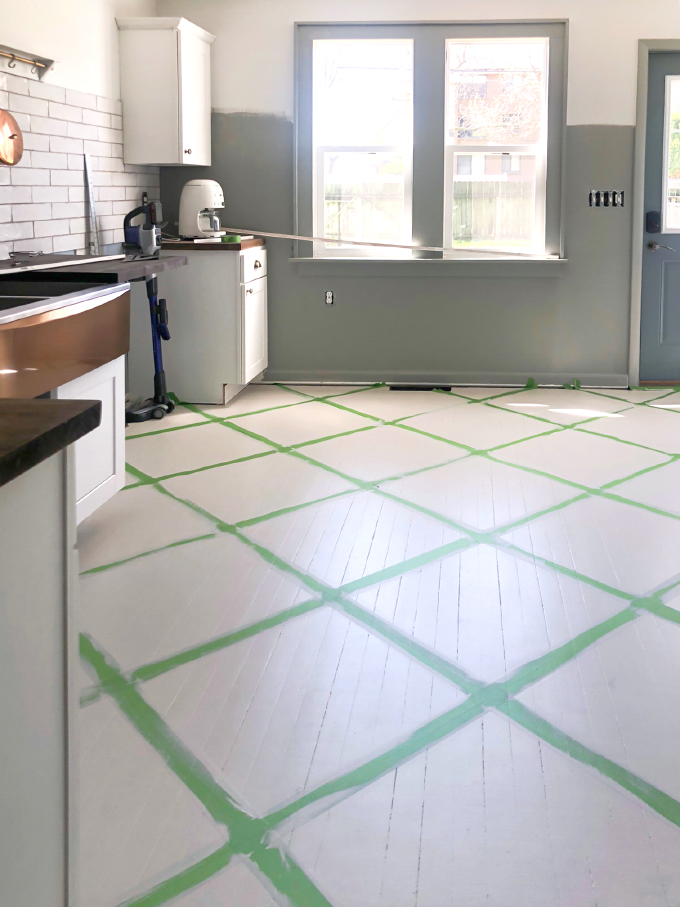
We let the tape edges dry overnight (only need 6 hours) and came back the next day and swept the floor. Then painted the second color Windsor Grey. A little tip here: At this point we have created roughly 2’x2’ squares, turned at 45 degrees. Mr Yolo was concerned about getting too much paint on the tape and pulling paint off the floor with the tape. Spoiler Alert!!!! That didn’t happen. What did happen is there were some corners of the squares that didn’t get enough paint. He had to go back with an artist brush and fill in the corners. Tedious work, but not the end of the world. The takeaway is do not be afraid to get the paint on the tape if it means you get enough paint on the entire pattern.
5) Pull the Tape (and Fix Our Mistakes!!)
After 24 hrs, we pulled the tape. As stated above, we were concerned on how the tape would come up. For the most part it came up really well with really crisp lines. There were spots where the tape pulled up the Oyster Shell paint, which Mr. Yolo just touched up. Our big mistake!
We used pencil…Eraser did not work. Neither did painting over the lines. A reader suggested a baking soda/water paste. This “worked” in getting the pencil out, but also affected the sheen of the paint. Another reader suggested Magic Eraser, which might have worked better, but I would suggested just skipping the pencil. After removing the lines, Mr Yolo washed the floor and applied touch up paint to the low sheen spots as well. Next time we will definitely use a chalk line or a dry-erase marker!
6) Top Coat
Ready for the Matte Top Coat. We really emphasize cleaning again at this stage to remove all the hair (and fur), because of the light color and the morning sunlight coming through the windows, any hair and dirt is easily visible. Another round of vacuuming, sweeping, and wiping the floor. Finally ready for the Top Coat. Just like the first round of Oyster Shell, we used a brush around the perimeter, then used a ¼” nap roller for the open floor. The top coat goes down really quick, and we only used about ½ a quart for the whole 150 sf kitchen.
FINAL REVEAL
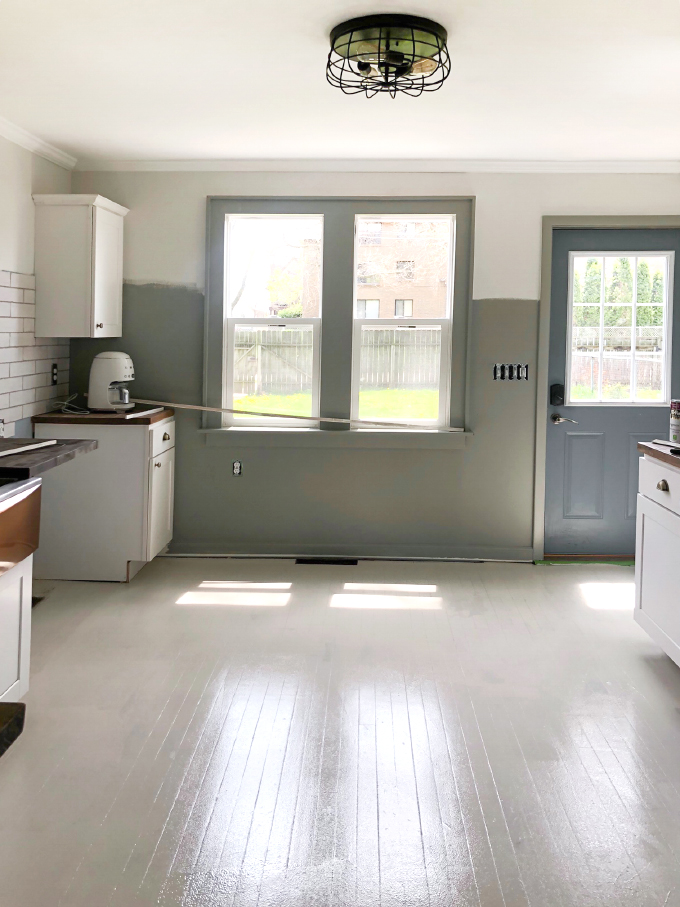
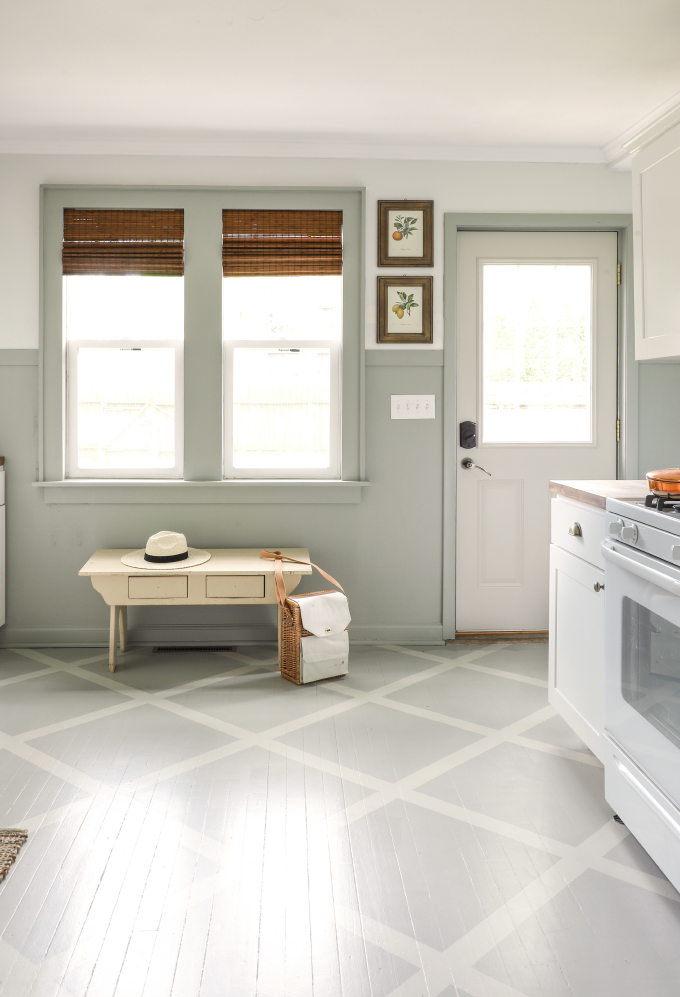
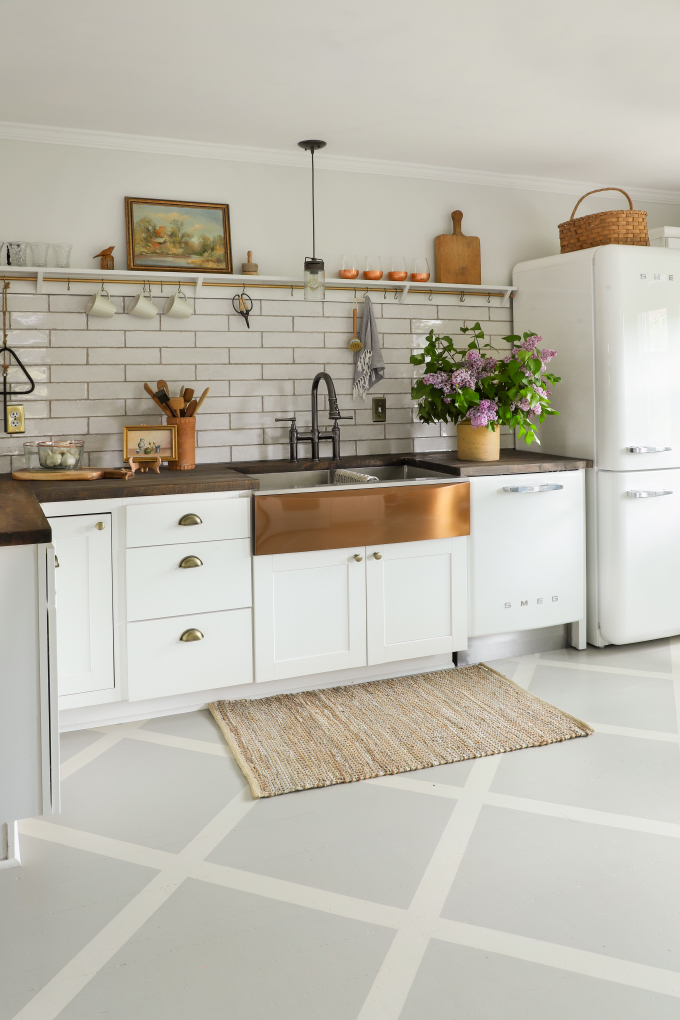
We let the top coat dry over night and came back the next day. And the painted wood floors looked AMAZING!! The kitchen feels SO bright and clean now. The pattern looks great, even when you’re on the ground. And all the effort to keep the dirt and hair out of the paint process was well worth it.
Some Final Thoughts on DIY painted wood floors (or the Cliff Notes if you don’t read the whole post)
Don’t use pencil for the layout. Getting the pencil off was tough. Eraser did not work. A paste made of baking soda and water did work, but also altered the sheen of the paint. Someone else said to use Magic Eraser, but we were already done. So Mr. Yolo more time touching up the paint then doing the install. Instead of pencil, use a chalk line or dry-erase marker.
We used Frog Tape to establish the stripes. It is the best tape on the market. And it worked so well, that it pulled up speckles of the Oyster Shell base coat. We first questioned whether we prepped the floor correctly. After reading the directions again, we saw that a certain percentage of pull up is expected when doing the initial test patch. Potential Solution. Use cheaper painters tape or just be prepared to do a few touch ups!
We talked with the Rust-Oleum team, and they suggested painting the floor with the first color, painting on the top coat, THEN marking the pattern, painting the second color, and finishing with a second layer of top coat. We’ll definitely try this next time!
We had to sand off the swatches because we did not prep the floor before painting them…ooops! I got too excited. Wear clean clothes when doing this. And clean the floors in adjacent rooms too. Maybe even set up a fan blowing away from the room you are working in. We were amazed at how much hair we cleaned off the floor… after we already cleaned five times.
The pattern is a real nice touch and we love it. But the touch up accounted for most of the time spent on our painted wood floors. One solid color with a top coat would look really good too, and drastically cut down the install time. But it was worth it, don’t you think?!
This post was made in partnership with Rust-Oleum®, all opinions are my own. Thank you for supporting my amazing sponsors!
EXPLORE MORE: DIY PROJECT


Literally yesterday I prepped (and sanded) our old hardwood floors to get ready to paint. I found out about your blog from Northshore home market place because I was looking for recommendations of best paint for this project. I’m beyond grateful for this post, timing is impeccable. I’m only doing one color and after one coat of the base coat, the room already looks amazing!! Thank you for inspiring me and reassuring me that I made the right choice in paint and the process.
We plan to do two coats of the base. Do you recommend two coats of the top coat? Or is it not necessary?
(We live in an old tiny Bayview home as well❤️ Our house will get a total remodel someday- this is the perfect solution to hold us over without breaking the bank)
If you are covering a dark floor with a light paint, do two coats! Otherwise just one 🙂
I love this! I have a kitchen that is a different color wood than the rest of the house. Very old worn floors that have big scratches and divots. Some space where the boards have separated a bit over time. I really want to try this. I hope it would look ok with those flaws. Maybe there’s something I could do to fill bad spots with before painting.
Any idea if you can use this to paint slate tile?
Yep! it will work on Slate tile
You only need one coat of top coat? Is it a polyurethane to keep it from peeling or chipping?
Yes! just one coat of the top coat keeps it from chipping
It’s really breathe taking! The lines are immaculate and I love that gray color. I’ve used Fabulous Floors Chicago in the past for basic resurfacing, and I want to use them again to do a similar design to this. Would do it myself but my knees are both pretty shot and they’re a pretty solid option for people on a budget. Thanks for sharing the project and inspiring me.
It looks marvelous and you have done us all a favor by explaining your mistakes and I love your revised edition!!!
Oh wow!! It looks like a totally different kitchen! This painting DIY is amazing!! Congrats on the work 😉
xx
Eli
http://www.curly-style.com