Budget-Friendly DIY Bungalow Kitchen Makeover (with Painted Cabinets)
Before & After, DIY PROJECT
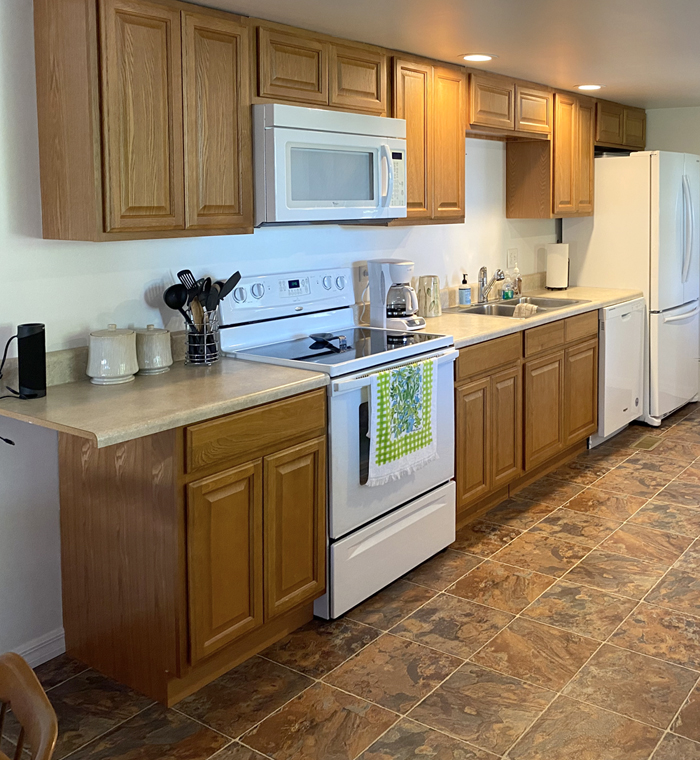
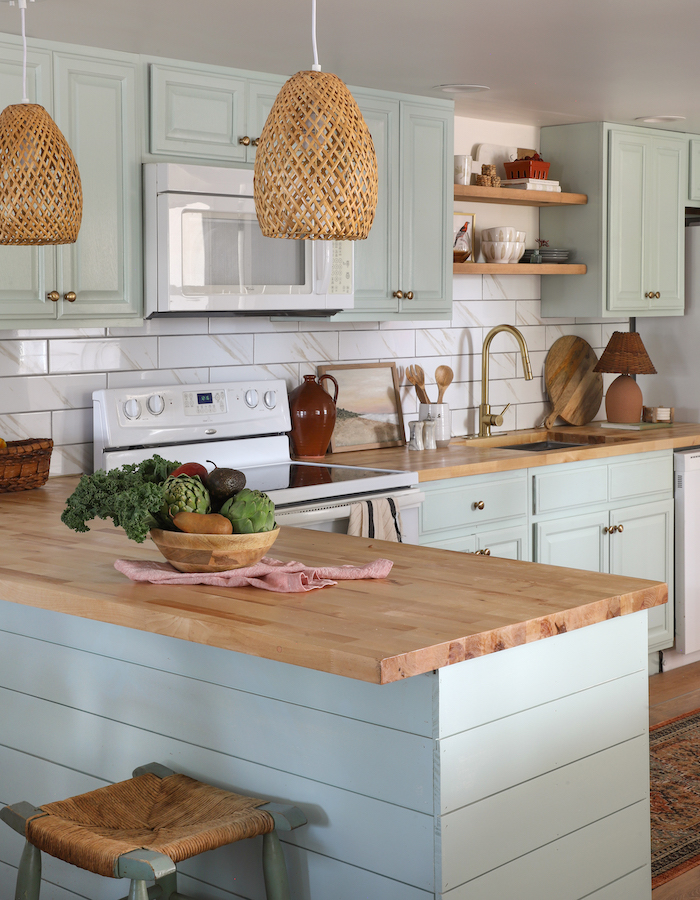
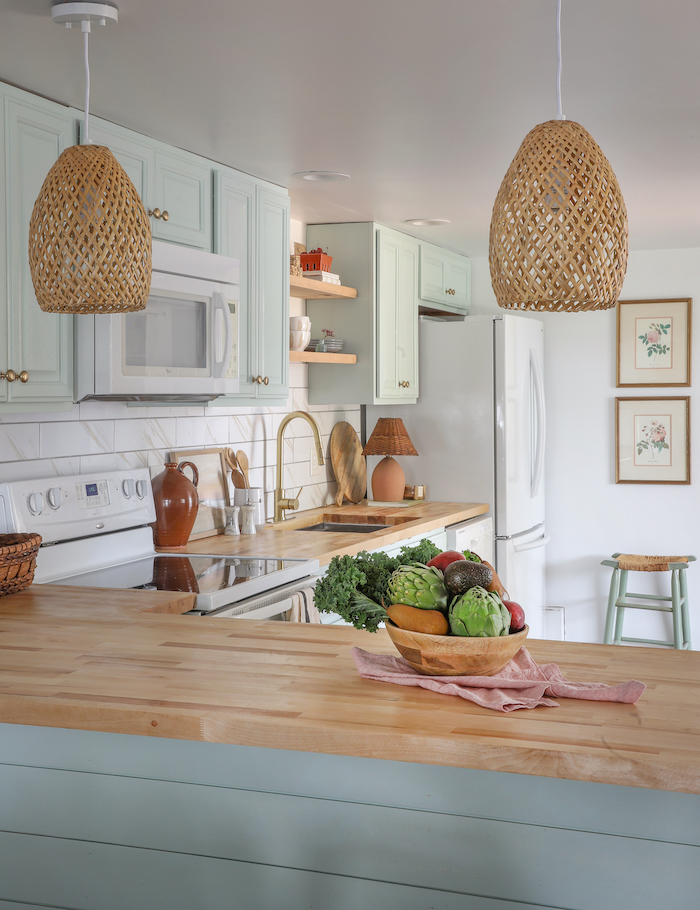
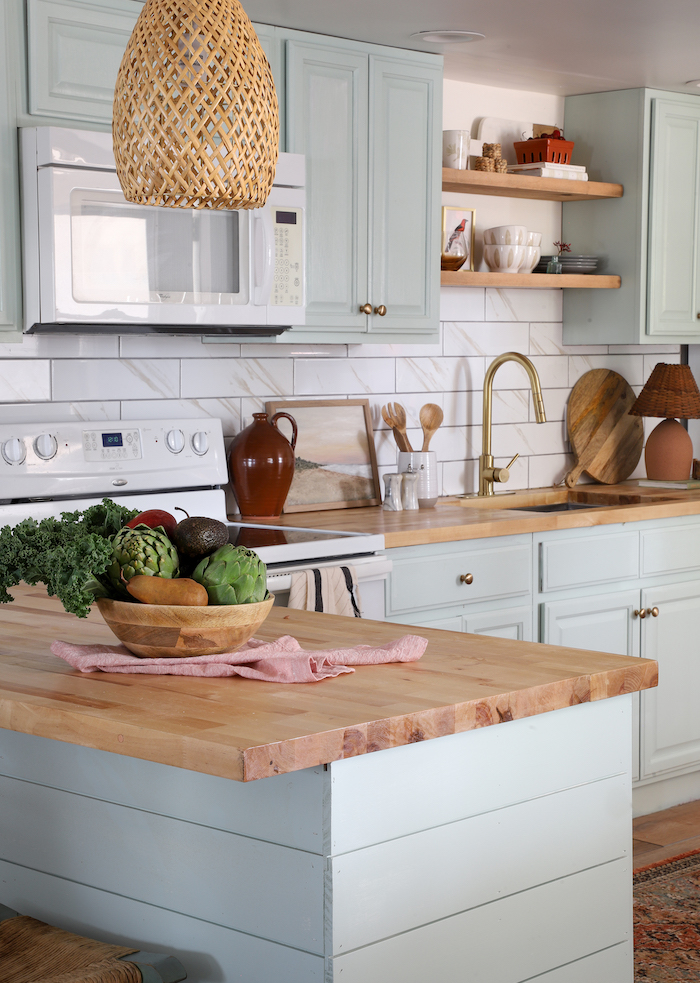
My sister’s Budget-Friendly DIY Kitchen Renovation!! I will forever be blown away at what a couple coats of paint on old cabinets can do. Here’s a little recap: We have been in Florida for the past month helping my sister renovate & decorate the new bungalow she bought (and enjoying the sunshine with Little Yolo after a busy 2021). This space has come together so well! The goal was to keep this budget friendly, so these are the same cabinets (just reconfigured) and appliances. We removed a couple upper cabinets, and we hung floating shelves using wood found in the garage. The countertops were replaced with affordable butcher-block. Keep on reading for the before and after and all of the details of this project!


Before & After
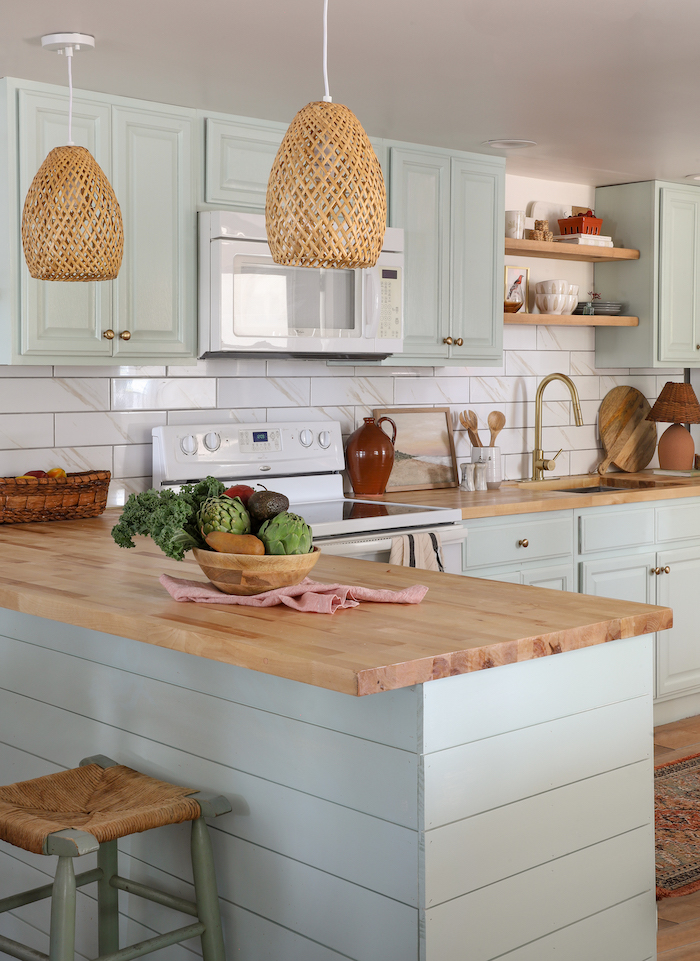
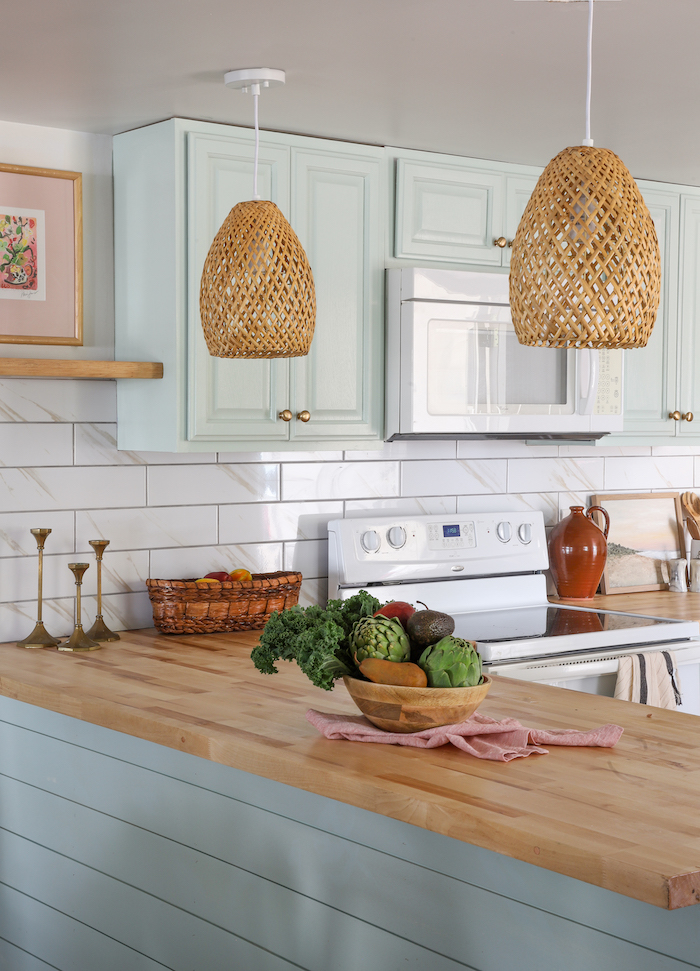
After my sister closed on the bungalow, she texted over pictures of the kitchen. I mocked up some ideas that would lighten up the space and gave it a more beachy vibe. The layout did not change all that much. My BIL took the island that was floating in middle of the kitchen and moved it to create peninsula, then added a shiplap detail to the backside. My sister painted all the cabinets…still so blown away at the transformational power of painting cabinets. We had fun coming in with the finishing touches to help elevate this space even more and bring in warmth and character.
Painted Cabinets
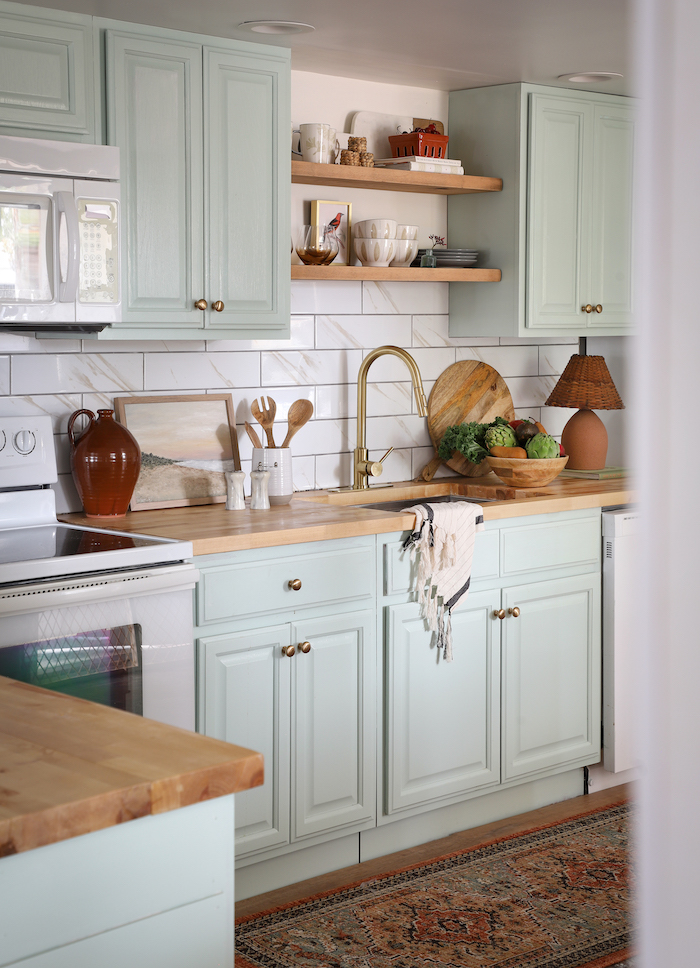
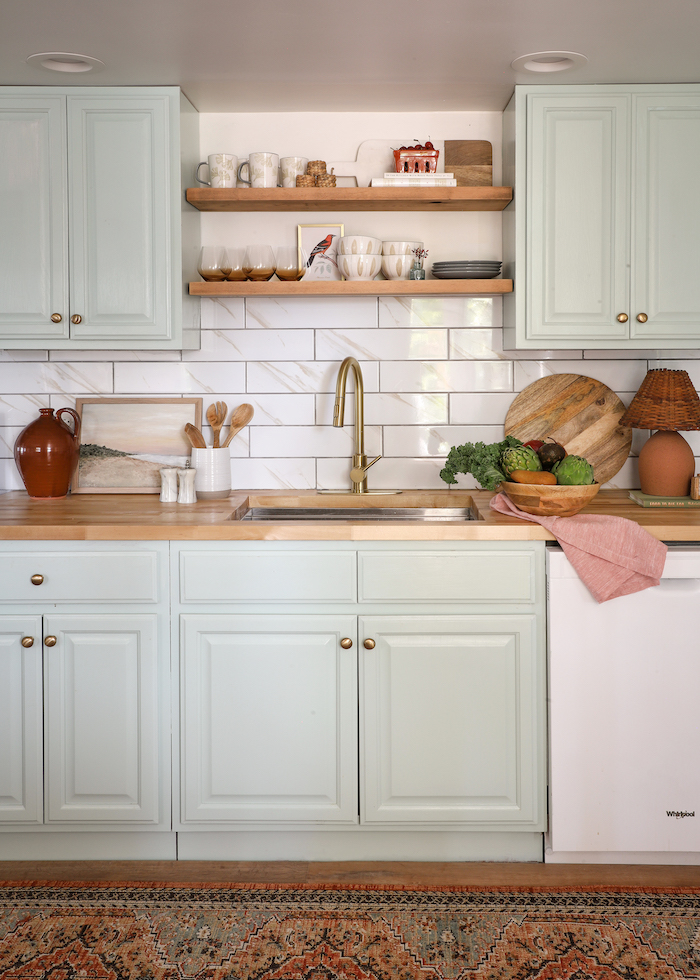
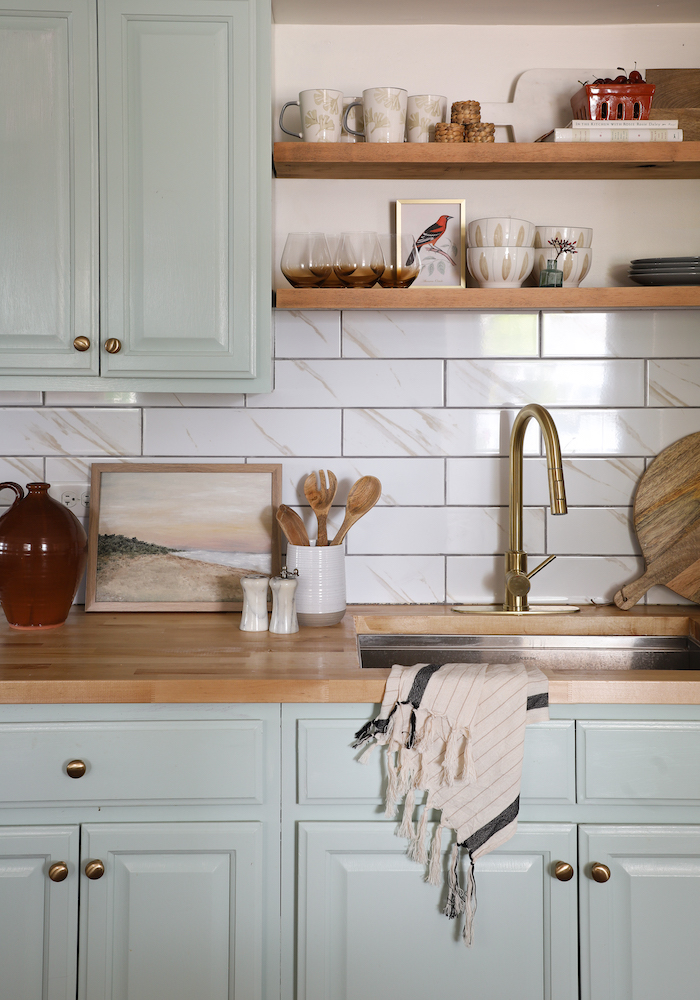
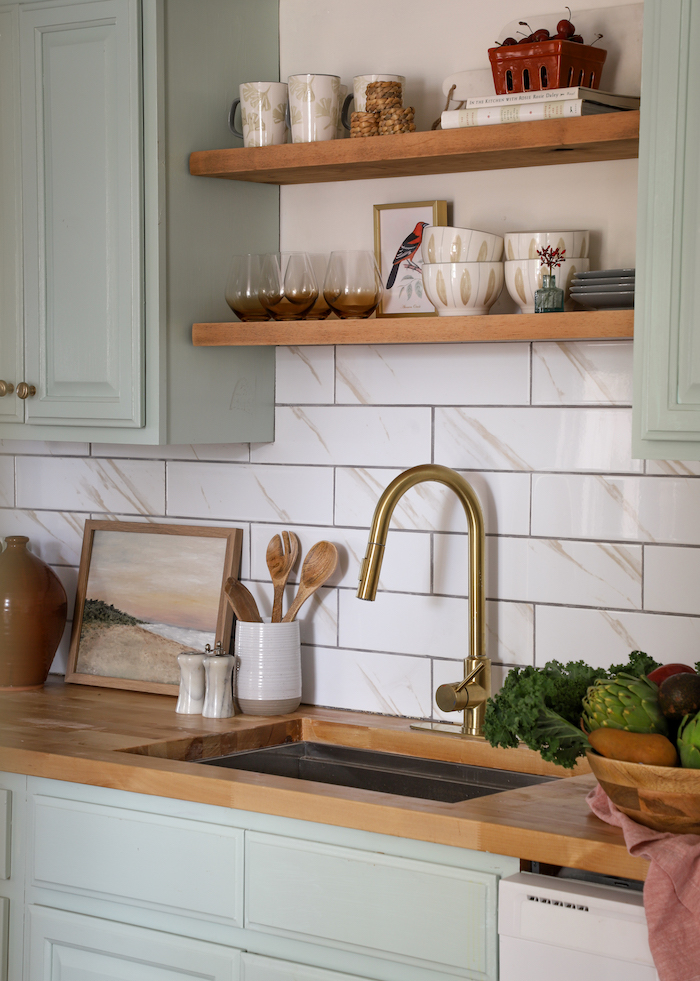
Back in Wisconsin, my sister tested out a bunch of seafoam green and light blue paints. We narrowed it down to a few we liked, but ultimately she needed to try it in the house. The way sunlight hits in different spaces can really change how a color reads. Plus, Florida sun has got to be different then Wisconsin sun, right? She ended up loving Behr Frosted Sage and used their Cabinet and Trim Paint. I have not tried this paint (here is my cabinet painting tutorial using Rust-Oleum Cabinet Paint), but it looks great in person. She lightly sanded everything, primed with the Behr Cabinet Primer, and then did 2 coats of the Cabinet Paint. We were installing shelves and definitely hit the cabinets a few times, and did not see any chipping… seems like a good product. The color is beautiful! Frosted Sage brightened up the kitchen, feels calming, and is just the right amount of beachy! Brass knobs were an easy and affordable way to jazz up the doors and add a splash of gold to the kitchen.
Backsplash
We knew a tile backsplash would not only help the kitchen function better, but would really kick things up a notch in the style department. After all of the recent tile projects at The Loft, Mr. Yolo is a pro. My sister found this tile at Home Depot on super clearance for just $3 a box! I was not sure how the oversized tile would look on such a small backsplash, but I love how it turned out. Mr. Yolo finished it with a Natural Gray grout from Home Depot.
Lighting
I knew pendant lighting over the peninsula was going to be the right touch. I found these Twine Pendants at a great price, and I just love the warmth against the cool cabinets. They tie together the stool I found at Goodwill down in Florida (if only Wisconsin Goodwills still took furniture donations). I wish there had been two of them. This sparked a pretty amazing discussion on my Instagram about the advantages (and disadvantages) to thrifting vs. buying things new. I bought some new stools and returned them, deciding to be patient and wait for more stools like this, or to find a pair.
Butcher Block
I had a reader reach out to me recently that said they made renovation plans and their contractor tried to talk her out of using butcher block because it is “so high maintenance” and would “end up costing more than granite” — after installing Butcher block in 5 kitchens, I have to disagree! There may be more labor costs to cut out the sink, but that would pale in comparison to the savings in material cost. It took 3 pieces of butcherblock for the counters, so the cost was under $500. My sister liked how the birch wood looked raw, so she used 3 coats of Watco semigloss lacquer, and they won’t need to do maintenance. We don’t prep food on these countertops; we use cutting boards for that. If you want a food safe version you can use this…but you may have some staining over time that would need to be sanded out. If you are looking for cost savings, and a countertop you can DIY, butcherblock is the way to go! My BIL cut a hole for a new Stainless Steel Sink and Gold Faucet.
Floating Shelves
Did you see what my sister calls “the lipstick trick” for hanging these shelves? She put some bright red lipstick on the brackets and we made a mark on the wood of the shelf to know where to drill the hole. Genius! Readers have also said they use toothpaste to do this. So smart. She found the wood in the garage, can’t beat that!
Steps to Hang Floating Shelves
– We use these Floating Shelf Brackets, which come in all different lengths. We like them to extend 3/4 into the wood shelf.
– Ideally, you would drill the brackets into studs, but if the studs are not where you need them buy heavy duty wall anchors (we don’t use the ones they come with, we buy ones that hold more weight)
– I wanted a shelf right above the tile, and then divided the space between the ceiling and bottom shelf to find the height of the top one.
– We installed the brackets with the anchors, using a level to make sure the shelves were straight across.
– Next, put a little lipstick or toothpaste on the end of the brackets, then hold up your wood shelf (that is already cut to fit) and it will leave a mark where you drill.
– Depending on the size of the rod on your bracket, you can us a large drill bit, or a spade to drill the hole into your shelf. Drill the hole slightly longer than the length of the rod.
– Put the shelf in place on the brackets and check to make sure it is level one more time.
– To secure them in place, fill the hole with a heavy duty adhesive, something with viscosity, like liquid nail and put back in place and let dry.
Thrifting
I have been having a great time thrifting here, but I never knew the thrifting scene back in Wisconsin was so ideal! I have been scoring at the Goodwill, but the prices at the antique stores have been pretty rich for me. There is one Goodwill I keep going back to, and found the brass candlesticks, rust ceramic jug, lampshade, stool, and art. I love a mix of old and new, and was happy I could add my thrifted touch to the space.
Shopping
Behr Cabinet & Trim Paint in Frosted Sage
Birch Unfinished Butcher Block
Floating Shelf Brackets
Salvaged Wood Shelves
Stainless Steel Sink
Gold Faucet
Twine Pendant
Brass Knobs
Classique White Calacatta Beveled 4 in. x 16 in. Glossy Wall Ceramic Tile
Runner
Ceramic Berry Bowl
Ceramic Dishware Set
Ombre Amber Stemless Wine Glasses
Pink Linen 4pc Napkins
5-pc. Coasters
20×7 Mango Wood & Marble Serve Tray
Mango Wood Serve Utensils
Mango Wood Serve Bowl
Mango Wood Serve Paddle
Natural Napkin Ring
EXPLORE MORE: Before & After, DIY PROJECT


Love the frosted sage cabinet painting!