[my DIY] rope wrapped chain bracelet
Uncategorised
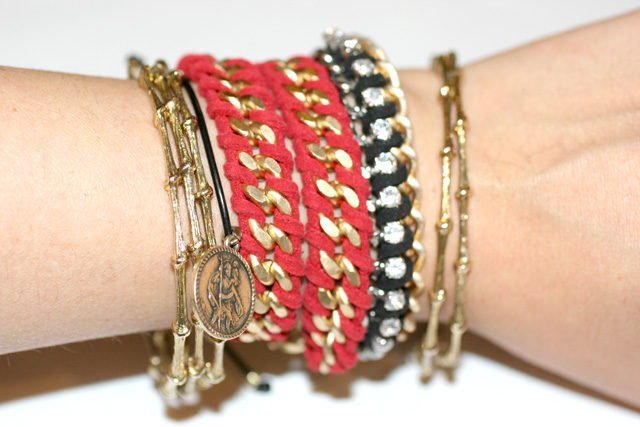
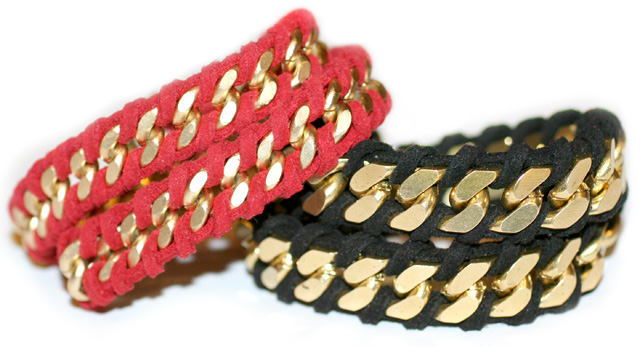 Just when I thought my wrists could not get any heavier, I added a couple new chain bracelets to the mix. I have officially ungraded my #wristaction! (as coined by my friend at brunch this week)
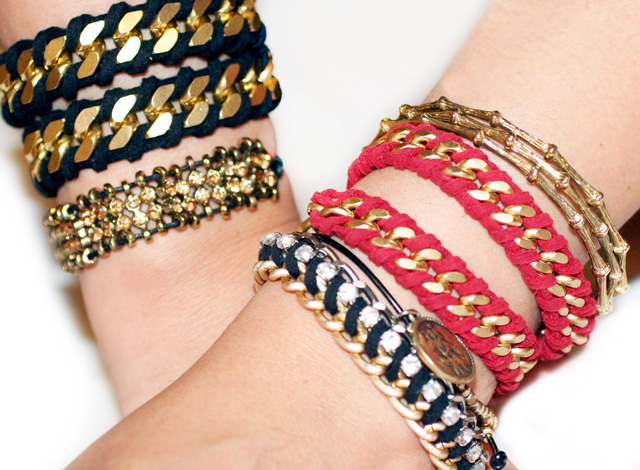 |
| DIY chain and rhinestone bracelet, Coin and sparkle bracelet from Accessorize |
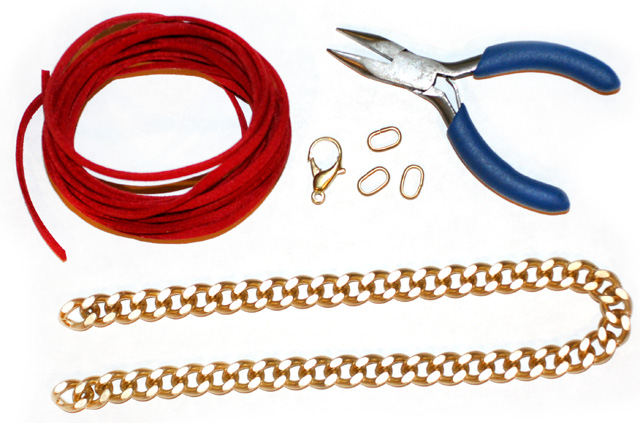
Supplies: 3 yards suede rope, 1 foot of chain, 1 lobster clasp, 3 jump rings, pliers (optional superglue)
Steps after the break

Cut a piece of rope a little longer than 2 feet.

Thread the rope through the first link and knot exactly in the middle.
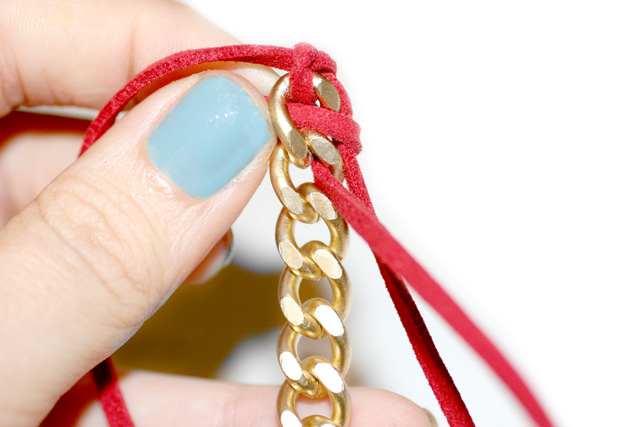
Take your remaining rope (2 yards or more) and also thread through the top link until you get to the middle of the rope. Then, thread the rope through each link, including a piece of the first rope you tied.
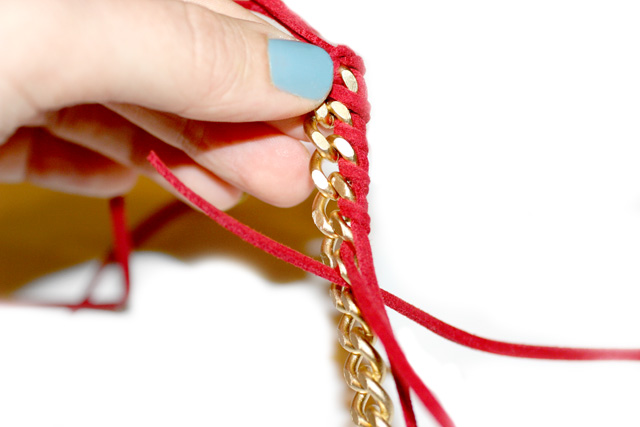
Continue threading down one entire side.
Repeat on the other side. Make sure to follow the direction of the chain, so the rope fits in the grooves.

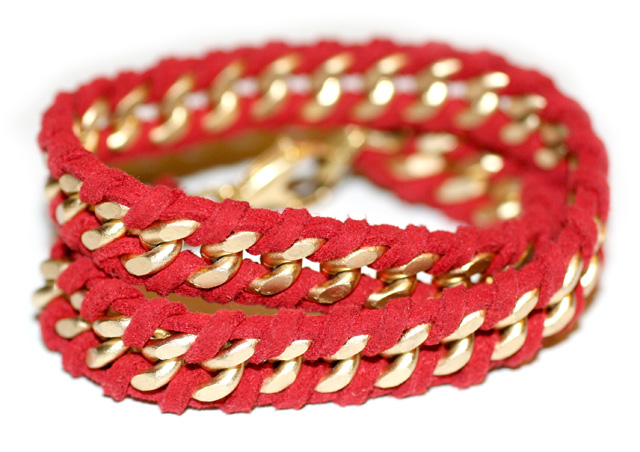
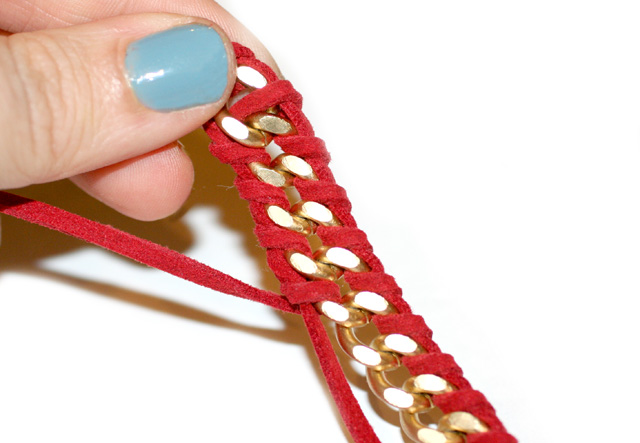
When you reach the end, tie both sets of rope in double knots and trim the ends.
You can dab a bit of superglue on the rope to reinforce the knot.
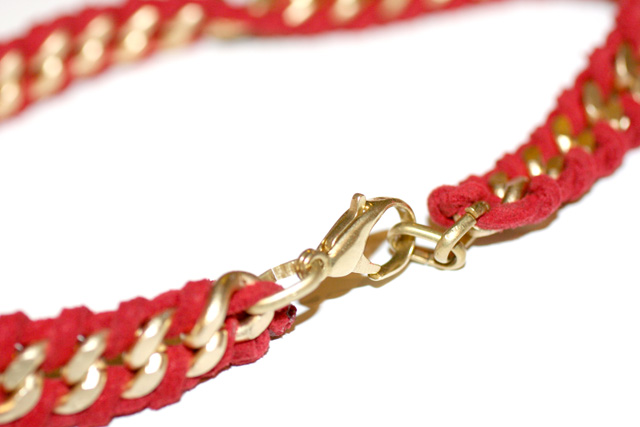
Add the jump rings to each end and attach the lobster clap.
Share the step-by-step on Pinterest!

EXPLORE MORE: Uncategorised


Genius! I love these…will definitely be making a green one! Thanks!
much love,
Kristina
simplybold.blogspot.com
Mint Green!
Great idea….I love this!
xx
Vanessa
Boots & Lipstick
Great idea….I love this!
xx
Vanessa
Boots & Lipstick
Love this!
x
Michelle
http://www.michellesstylefile.blogspot.com
GIVEAWAY
Have always wanted to make these!
xx
http://www.queenoffunkydiy.blogspot.com
Great job!! Marlene Birger has something just like this but only a necklace, that will be my mission for the comming weekend.
love k
Great DIY! Love that!
I must try that, thank you for giving such inspiration.. Love you… ^^
freakypinkglamz.blogspot.com
i put a link from my blog to yours ’cause your tutorial are always amazing! so chimple! 🙂
http://chimplethings.blogspot.com/
love it!!:)
baci
S.
http://www.acozybox.blogspot.com
love this idea, looks so professional as well. I definitely want to try this.
http://www.loafsandabowtie.blogspot.com
Very cool… Can’t wait to make my own
Great project! those bracelets are pretty pricey in store for what looks incredibly easy! thanks!
in dramatic fashion
I love this and all of your projects! Thanks for all your great ideas!
Awesome!! I can’t wait to try this, it looks like a trip to Hobby Lobby is in my future. 🙂
And my friends would eat these up for gifts!
So awesome!! I am definitely going to try this, but something tells me you make it look easier than it is 🙂
I’ve seen a few of these DIY chain bracelets and this is by far the best 🙂
check out my new blog:
http://hautedamnhelena.blogspot.com/
I love it!
a-little-awkward.blogspot.com
me encantan estas pulseras 🙂
algún día me animare a hacer alguna
I love this idea!
Very nice, I will definitely try this.
A jewelry blog.
http://www.houseofavandan.blogspot.com
We saw bracelets just like this down in Buenos Aires and I was so mad at myself that I didn’t get one! If I can make mine look as good as you have I’ll be so excited!
Love this!
Where do you get you chain from? I was in Micheal’s and they didn’t seem to have a large variety.
Try Jo-Ann’s if you have one close to you. I was just there today and picked up a chain just like this. It was a necklace and by the jewelery section. I just cut it down to fit as a bracelet but on second thought a necklace like this would bet so cute too! 🙂
These bracelets look so bad ass! I need to find some time to make them.
Where do you get the chain from?
LOVE these!!! I like that they have a lobster clasp too…
Girl in the Poodle Shoes
I’ve got to try this! I told you you’d be keeping me really busy during the winter break. Hehehe will post a photo of my #wristaction soon enough!
http://kristenglam.blogspot.com/
This comment has been removed by the author.
These are some kick a$$ bracelets! I can’t wait to make some. Thanks!
xoxo
Crystal
http://www.hauteycouture.com
great job!i love it!
xoxo
It looks so expensive! Love that post! Will do my DIY now! xx
I love these bracelets!
Where do you get the chain? I cant find that kind anywhere!
OMG, you´re a genius!!! 😀 have to try it!
Where can I get this chain? Any ideas?
LOVE! I’ve made very similar ones inspired by the two tone metal of yours.
Mckenzie, M&J Trimmings in NYC. They have online store 🙂
im gonna try making one love this!!!
Broke Fatshion
wow! I love your DIY’s! I’ve been looking for one of these, but it’s kind of hard to find. So, thanks a lot! 😀
http://kaarttehan.blogspot.com
http://kaarttehan.blogspot.com
http://kaarttehan.blogspot.com
Love this.. I’ve made a similar bracelet but not this one!! Will have to do it next!
The LA Model
http://www.margauxbrooke.com
Just seen where these are @ JCP called Maxit. Going in the morning to get some if they have them!
Thanks for the great tutorial! I can see myself making very one soon! 🙂
Great idea! I have to do this in black.
i’m surprised at how easy this is! looooove it!!!
Great idea! Love it!
Kisses from Hong Kong,
Nicole
what size chain do you use for these? 10mm, 12mm?
beautiful! so going to try this!
The only jewelry I wear are bracelets and rings so my arms get really blinged out. LOVE these they’re really edgy.
Lisa- Of a Gem
ofagem.blogspot.com
i LOVED this idea! i´m gonna try it!! 🙂
Just stumbled across your blog and thank God that I did! Such interesting posts and photos you got here. I truly admire your style. Great blog. Keep it up! xo
itsNikki
Fashion blogger
Manila, Philippines
http://itsnikki-goes-trendy-chic.blogspot.com/
Im super excited to start this project.! Thanks!!! p.s. where do i buy chain? 😀
I loved the bracelets and stuck your blog right now!!
🙂
http://chicthem.blogspot.com
cute! i’m definitely going to try this!
http://www.helloclee.blogspot.com
Love this tutorial!! I want to make some for myself! Will you share where you found your chain? What size did you use?
Stunning! Where did you find such lovely hardware? All the places I’ve looked have flimsy looking chains! =(
This is really cute!
there are a lot of chains at this website:
http://www.tohoshoji-ny.com/
These are fabulous. One thought-not sure if super glue is the best type to use. Typically, it is for non-porous surfaces. Probably elmers would work as well.
Wow! I love your Ideas !
http://louisa-whiteroom.blogspot.com/
is there a video tutorial for this? these instructions are impossible to understand
WONDERFULL :)i adore them !
Bellissimi nella loro semplicità!
Can’t wait to try to make one of these! Thanks for sharing your gorgeous ideas!
~Hugs~
Suzanne
To all of you who are searching for great bracelet like this, I found those here : http://www.mjtrim.com/7mm-metal-chains.html
Hope it’ll help you!
This is so cool! And I love the nail polish – may I ask what color it is?!! 🙂
When I get about half way down the chain it begins to twist. I have tried making the wraps tighter and then not so tight but it still twists. Has anyone else had this problem?
i’m having the same problem and i think we are using the wrong chains. i wish they would tell us whats the exact name of this chain because there’s so many different types and I think this is the right one
http://www.primabead.com/36-Curb-Chain-Gold-P2310.aspx?source=azad
Thank you for your reply. I too think the chain is the problem. I have spent a fortune trying to find the correct size. I’ll try this one!
I bought a chain today at Joann’s that looks very similar to the chain used in the tutorial. But mine also twists, and actually makes it kind of unfomfortable to wear, even if you untwist it when you wear it… :/
Mine twists too. I want to give it as a gift but not if it twists. Will the creator reply?
Can’t figure out for the life of me how to do the from the instructions, please make a video!
Adorable
http://angelica-may.blogspot.com.au/
That is so good. Very creative. Thanks for this tutorial.
Can you do a video please? I don’t quite understand the process, but LOVE the look.
Looks just like something I’d splurge on in an impulse buy! I’m so glad I can make it on my own and be extra proud of it 🙂
Alternatively you could use a cord or a piece of string. Adjust the string to where you want it to sit. Tie a knot or mark with a texta pen and then measure the length with a ruler. The total length of our necklaces include the clasps.
love it!!!
where did you get the chain from??
The other issue is the chain flips and turns when I tried to make it. I know it goes on straight, but it looks awful lying there waiting to be worn. Do you think it is chain I used?
This is beautiful!
However, I can’t seem to understand this step: “Take your remaining rope (2 yards or more) and also thread through the top link until you get to the middle of the rope. Then, thread the rope through each link, including a piece of the first rope you tied.”
Can you please clarifying this threading process?
I would really appreciate it!
Thank you,
An enthusiastic bracelet lover =)
That’s where I’m stuck! 🙁
Great pictures – they’re so helpful! I want to try this NOW!! 😉
u should definately add a pin button to your posts so pinners like me can pin you on pinterest
what are the exact chain that you use..can you please post a link for your readers thank you
Thanks to your turotial I could make a slightly different version of this bracelet. I didn’t have a chain, so I had to make my own chain from jump rings…
http://roselaflore.blogspot.com/2012/04/naramek-propleteny-bavlnkami.html#more
I love your tutorilas, thanks!!
http://tobchic.blogspot.com.es/
Must try this soon.
Jaclyne
http://www.sadeesays.com/
please is there are video tutorial for this or can anybody else post/write new instructions?? coz i really do not understand the second step!! please help!
Me neither, hav you had any luck?
muy lindo, pero no entendi nada!!!
I want to try this but I can’t find this type of chain anywhere near! Help
Please! And what size of a chain is it? PLEASE HELP! 🙂
Meli – try an arts / crafts store like Michaels. That’s where I get my chains.
The chain is from M&J Trimmings at mjtrim.com: 10mm metal chain.
I’m definitely going to try to make these to sell on my site!! Thanks!!
~signed The Slim Diva~
http://LushDivasBoutique.com
I’m trying to do this as a gift to a friend,but I’m stuck. How do you tie the end with the four ropes?
Thanks!
I love them 🙂 Definitely I’ll do them for myself!
The chain(s) s from M&J Trimming at mjtrim.com: 10mm metal chain. The lobster clasp, jump rings and suede rope can be found at Michael’s and/or Hobby Lobby.
Step 2 is confusing…I don’t understand it.
How did 2 pieces of suede turn into four???
There are 4 pieces of string :). Two strings, two lengths: one about 2 feet and the second about 2 yards (6 feet).
So here’s how I did it:
-As you see in the pic, you tie the 2 foot length of string in the middle directly in the middle/at the top of the first chain loop
-Then, take the 2 yards (6 ft) of the second length of string and ALSO thread it through the first chain loop until it is split in the middle. Don’t knot it.
-Now you have FOUR pieces of string total! One knotted. One not. (lol)
-Next, push aside one half of the first (knotted/2 feet) string…you’ll come back to it.
-You will now have 3 strings on one side. This will be the first side you wrap!
-You will use all three strings: half of the 2ft of string and both halves of the 2yd string to wrap the first side of your chain
-To wrap: you keep the knotted half of string parallel/flush with the chain and you loop the 2 yards of string around the stationary string and loop it through the chain. If you’re doing it right, it will look like the pictures above. That might not be the best description, but troubleshoot the loop until it looks like the pic. Repeat until the last chain loop. One side is now wrapped!
-Now, repeat on the other side!
-Super glue the ends together and make it neat 🙂
-Attach your jump rings on the ends
-Add the lobster clasp to one end
Voila.
Hope this helps everyone!
S
*Note: as ppl have mentioned, the chain will start twisting at some point as you wrap, making it somewhat unruly. I have done this twice now and haven’t figured out a way to avoid this. If anyone has any ideas, I’d be willing to try a third time!
Sorry! I meant you use TWO strings to wrap one side! Not 3. So push aside one half of the knotted string and one half of the threaded/un-knotted string.
It would be very useful to make a video of the whole process 🙂
Some parts are confusing,I’m stuck >.<
A video please, i cant get it
You could make a video? English is not my mother language and don’t understand the second step. I don’t know how it turns into 4 pieces :/
I love the bracelets. How about some hot pick or lime green?
Oh Man!!! I just discovered I lhave 10 thumbs and no fingers. The bracelets are beautful. How about I purchase one?
I love love love this DIY.
Keep it up your blog is amazing 🙂
http://www.pretty-updates.blogspot.com
Here’s the video 🙂
https://www.youtube.com/watch?v=zhOkKf1WkWE
To round out our catier bangles list, we had to include the hot leather
tote from Prada, and I’m sure you know which waterproof jackets I am
talking about – the Vitello Daino Leather Tote, of course! This Mother
Of The Bride Dresses has been dropping jaws all year long with its luxe calfskin and shiny hardware. Its classic appeal guarantees that it will be in omega speedmaster watches style for years to come and will certainly be making its way
onto lists of classic cheap miu miu handbags in no time. Its exterior displays the famous Prada
logo so you can make sure everyone knows you are carrying luxury cheap chanel shopping and
quality – two of Prada’s most notable qualities.
Very nice what you do … Here are my pages
http://www.bisuteriacarolina.jimdo.com
http://www.lascosasdecarol.jimdo.com