MY DIY | Copper Pipe Floor Lamp
DIY PROJECT, Home DIY

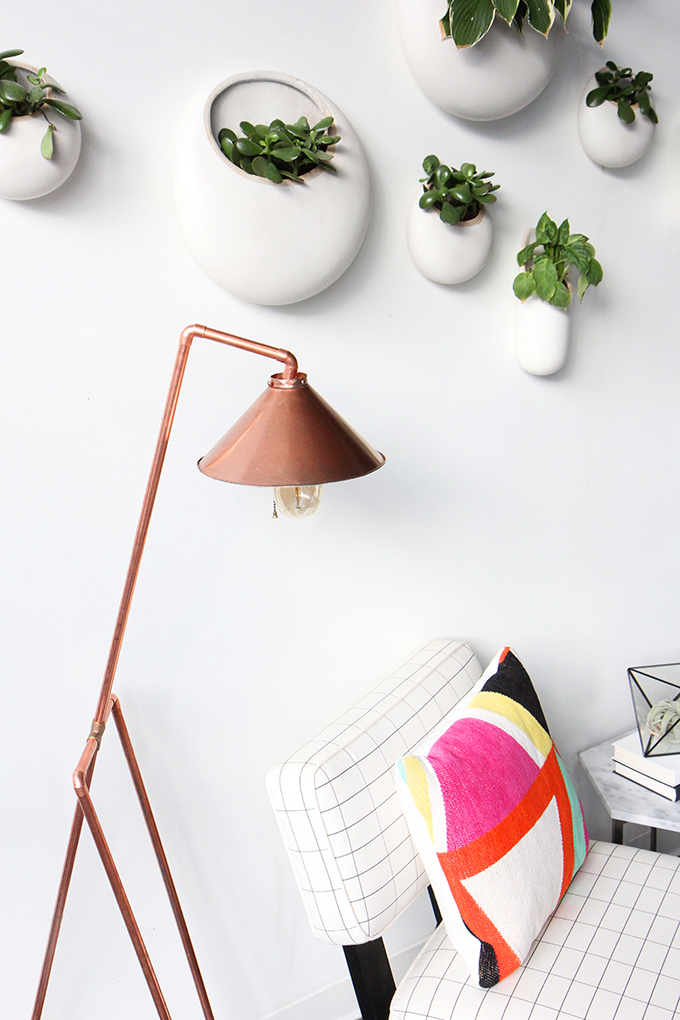
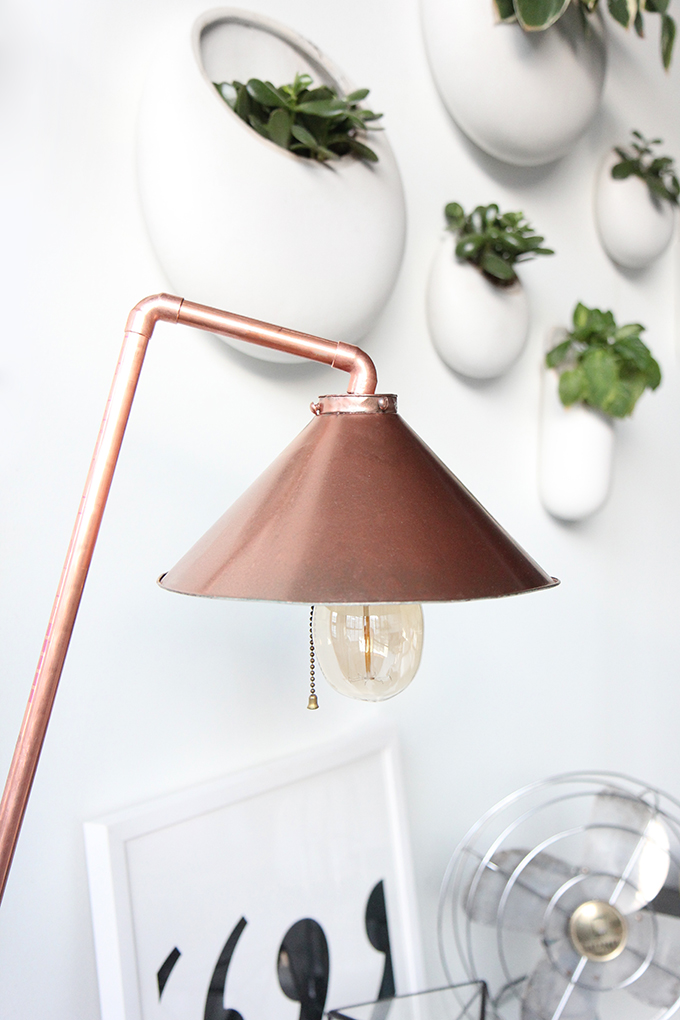
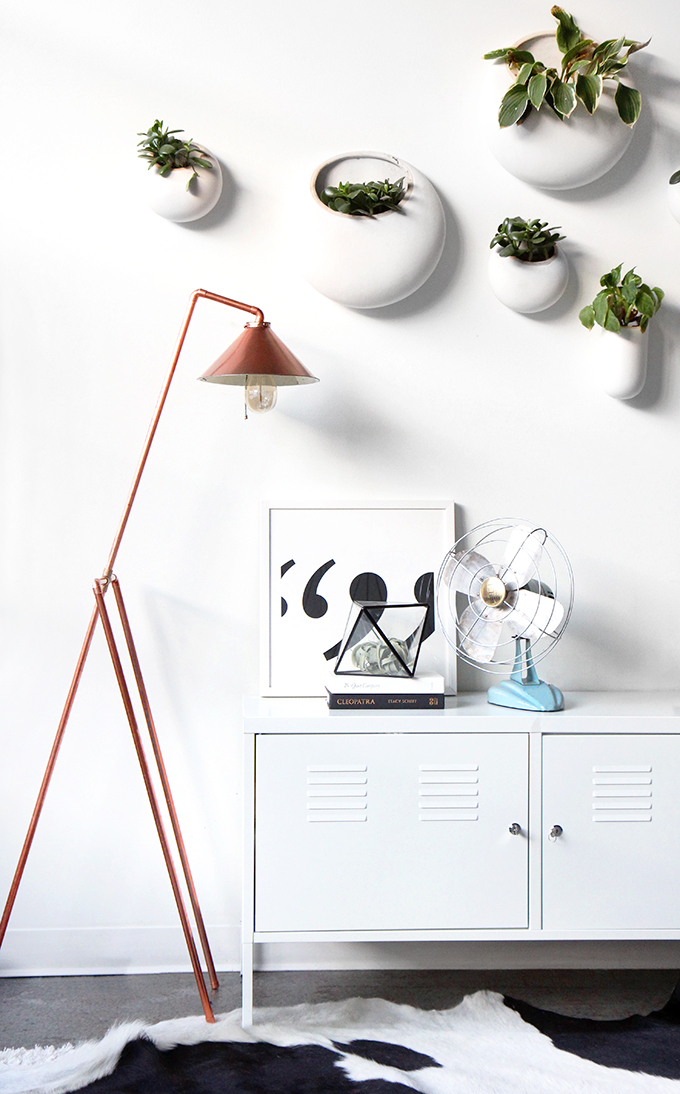
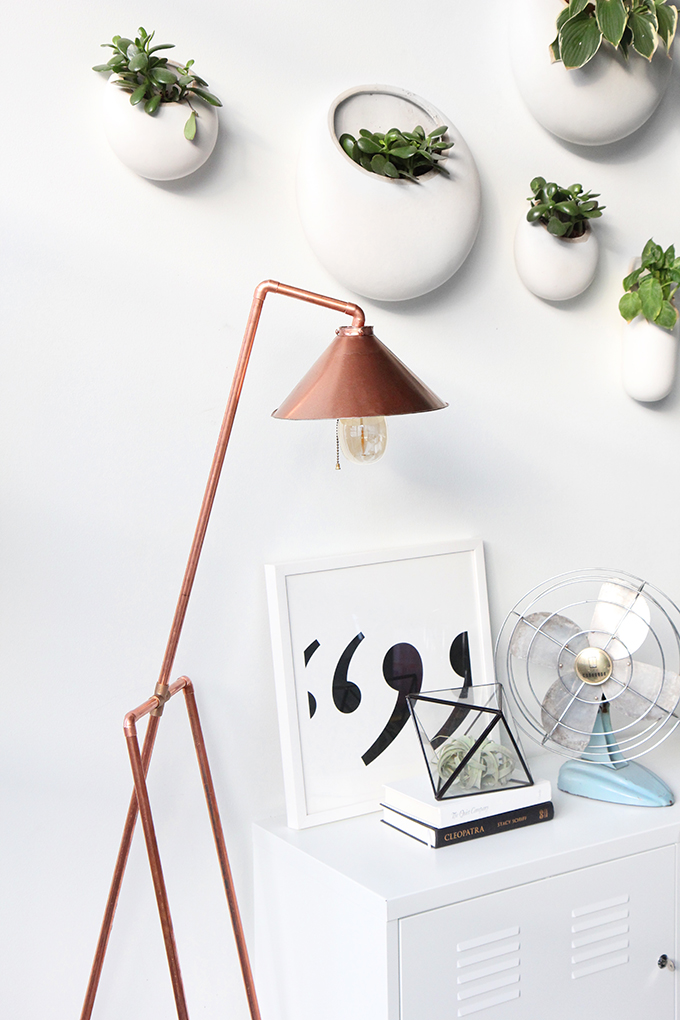
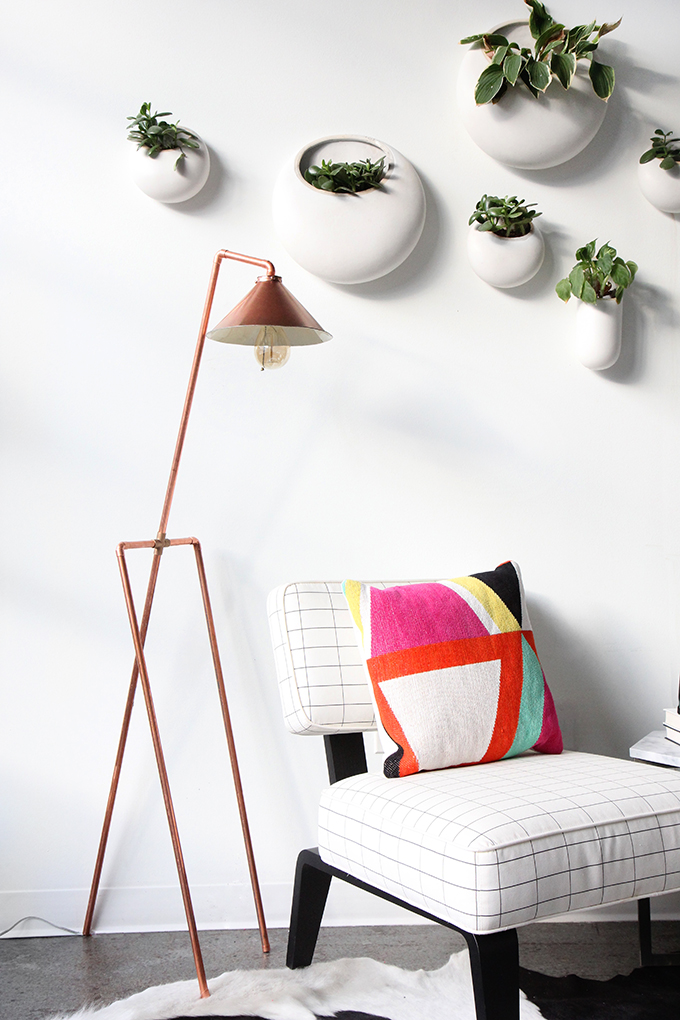
Ok, I know I took way too many photos, but this lamp has been a labor of love. Come along on the journey, and hopefully it will make creating your own a bit easier! After I saw this photo, I knew I wanted to make a DIY version, and figured it would be super simple to recreate with copper pipe…and I was almost right. I got all the copper pieces cut at the hardware store, and the copper elbows and caps were no problem, but that center cross piece in the middle was NOWHERE to be found, and so began the mad search. I scoured the internet, and was not willing to buy in bulk from China, so tried a bunch of cross fittings in different materials off Amazon, and after too many tries, still nothing fit. Next, I called around to all the plumbing stores, and after my 3rd call I found a store that sold one…for $20…errr…more than I was planning, but I was too far invested to say no at this point. With the stand pieces set, I was off to find the perfect shade, which I am sure could easily be purchase at the hardware store, but I had it in my mind that I wanted a vintage one. Great news, I scored the perfect pendant while antiquing that was already wired, woot!, (it would have been even better if I had not already bought a lamp kit online). After spray painting the shade copper, the assembly took a matter of minutes! Minus all my trial and error expenses the lamp only cost around $65 (way cheaper if you can find that cross fitting for less). I couldn’t be happier with how it turned out! And full disclosure, I still have to add the plug to the end, but I was too excited about it to hold off on posting, plus I might need some adult supervision. Step and supplies after the break…
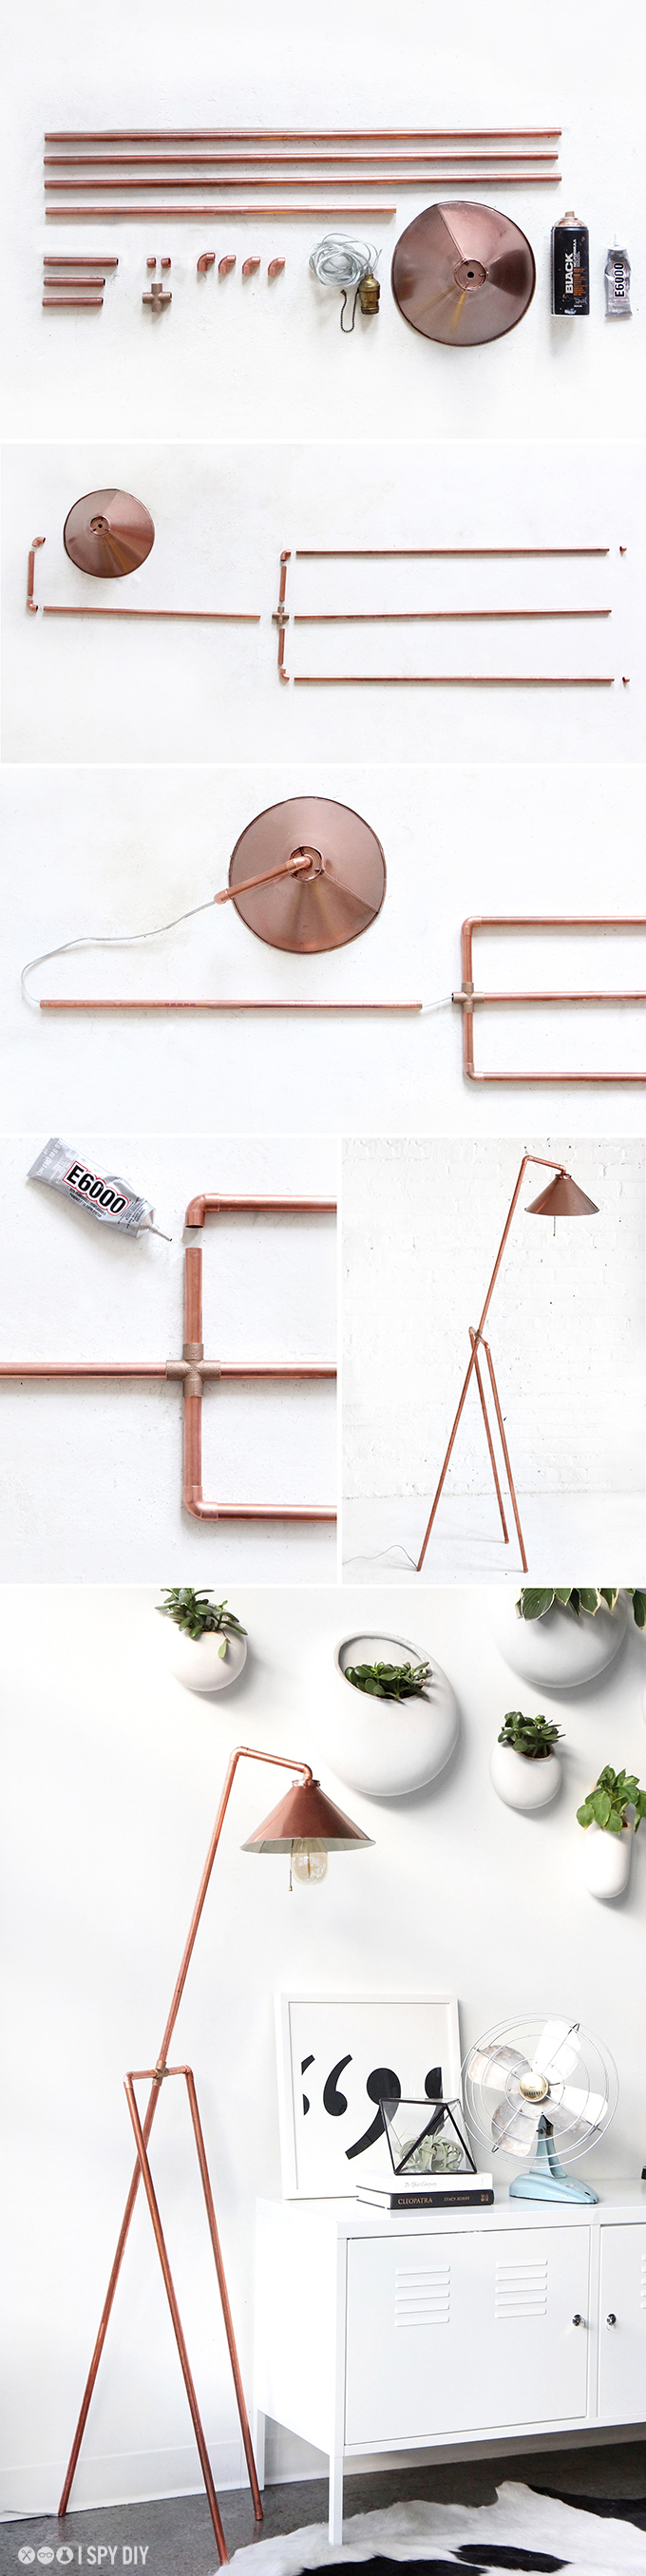
What you need:
1/2 inch copper pipe cut into 8 pieces:
Three – 5ft
One – 4ft
One – 6in
Two – 4in
Four – 1/2in Elbow joints
Two – 1/2in end caps
One – 1/2in Cross fitting
Lampshade – or pendant light
Lamp wiring kit
E6000 Glue
What to do:
Layout pieces as shown.
Next, run the wire through the center pipe. My pendant was already wired, so I ran it through the top and am adding a plug at the end using this tutorial. But if you are using a lamp kit, start from the bottom of the lamp, so the plug is sticking out the bottom and wire at the top, following the directions.
Next, insert all the copper pipe pieces into the joints, adding E600 glue where the piece fit together (or you could solder the joints).
Before the glue dries, stand the lamp up and let dry overnight in place.
Add a bulb, and done!
EXPLORE MORE: DIY PROJECT, Home DIY


Love your lamp and style 🙂
This lamp is so awesome, I love the copper and the shape!
https://www.makeandmess.com/
I really like the look of this lamp! X
http://www.thoughtsinstyle.com/
I must have it !
xx
http://www.cherry-mag.com
wow it Looks GREAT! Love it!
and the plants on your wall are realy cool.
greetings
Daniella
http://www.frlweiss.de
I love the lamp, but I think the light bulb is what really sets it apart. Where did you buy the lightbulb?
Absolutely love this lamp!
https://fhustig.wordpress.com/
This is so cool! I think you should start selling DIY kits based on your projects like this one. I think it would be a hit!
This is really fantastic!!!The lamp fits perfectly in your condo. Also, you found a place for your succulents.
I love that floor lamp! It is gorgeous!
Paige
http://thehappyflammily.com
Okay wow, this is amazing! x
http://jessicawoods.fr
Oooh this is so cool! Def going to try this out 🙂
ohliv.blogspot.co.uk
Oh, I love it. The planters on the wall are great too.
The lamp looks so good! I love the copper
Mi x
http://www.midnightmi.blogspot.co.uk
I actually think your version is much better than the original one! Im loving it!
http://ayellowrain.blogspot.com
I worked in hardware stores for about fifteen years and never once did I figure out something like this! You are a genius! The lamp is so COOL!
So cool. I’m a big fan of everything industrial and have always wanted to make my own decor. thank you for this. // ▲ conundrumofcoitus.com ▲
You have taken it to another level, The really cool part about this lamp are its legs!
It’s so cute, but i’m hardly handy with a pair of scissors, let alone pipes. But definitely going to try it out anyways. Challenge accepted!
Rabecca / http://www.midnightburnout.com/