DIY DUPLEX Before & After| Affordable Airbnb Kitchen Makeover
DIY PROJECT
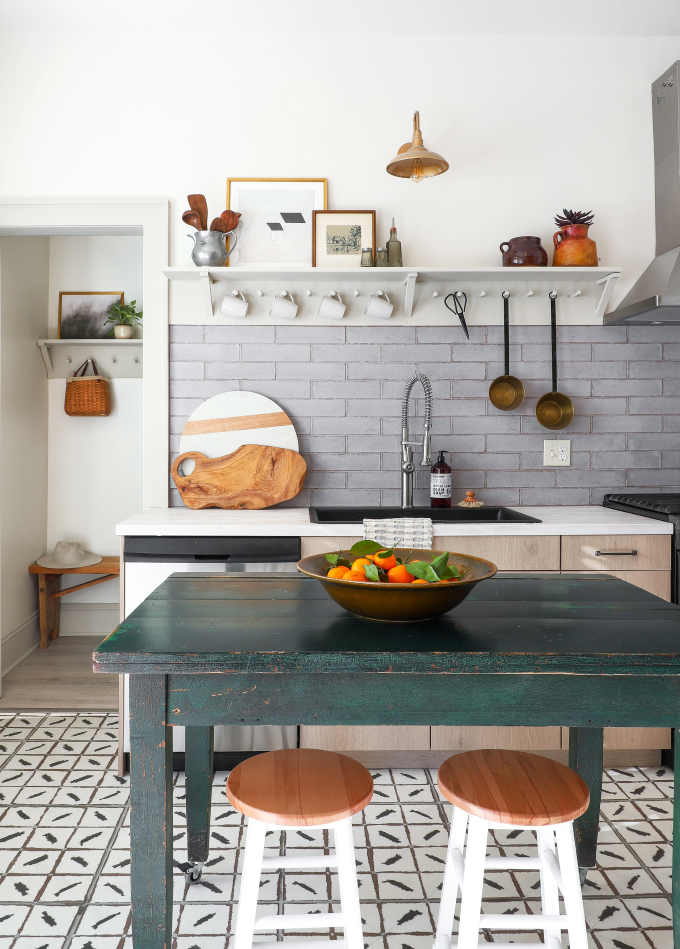
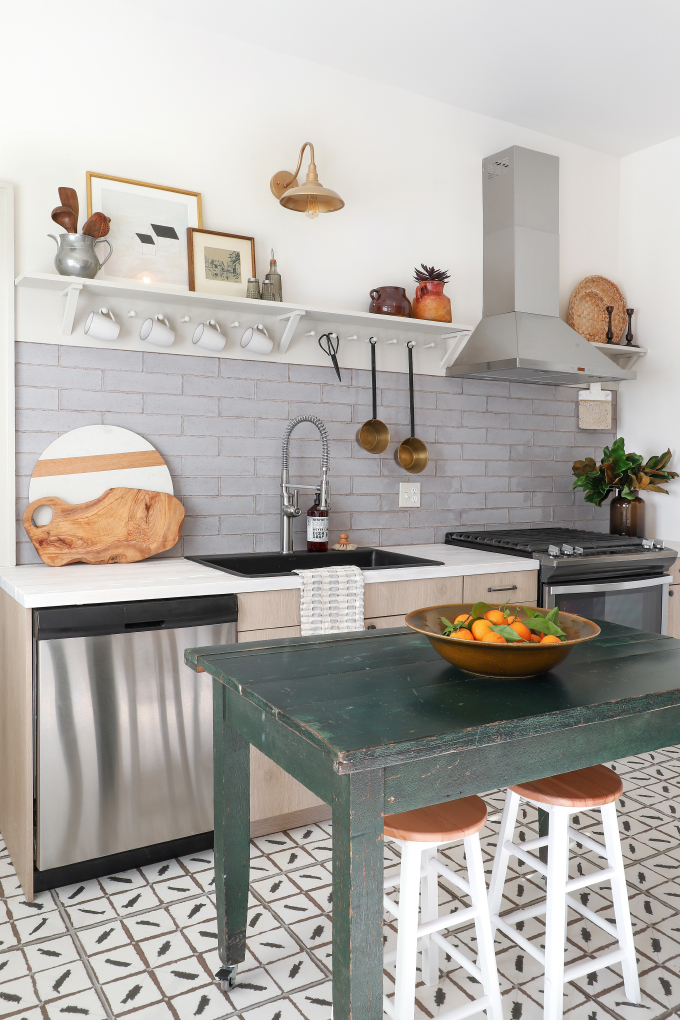
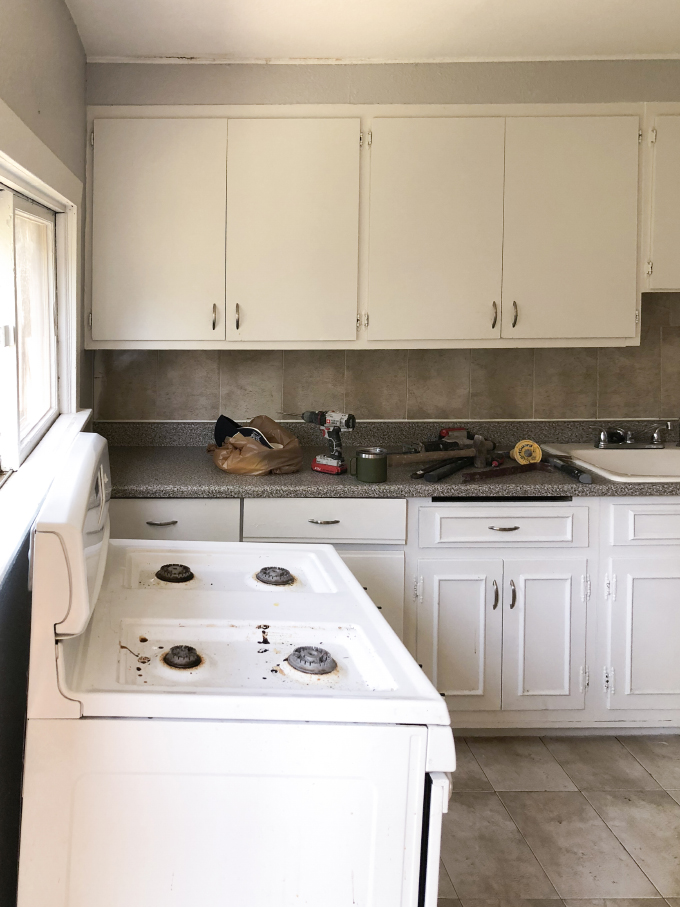
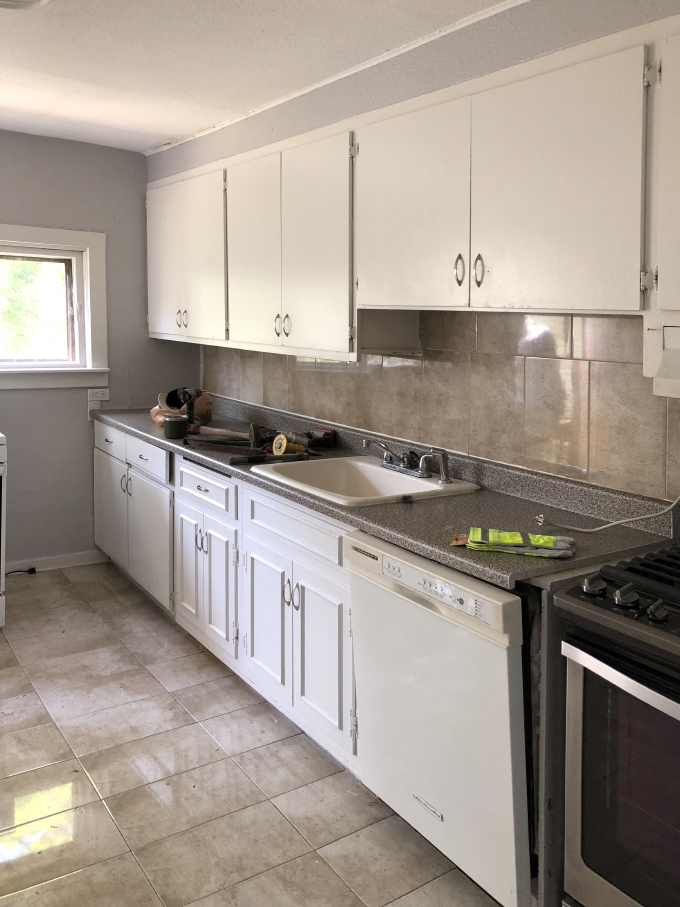
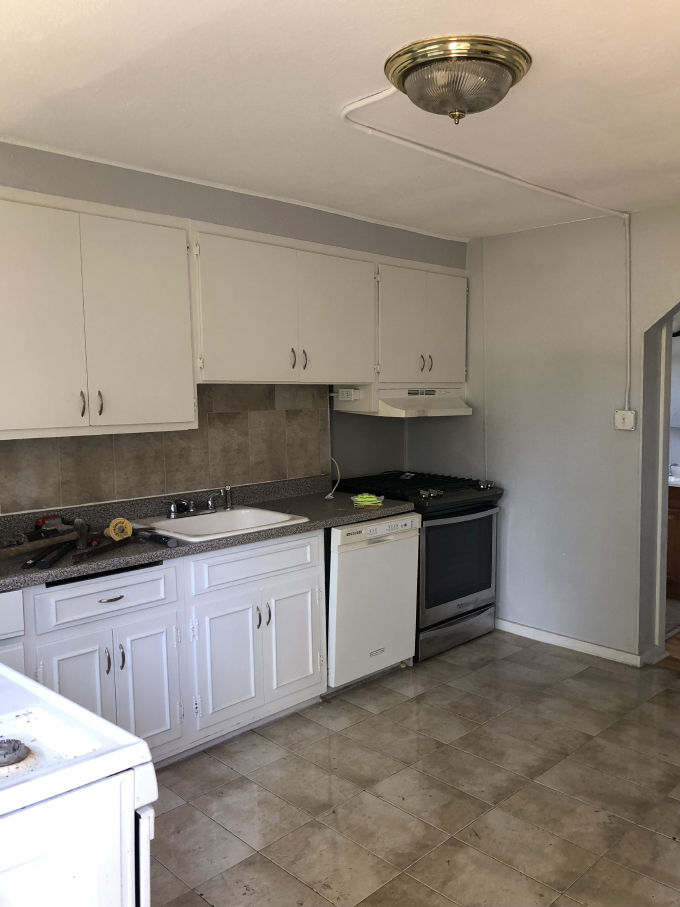
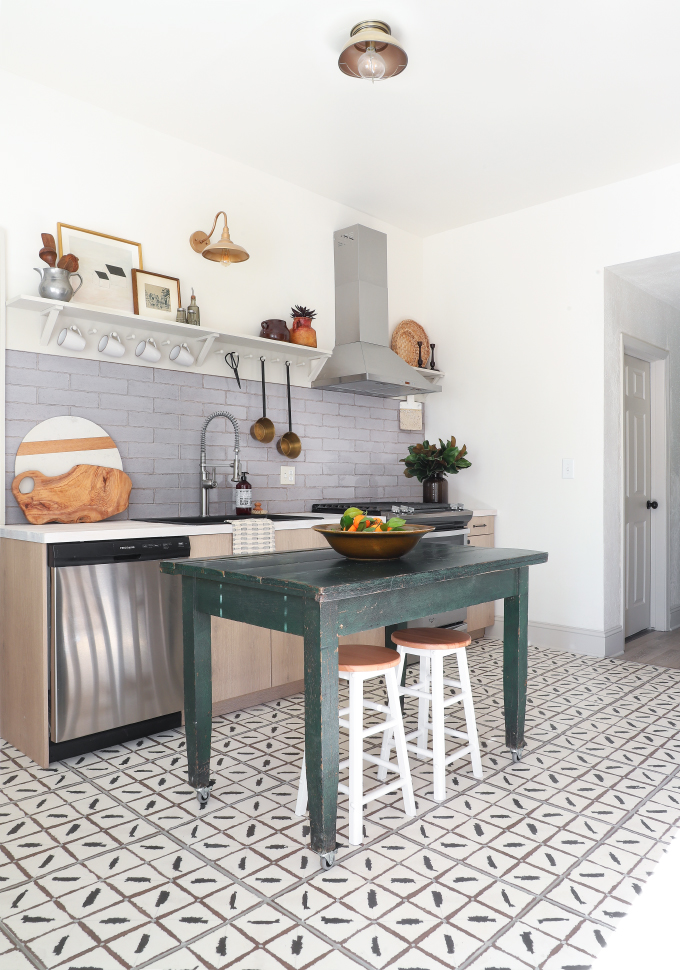
I’m excited to share the kitchen makeover at the DIY Duplex! This is my favorite space in the downstairs unit. We were on a tight budget for this DIY renovation, and found a bunch of cost savings ways to make a fun and functional kitchen for our Airbnb guests!


Cabinets
During the process of picking out supplies for this kitchen (see more on the “DUPLEX KITCHEN” highlight on @ISPYDIY Instagram) you all were most interested in the cabinets. We designed kitchens at both Ikea and Menards using their online kitchen design programs – check out the Menards Kitchen Designer here and the Ikea one here. You can also go into the store and work with a designer (which can be a lot quicker then learning the program). The price was pretty comparable between the two, with Menards being a little better of a deal if you order during Menards 11% rebate event, which amounted to a couple hundred dollars in store credit back. The big reason we went with the Menards kitchen is that the cabinet bases come already assembled, whereas the Ikea ones come in flat boxes and need to be built from scratch. Having the cabinets delivered already put together is a HUGE time saver. Mr. Yolo could just set them in place, and then just add the doors and base. Unfortunately, Menards stores are not everywhere in the US, but I asked if they would deliver, and they said to contact the nearest store and ask for shipping options. We are really happy with the quality! I picked the KLËARVŪE Cabinetry in Varsta Canyon, which is a wood laminate finish. They have not got a ton of use yet (the real test will be after the Summer season of Airbnb guests), but they seem solid so we feel confident they will withstand heavy use.
COST
Cabinets/trim = $1400 and then took advantage of the 11% rebate at Menards.
Table/Island
I bought this antique table awhile back, and when we were looking for an island for this kitchen, this ended up being the exact size needed to fit the space! Just had to do a couple clear coats on the top to seal it, and add casters on the bottom of each leg. Now guests can roll it around the space and use it as a table or prep space for cooking. Best thing is that we repurposed things we already had so the cost was minimal!
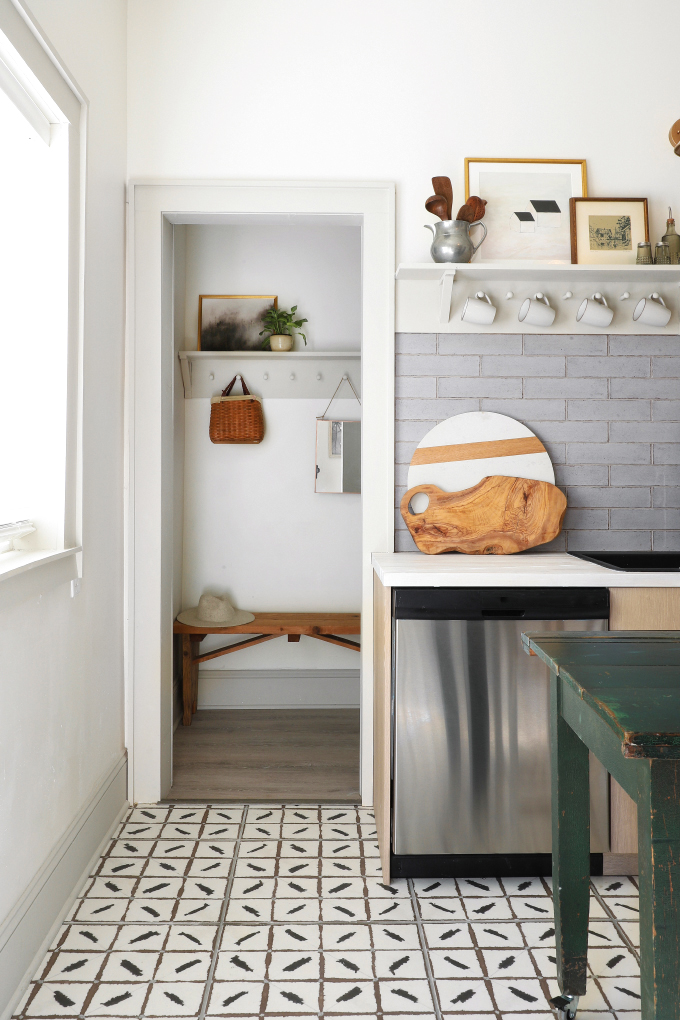
Pantry
Durning demo, we uncovered a stairway to nowhere behind the kitchen wall! We turned the unused space into a pantry and put a stacked washer/dryer on the back wall. We installed shelves for all the cleaning supplies, plus another peg rail for coat storage. Bonus space well used!
Peg rail
We saved a bunch of money by not doing upper cabinets which works great for an Airbnb because short-term guests do not need the storage. Stay tuned, because later this week I will have a tutorial for the peg rail!
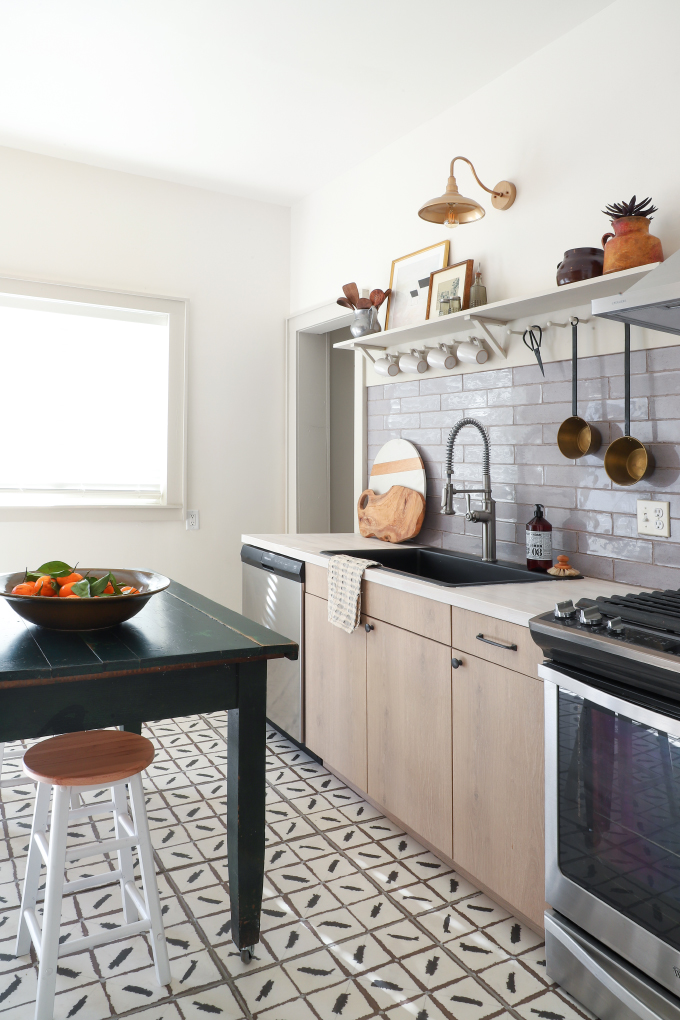
Tile
When I got a sneak peek at this tile by Annie Selke for The Tile Shop, I knew I wanted to use it in my next project! You all know that I have put The Tile Shop tile in all my home renovations, so I was so excited when they agreed to sponsor the tile in this kitchen. I love putting statement tile in our houses, because they stand out to potential renters on Airbnb. This tile is not “budget”, but as a designer I love the opportunity to show you all how it looks in a space, so you know if a statement tile is right for you! I am so in love with the floor tile, and can see it in a mudroom or laundry room if it is too bold for a kitchen. And this subway tile has a handmade look, with aging around the edges and a crackle finish, giving it a softer feel than traditional subway tile. I love it so much that we used it in the bathroom and the upstairs kitchen, and have plans to use it for the backsplash in another house.
Backsplash Tile: Annie Selke Artisanal Pearl Grey Wall Tile $11.99/sq. ft
Floor Tile: Annie Selke Ikat Blue Ceramic Wall and Floor Tile – 20 x 20 in. $8.99/sq. ft
Butcher Block
To save money on countertops, we chose butcher block, and only spent $220! In general, you sacrifice durability for the low cost, and add some routine maintenance that the higher cost countertops, like Quartz, do not require. But, we have butcher block countertops in another house where the kitchen gets used a ton, and have not had any major problems. For any stains, scuffs, or water marks we buff out with 220 grit sandpaper and recoat with butcher block oil. Since the cabinets are wood color in this kitchen, we tried something new, and perhaps a little risky, and white washed the countertops with 3 coats of Antique White stain and then used a Butcher Block Oil & Finish to seal them. So far, this combo has repelled stains, but we have not done any major cooking (or wine pouring) in the kitchen. The nice thing is, we can always sand them down and re-stain darker if the upkeep of the white is too tough. I’ll do a follow-up on these countertops once we have more guests cooking in the kitchen!
COST
Butcher Block Top 25″ Wide x 96″ Long x 1.5″ Thick = $220
Watco® Butcher Block Oil & Finish = $13
1 qt. Antique White Premium Fast Dry Interior Wood Stain = $9
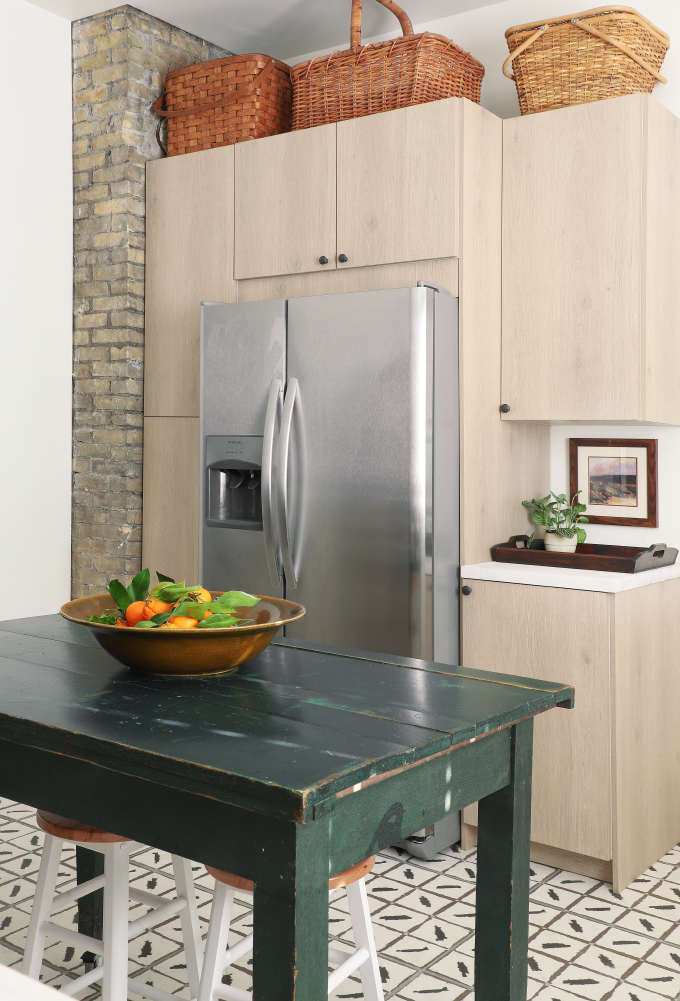
Appliances
We made sure to shop for appliances during the Labor Day sales at Home Depot, and got great deals on Frigidaire! (Fun tip: If Menards is running their 11% rebate, Home Depot also honors it. So use that as a time to shop the prices of each store, knowing that you’ll get 11% store credit with whichever one you choose. With a Home Depot receipt in hand, go to homdepotrebates11percent.com. One caveat is that we are not sure the geographical restrictions that Home Depot, since they are national and Menards is midwest.)
COST
Fridge = $998
Dishwasher = $298
Range = $300 (purchased from a friend)
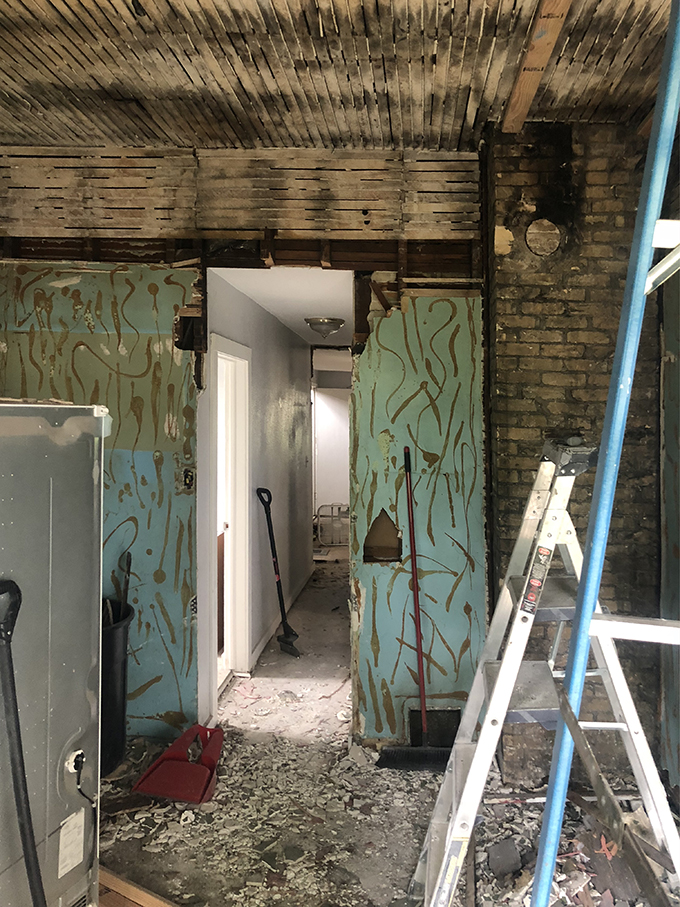
Exposed Brick
We were so excited when we found the original chimney behind the drywall. It’s Cream City Brick, which is native to Milwaukee. To clean the brick we sprayed it with diluted vinegar and scrubbed with a firm bristle brush, cleaned off with a sponge, and repeat. We thought about sealing it, but were super happy with how it cleaned up!
Ceiling
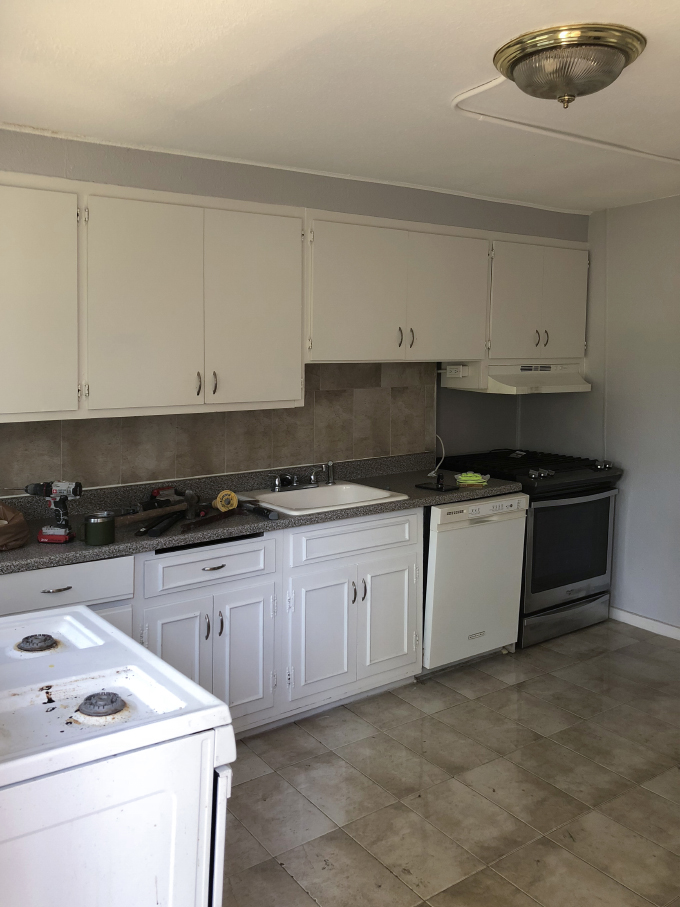
When we started demoing the kitchen, we took a peek into the ceiling to see why the electrical was exposed, and found that the ceiling had been dropped at least two feet! We figured they did this because it’s easier to cover up failing plaster than repair it. So we tore down the drop ceiling and all the plaster still hanging on above it. We screwed 2×4 studs to the floor joists and hung drywall to near original ceiling height. The high ceilings open up this space a ton, but it was quite the undertaking (see below). We were up to our knees in blown-in insulation demoed ceiling. Drywalling a near 10′ ceiling is no joke. Luckily, a friend of ours loaned us his drywall jack (in exchange for a bottle of whiskey) and another friend taped and mudded the drywall once it was installed (in exchange for some money 🙂 In the end, worth it for the kitchen, but Mr.Yolo shot down my request to raise the ceiling in the livingroom….phase 2 he says, ha!
If you have any additional questions, leave a comment!
Sources
Backsplash Tile: Annie Selke Artisanal Pearl Grey Wall Tile
Floor Tile: Annie Selke Ikat Blue Ceramic Wall and Floor Tile – 20 x 20 in.
Sink/Faucet:Kohler Kennon Drop-in/Undermount Kitchen Sink with Sous Kitchen Faucet in Matte Black
Hood: CAVALIERE Range Hood Wall Mount Stainless Steel
Countertop:Butcher Block Top 25″ Wide x 96″ Long x 1.5″ Thick
Cabinets: KLËARVŪE Cabinetry in Varsta Canyon
Cabinet pulls & knobs
Lombard Drawer Pulls Cabinet Hardware Collection
Franklin Brass Flat Top Round Knob
Art: Minted First Snow
Sconce: Emliviar Farmhouse Barn Lights
Pegrail: DIY Tutorial coming
Vintage: jugs, table, bench, art
EXPLORE MORE: DIY PROJECT


Absolutely wonderful update !
Live what you did with the kitchen.
And the pantry…… great.
How much do you think re-drywalling the space would cost for materials/labor if you didn’t diy/have a helpful buddy? The room looks fantastic!
We have always done our own drywall, so not sure the cost to hire out, it’s pretty easy! The tougher part is the taping and mudding which cost about 5/sq ft.
I know the tile was sponsored, but can you please post what it would cost if someone was going to buy it? You have all your other costs listed. Thanks!
Just added the square footage cost!
Do you have every project tested for asbestos when you are rehabbing older homes like this? Would love to know what company you use or how you test if so!
If you have material in the house that you think might contain asbestos, you can get a test kit or hire an asbestos investigator to take samples to test.
Do you offer home consulting/design services?
Sorry! We don’t have the bandwidth for taking on clients now
What washer/dryer did you use? We’re looking for a mini stackable set for a kitchen pantry also!
We used Samsung, but it is actually a full size stackable!
Just blown away by this before and after. You guys are truly magicians. That floor is stunning, I just love the tile.
xo Jessica
My Style Vita
The light wood kitchen cabinets look amazing in this kitchen! I wonder how often you need them refinished? So pretty.
This looks absolutely amazing!! I cannot believe how different it looks. That was a lot of hard work and it really paid off.
Hello, I really love the wallpaper in your baby’s room..
Do you know the company you purchased from?
Thank You , Have a Great Day!
Jen
Chasing Paper!