BAYVIEW BARNHOUSE | Mudroom Renovation Before & After
Before & After, DIY PROJECT, Home DIY, The Barnhouse

The mudroom at the Barnhouse was the only space that was completely untouched during the renovation, because I was not quite sure the direction I wanted to take it. After living in the home for the last few months, I knew what I wanted to do and how I wanted the room to function, so I came up with a game plan. And then two of my favorites, The Home Depot and HGTV Magazine reached out to see if I wanted to partner with them on the room renovation, and I said “Heck ya!”. Bonus: the final space will appear in this month’s issue of HGTV Magazine!!

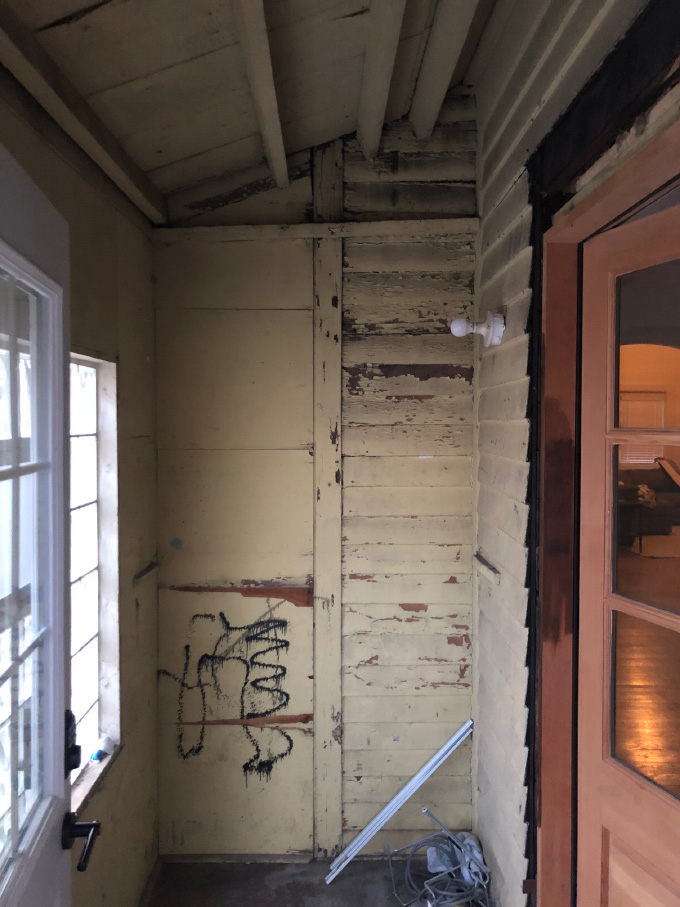
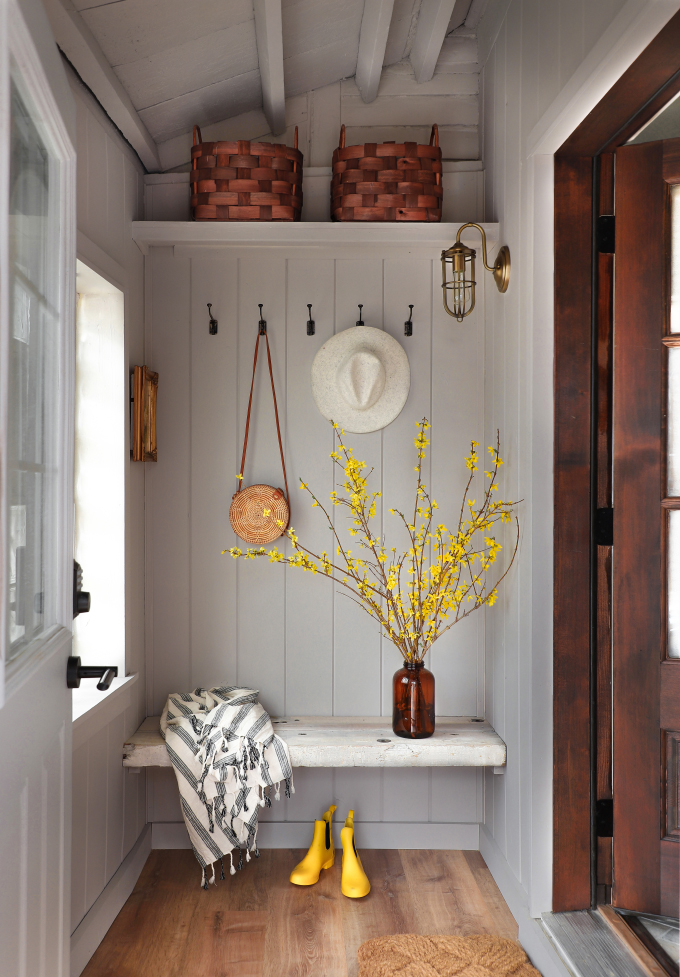
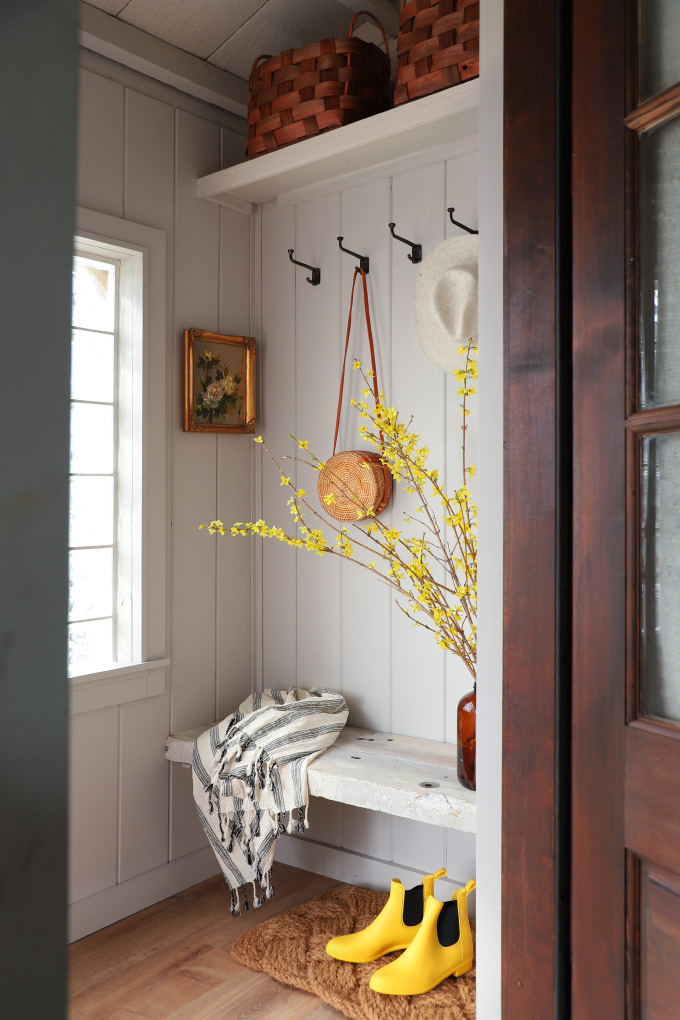
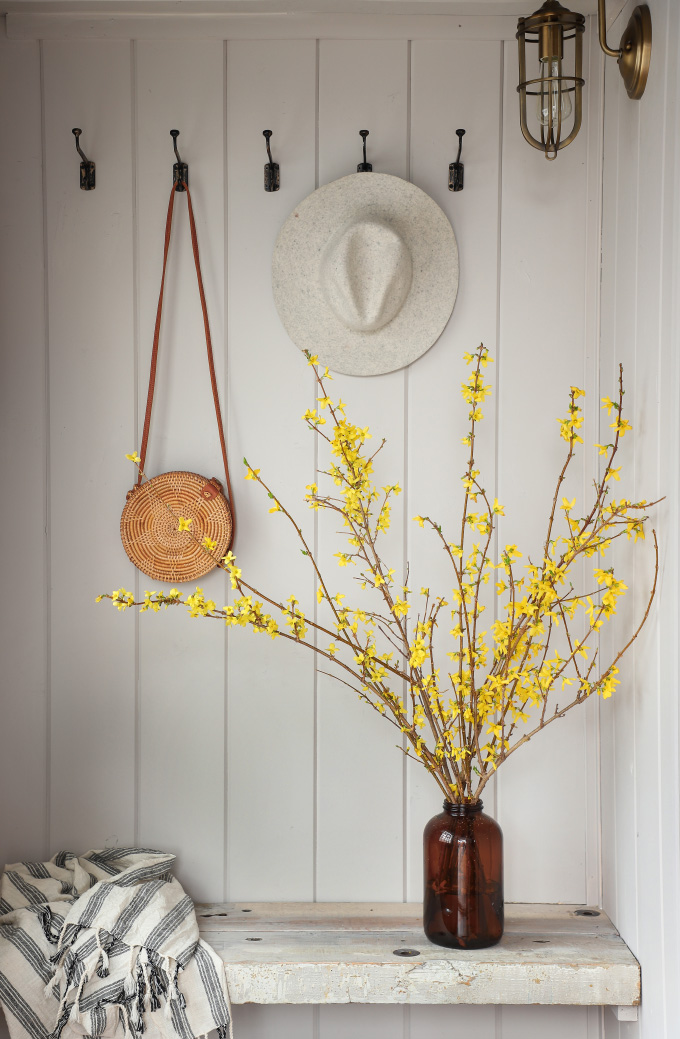
The before space was rough, lots of different siding and layers of paint. It looks like there were many band-aid fixes to this room right off the kitchen of our 1875 built home. The plan was to tear off the siding, replace with vertical tongue and groove boards, but leave the ceiling open, and really transform the existing space with paint! You all know how much I love a dark room (Behr Hostaleaf here, Black Evergreen here, and Blue Metal here) d but I wanted to do something different to brighten up this space off the kitchen, and fell in love with BEHR Doeskin Gray Interior Paint and Primer from Home Depot. This gray color is perfection, it’s soft and inviting, with a hint of beige in the sunlight which brings a lovely warmth. If you head over to @ISPYDIY Instagram, I have the whole renovation process documented in the MUDROOM highlight, and it truly is amazing to see the transformative power paint has renovating this space!

This transformation is one of my favorites in the house!! Keep reading for the steps, then stop by my MUDROOM highlight and IGTV on @ISPYDIY Instagram! And check out the mudroom in this month’s HGTV Magazine!
Supplies:
–LifeProof Fresh Oak 8.7 in. x 47.6 in. Luxury Vinyl Plank Flooring
–Mascot Hardware Straight 4-1/2 in. Antique Brass Hat and Coat Hook
–Feiss Urban Renewal 5.5 in. W 1-Light Dark Antique Brass Sconce
–Varathane 1 qt. Dark Walnut Premium Fast Dry Interior Wood Stain
–KILZ Original 1 gallon White Oil-Based Interior and Exterior Primer, Sealer and Stain Blocker
–BEHR Premium Plus 1 gal. #N200-2 Doeskin Gray Interior Paint and Primer – Matte
–Varathane 1 qt. Matte Soft Touch Polyurethane (2-Pack)
–1 in. x 8 in. x 8 ft. Premium WP4 /#116 Tonge & Groove Board
–Wagner Control Pro 130 Power Tank Airless Stand Paint Sprayer
–Knot-Ical 18 in. x 30 in. Hand Woven Coconut Fiber Door Mat
–Citristrip 1/2 gal. Safer Paint and Varnish Stripping Gel Non-NMP
Check out all the steps after the break!
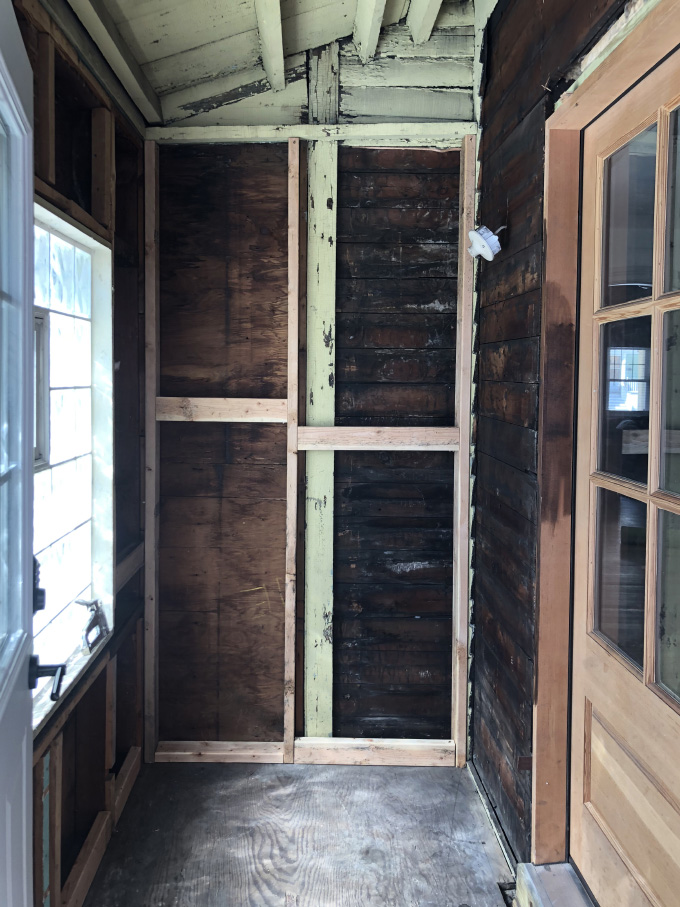
We demo-ed all the different siding, and then used 2x4s to frame out the space so we could add roll insulation to keep the space warmer during the winter.
You can see in the below picture that we added another stud 15in from the floor to screw in the braces for the bench.
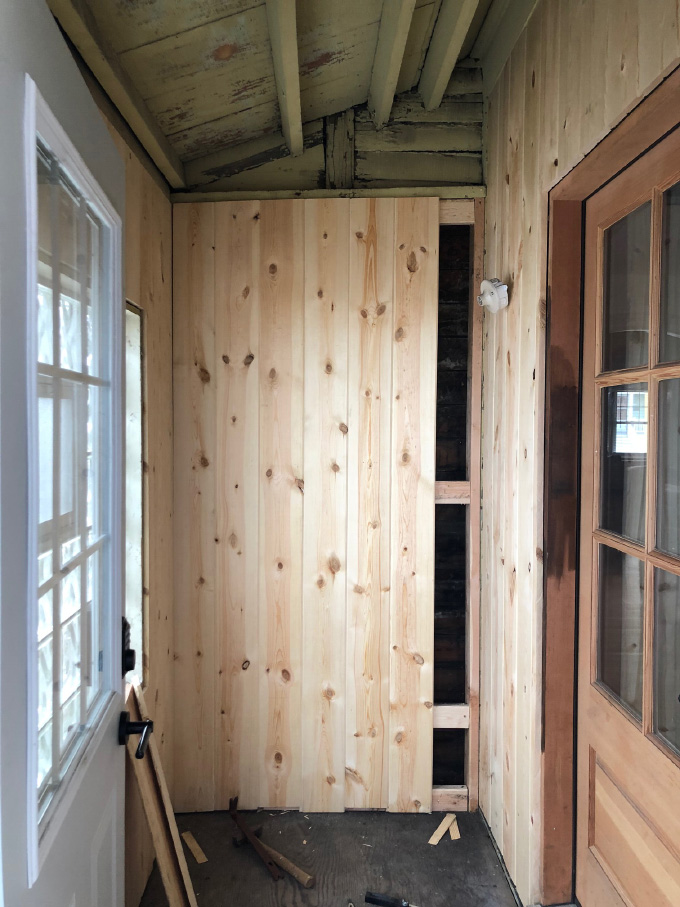
Next it was time to add the tongue and groove panels to all the walls. This was quite the undertaking because every wall, window, and door in the 1875 build home is not level or square, ugh! It would have been easier to drywall the whole thing, but I really wanted to keep the ceiling open and have the space fit the old barn house vibe. Speaking of the ceiling… there were so many layers of paint to scrape off. I sprayed two rounds of paint stripper on the ceiling, scraped off as much as I could, then sanded the rest. I got *most* of the chipping paint off, but ultimately had to accept that it was not going to be perfectly smooth.
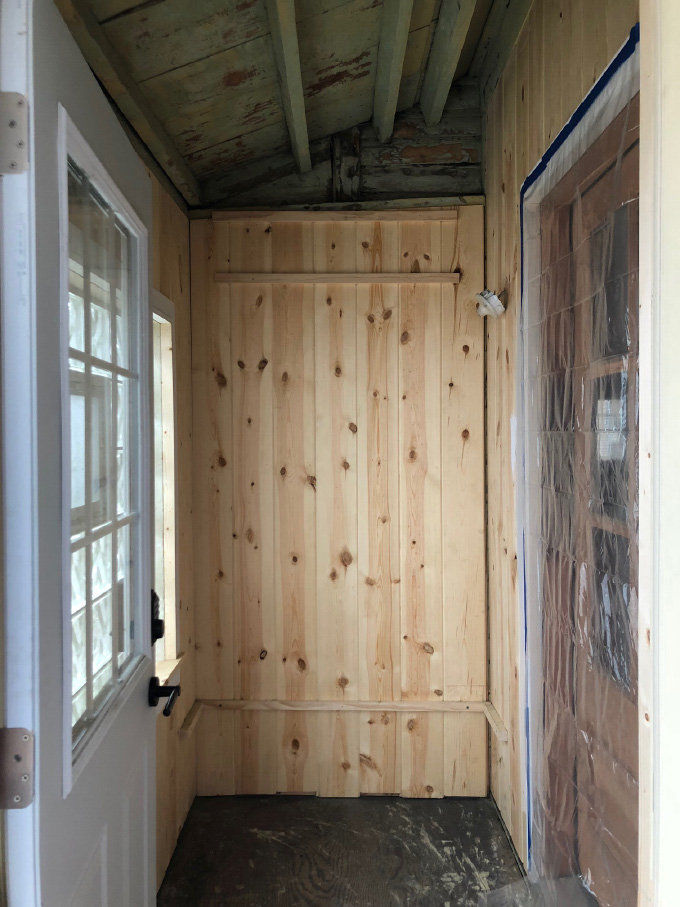
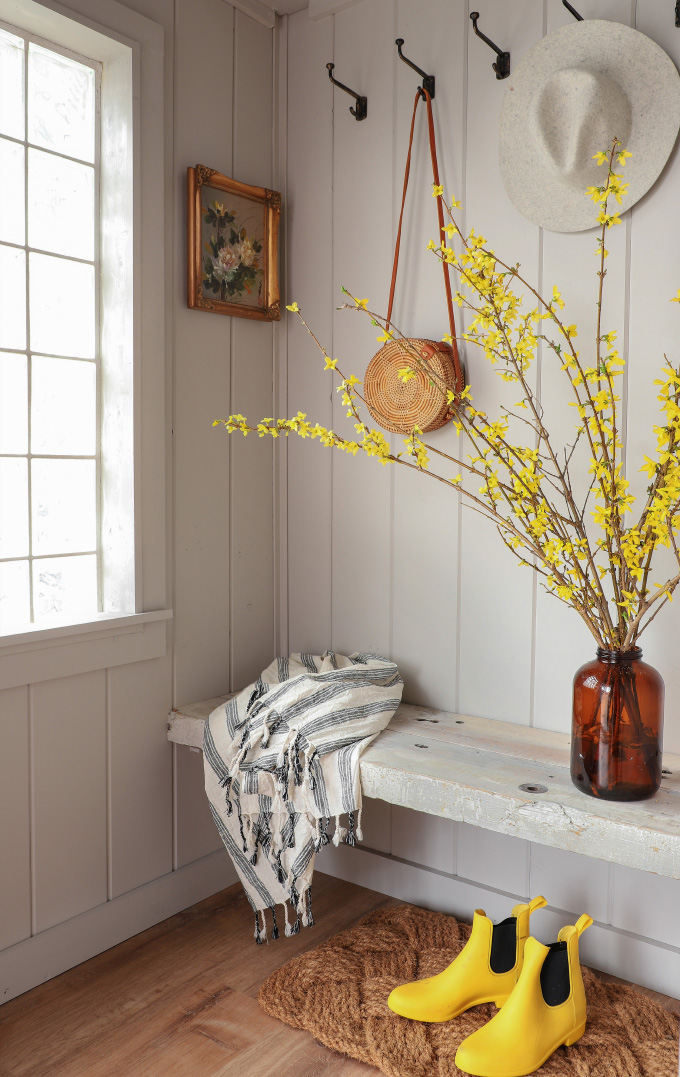
After quite a bit of patience, the walls were covered with the planks! The plan was always to add trim and baseboard, which gave us a little wiggle room. 2×2 pieces of wood were screwed into the panels to create braces to support the bench and shelves. The bench braces went into the studs so it could hold more weight.
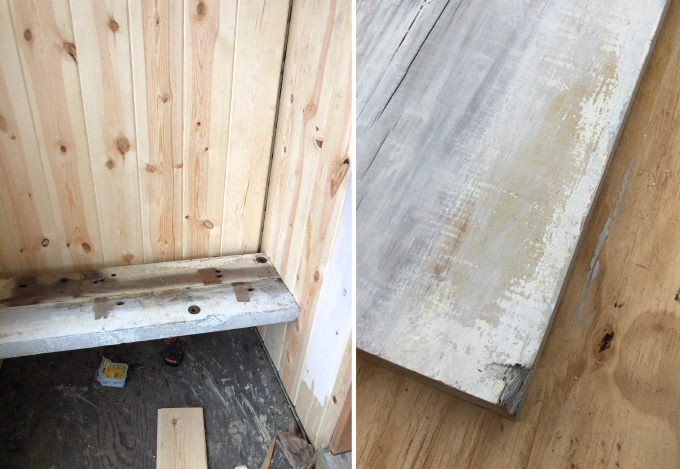
We constructed the bench out of two old pieces of salvaged barn wood that we glued together. There were some darker spots on the wood, so I diluted the wall color, Doeskin Gray, with water (1/2 paint, 1/2 water) and used it as a stain to even out the wood. I brushed on the diluted paint, and then wiped off the excess, and kept layering it on until I achieved the look I wanted. This really tied the bench into the painted wall. I let the paint dry, then covered with 3 coats of Varathane Matte Polyurethane.
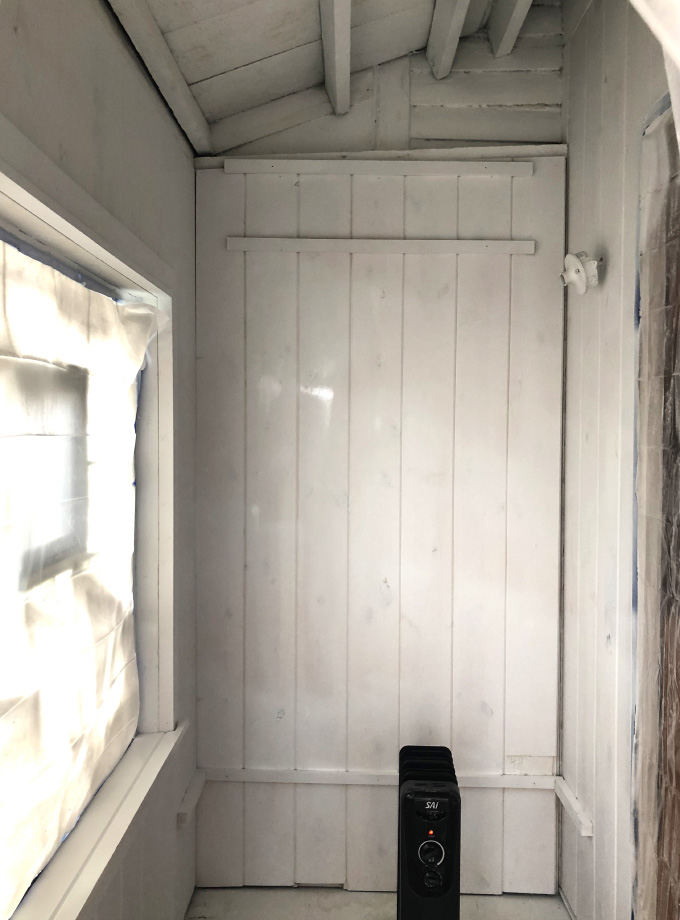
Next, was the BEST progress moment, PAINTING! The transformative power of paint is so amazing! This is our second project using this paint sprayer by Wagner and it’s totally worth the money. Once you get the process of cleaning the sprayer between paint colors down, it’s amazing how much time you can shave off a project. We did 3 coats of Kilz Original Interior and Exterior Primer to create a consistent base for the gray color, and cover up that nasty ceiling!

And then we sprayed 2 coats BEHR Premium Plus Ultra Doeskin Gray Paint in a Matte finish. How pretty is this color!!! This was my favorite moment of the renovation. I kept walking in the room, ohh-ing and aww-ing over how it looks like a completely new space. The door trim is still Nano White so you can see in comparison how rich the gray is, while still keeping the room super bright. I was also pretty nervous about the ceiling up to this point, and I was so impressed at the paint coverage and how the ceiling was transformed from an eyesore into a beautiful rustic element.
I had tested out a richer stain on the wood door, but was not ready to commit until I saw the wall color. After it was painted, I immediately knew this Varathane Dark Walnut Interior Wood Stain would be a perfect complement to the soft gray.
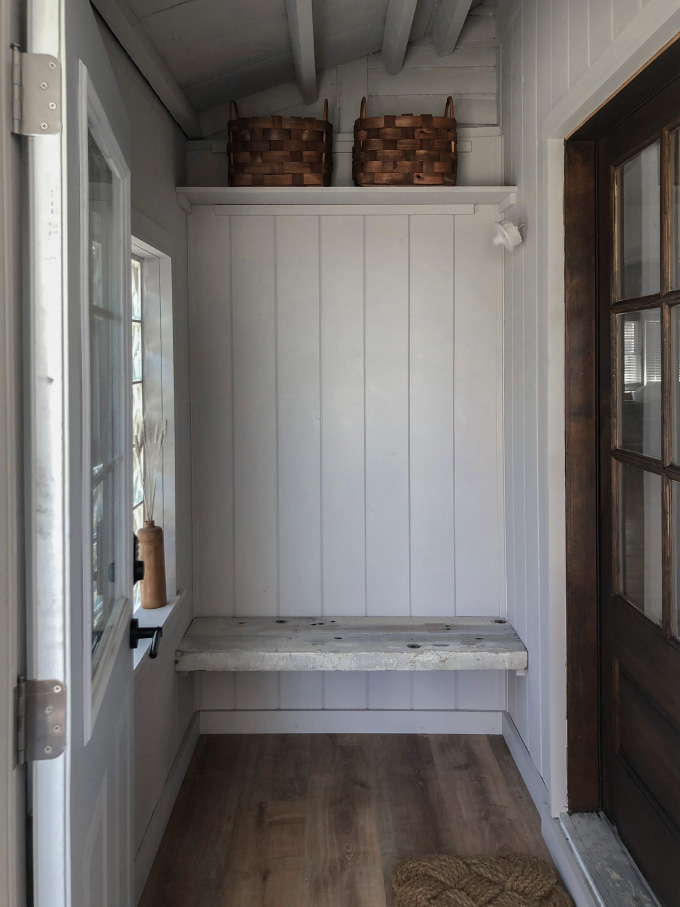
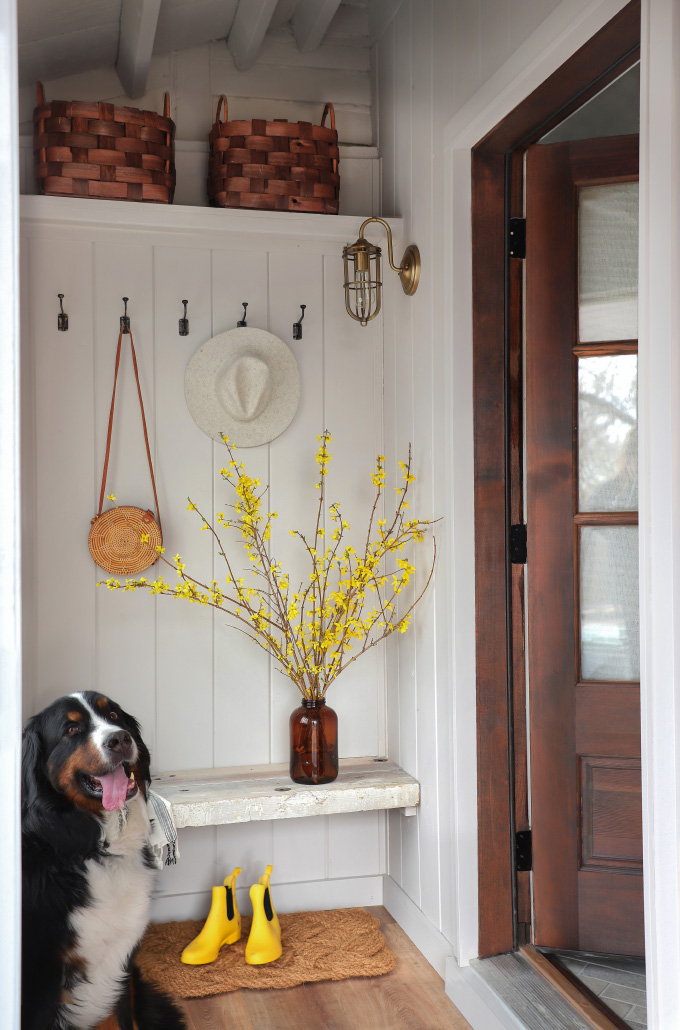
Next up were floors and trim. The LifeProof Fresh Oak Luxury Vinyl Plank Flooring came highly recommended by the guys at Home Depot because it’s water-proof which is perfect for snowy winter boots. I also LOVED the look of the wide boards and barn wood finish. It’s a really beautiful product and so simple to install. I wanted the trim to stay simple, so just used 1×4 boards. Just a few more finishing touches like screwing in the hooks, and new light and the space was DONE!
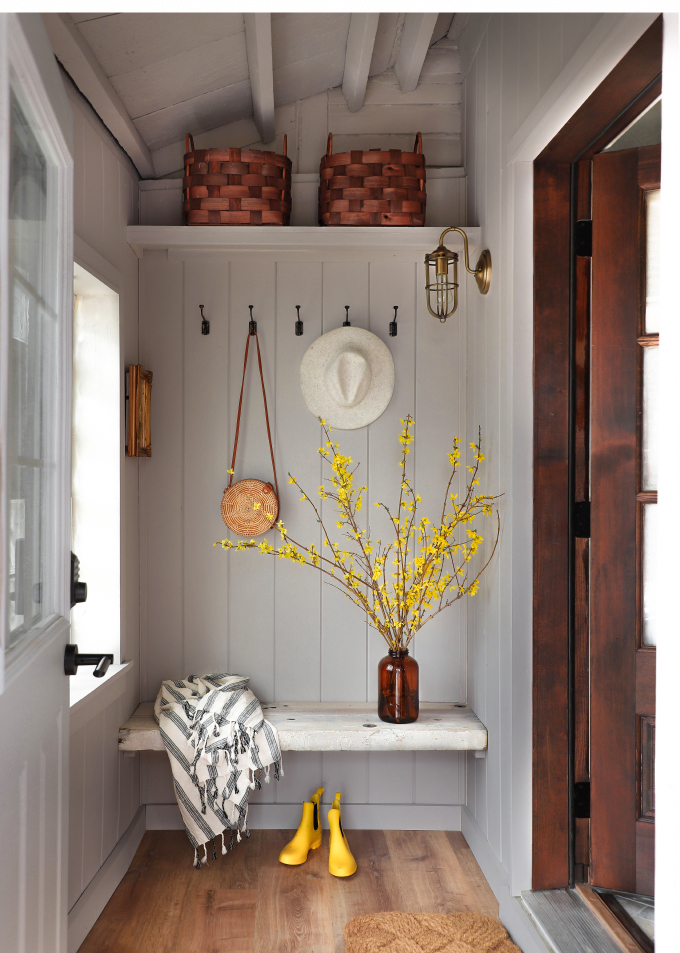
I am IN LOVE with how this mudroom turned out!! It’s the perfect amount of rustic and modern. And the last eyesore in the house is now a beautiful space that we can use as a back entrance. The paint color was the real star of this renovation, totally transforming the space. I am super happy with the Doeskin Gray color, and can’t wait to use it again. And yes, it will usually be covered in coats and shoes, but I will always have these pictures to stare at, ha! Thanks so much for following along with the room renovation, and for more info stop by my MUDROOM Highlight at @ISPYDIY on Instagram, and check out the room in this month’s HGTV Magazine!

This post was created in partnership with The Home Depot and HGTV Magazine. Thanks for supporting these amazing brands!
EXPLORE MORE: Before & After, DIY PROJECT, Home DIY, The Barnhouse


Your sense of proportion and space planning is so nice and restful! What a pretty space.
I was looking for a gorgeous color to paint my wainscoting in the entry of my Bay View house. This is the PERFECT color. Your mud room is gorg!
This came out so so beautiful! I love the yellow!
xo Jessica
My Style Vita
Looks great! I got that round bag for my birthday last month. Love it. LOL